This article contains affiliate links
Hedges can be an effective way to create garden screening, structure and natural boundaries.
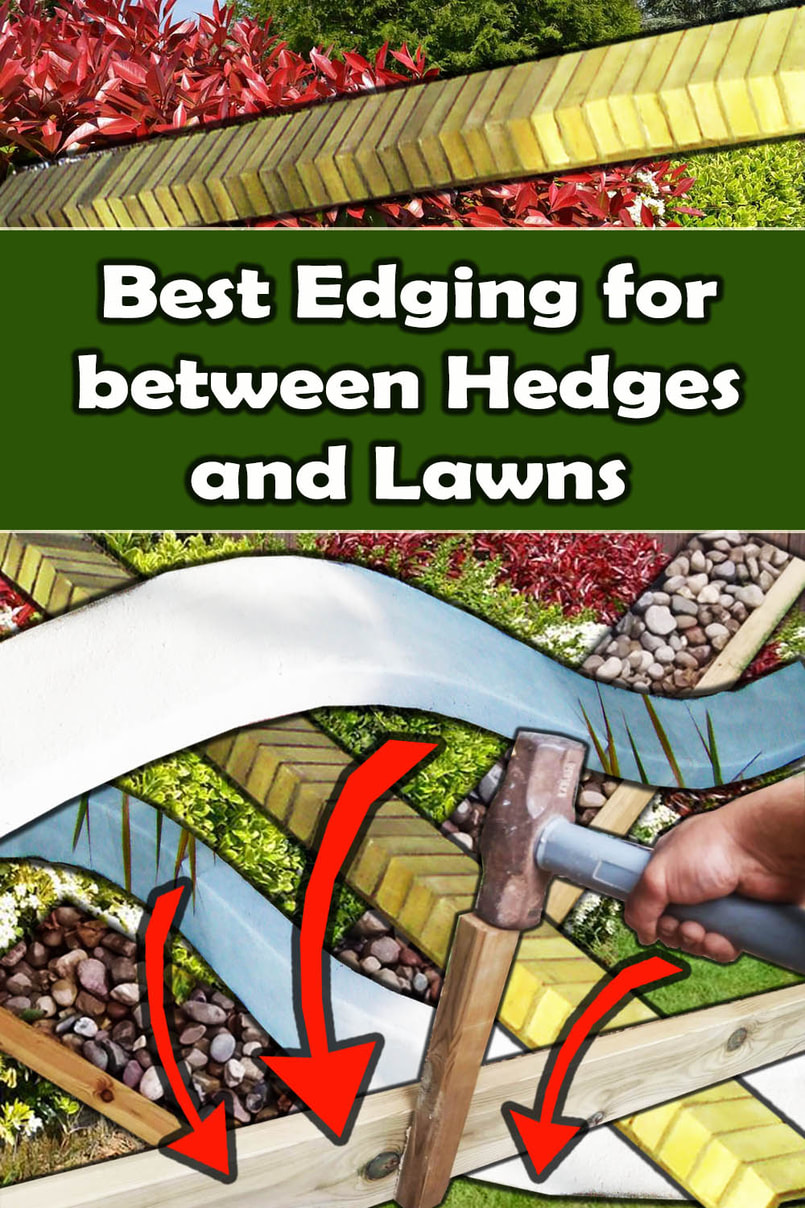
Hedges however can have an impact upon the surrounding ground especially next to grass lawns. Hedges next to grass can shade the edge of lawns and draw water and nutrients away from them. Consequently it is best to install a suitable edging to separate hedges roots from lawn areas. In this article I identify and summarise 8 of the best garden edgings seperating from hedging to grass. What is the best edging between hedging and grass?
The best edging from hedging to grass will provide a robust root barrier, clean mowing edge and help retain soil. Optimum edging will also be thick enough to prevent grass encroachment and blend well with surrounding landscaping. Below I have listed 8 edgings suitable for edging between hedges and grass. 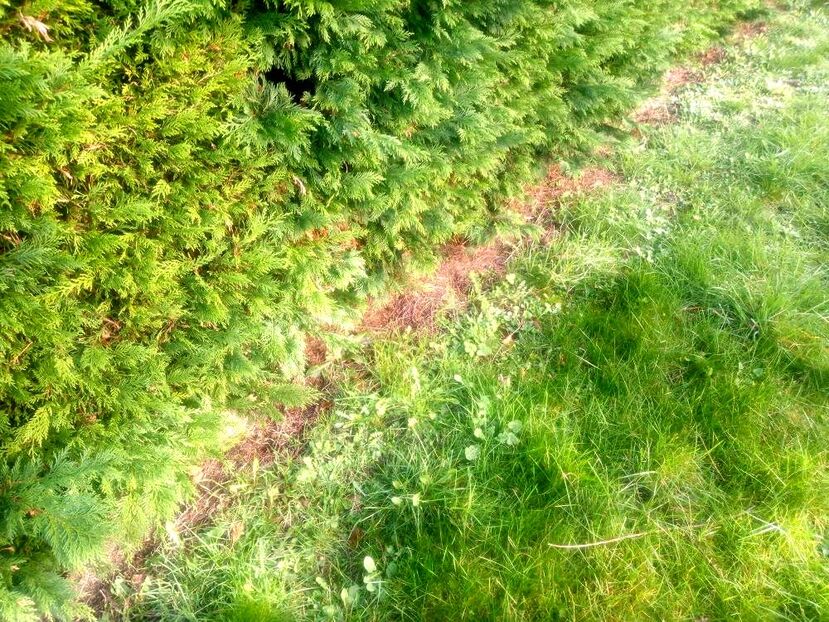
8 edgings effective between hedges and grass
1. Brick edgingsBricks provide a robust and durable edging material which easily matches most garden styles. Because bricks are made from fired clay they do not rely upon colour dyes for their appearance. This makes them look appealing for decades without the threat of fading colours. Brick edging can provide a robust separation between grass and hedging roots. They can also be laid in numerous arrangements to retain soil and create mow strips. Why not visit our article on the best bricks for landscaping here. 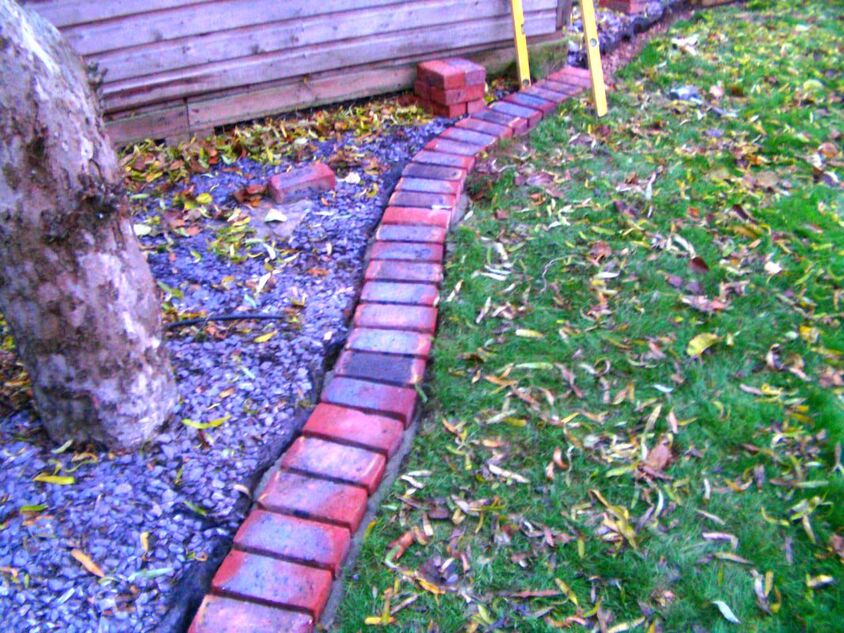
2. Path edgings
Path edging kerbs are linear pre-cast concrete kerbs typically 1 metre by 150mm. At around 25mm thick (1 inch) path edgings come in a range of styles and designs. Standard kerbs typically come in a basic rectangular shape. These are very effective at creating clean separation lines between grass and hedging. Their 150mm thickness also makes them suitable for raised edging retaining soil between hedge and lawn. 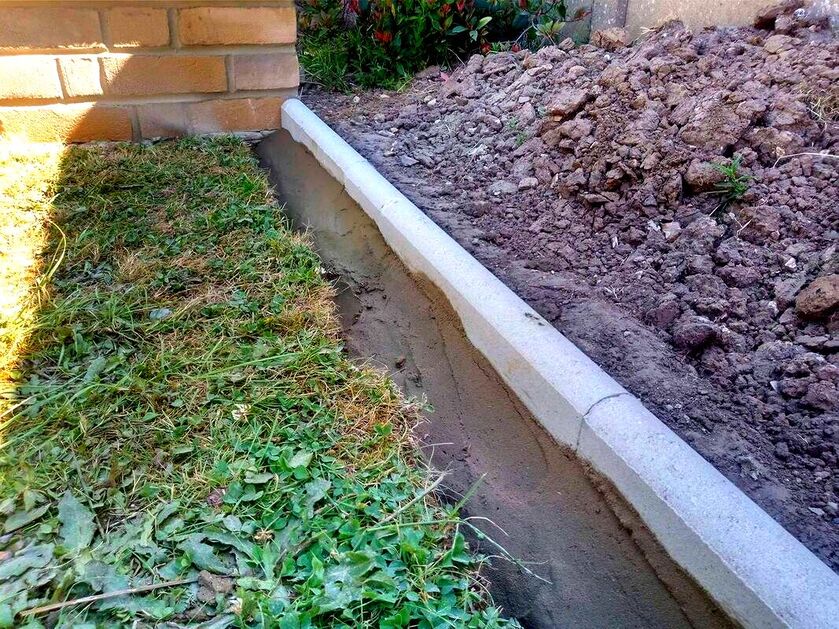
3. Block paving
Block paving is a concrete paver typically utilised for surfacing driveways. However these versatile concrete paving units are also very effective for garden edging. These blocks are dense, durable and weather resistant coming in a wide range of colours and styles. When laid upon a generous mortar bed and sub-base they provide extremely robust borders. Block pavers, like brick, can create the perfect mowing edge where hedges meet lawn. I personally think the best block paving for garden edging is Marshalls Tegula which featured in the image below. 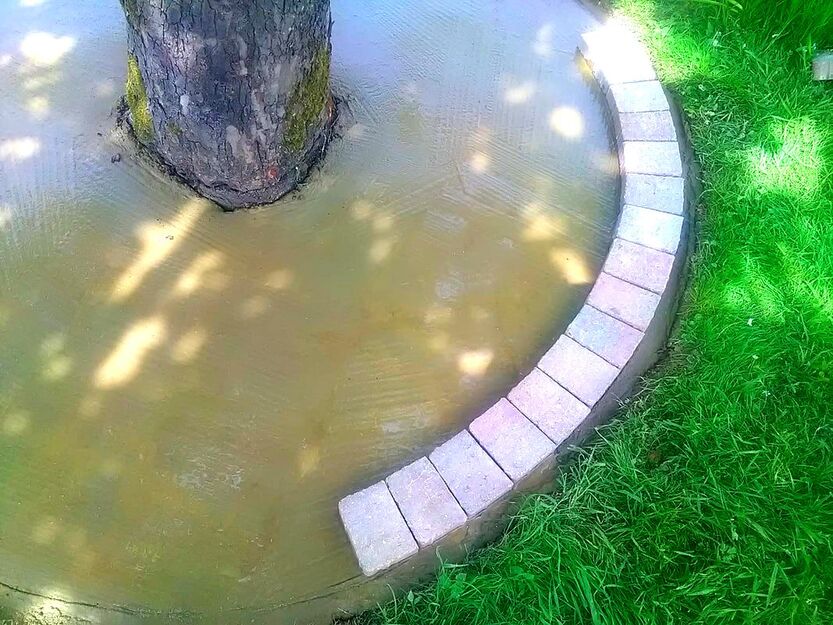
4. Kerb edgings
Kerb edgings come in a broad range of robust edging products typically designed for driveways. These edging blocks are traditionally used to edge borders, steps and pathways. Kerb edgings have a significant mass and depth which make them very suitable for retaining features. This makes them perfect for forming a separation line between hedge roots and lawns. Kerb edgings can create effective raised edgings around hedges helping to retain soils and mulches. 
5. Granite setts
Granite setts have been utilised within landscaping and external surfacing for thousands of years. These robust cubes made of solid granite are both extremely durable and weather resistant. Their light grey and speckled appearance creates a visual contrast to lawns, soil and mulches. Laid as edging granite sets can make a very effective separation border between lawns and hedges. 
6. Cut paving
The great thing about paving slabs is they can be cut to any form or shape. This means they are perfect for producing affordable and fast, flush edging to lawns and borders. Cut paving is perfect if you wish to create strip and mowing edge paving between lawns and hedging. Natural stone edgings are particularly effective at providing colour contrast to lawns. This is especially so when using materials such as porcelain and black slate. 
7. Timber
Timber edging is one of the most universal and affordable materials for installing edging. Not only is timber affordable it is also fast and relatively easy to install. The best timber edging for between lawns and hedging is thicktreated timber. Thinner timber boards may not only degrade in time the roots of hedges can force them to buckle. Thicker grades of timber such assleepers are typically best installed between lawns and hedges. 
8. Metal edgings
Most metal garden edgings on the market are flexible which is great for forming curves! However larger hedge roots can grow under the edging lifting it out of the ground. Consequently it is best to use the thicker metal edgings between lawns and hedging. The minimum width should be around 2.5mm making a product such as core edge the best option. 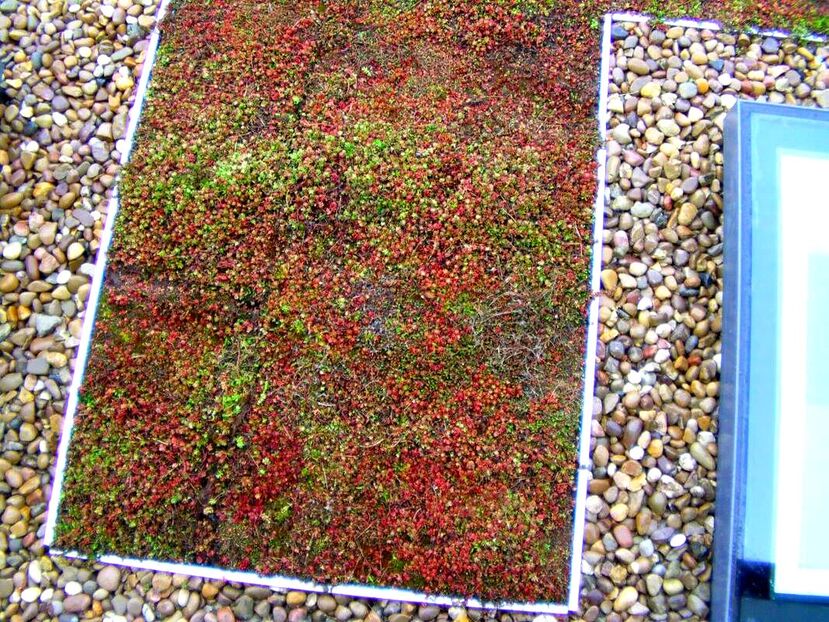
Thank you for reading our article on the best edging from hedges to grass. I will leave some other articles you may also find useful below.
'As an Amazon associate I earn from qualifying purchases'
1 Comment
This article contains affiliate links
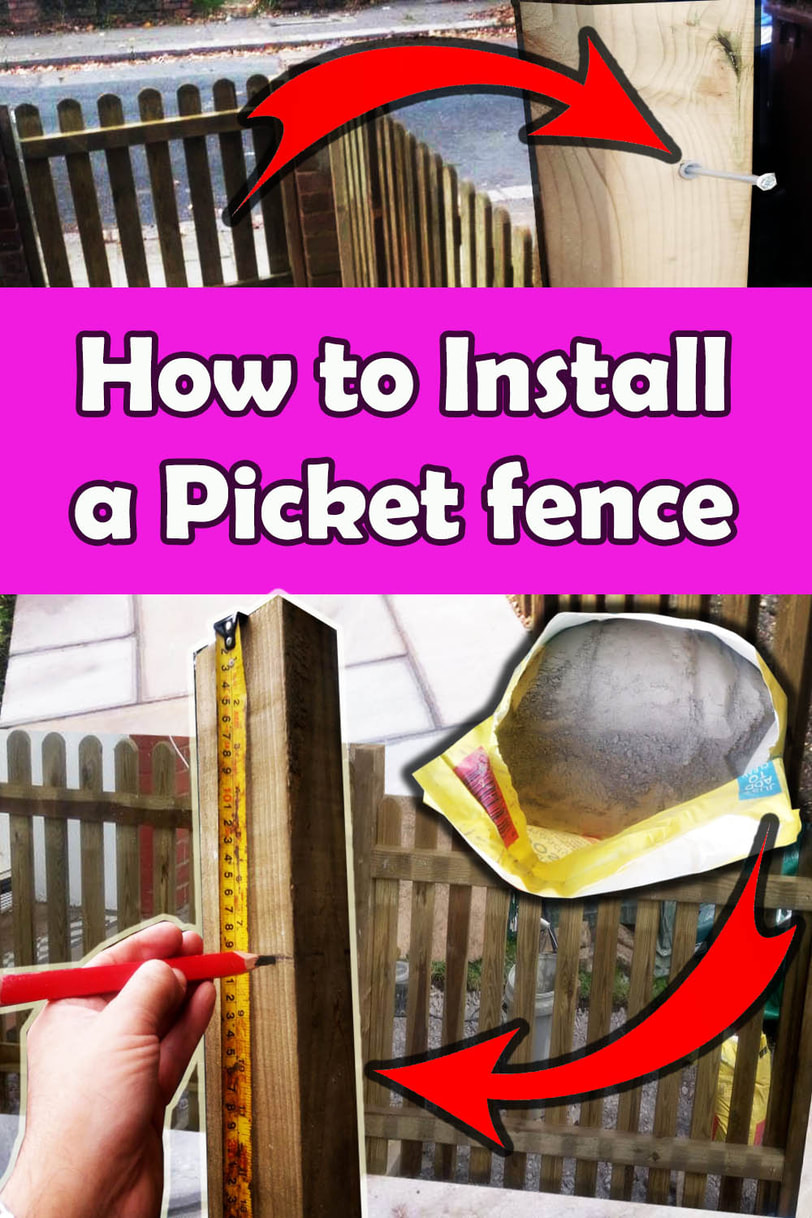
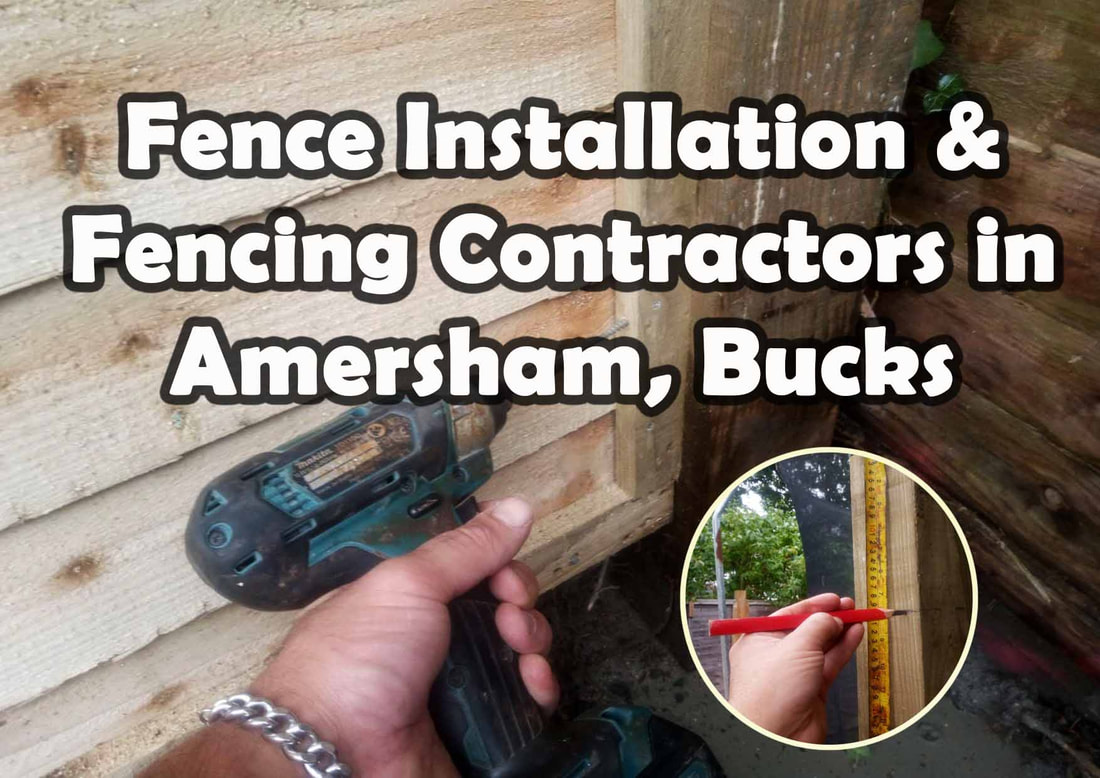
Picket fences can provide an aesthetic boundary to your property without creating too much shade. These low level and airy fences are the perfect way to define your property without blocking views. Their vertical and narrow slats act as a precarious obstacle to wondering feet but also look elegant and neat. It is no surprise that pickets have become one of the most favourite fences for front gardens and narrow back yards. Picket fences now come in a wide range of panel styles lengths and heights. In this article I will explain how to install picket fence panels regardless of which type you choose. I will cover everything from setting up your line to installing on a slope, setting posts and fixing panels. Find my step by step guide on how to install picket fence panels below. Tools you will need
Spade
Post diggers Spirit level Wood saw Tape measure String line Wheel barrow Hand Drill Claw hammer Shopping list
Postcrete
Timber posts External grade screws Picket panels How to install picket fence panels step by stepStep 1: Set up your line
One of the most important starting points for erecting any new boundary is setting up your line. This involves setting up a tight string line so it matches the boundary you are working too. Try to set your line about 500mm from the ground, this will ensure you do not accidently sever your line as you dig. Make sure your picket fence line is free from vegetation and obstructions. 
Step 2: Check your levels
More often than not you may find that you are laying your picket fence upon sloping ground. If so, you will have to step up your panel slightly as you travel up or down hill. Before you start building, examine your levels to see how drastic level changes are. It is always best to keep step ups or downs consistent throughout the fence line. Step 3: Work out cut locations
When installing picket panels it is inevitable you will have to cut some panels down at one end. Try to work out which end of your fence will be less visible and place the cuts at that end. If a cut ends on an individual picket you may need to price the pickets off and re-space them evenly between the cut. 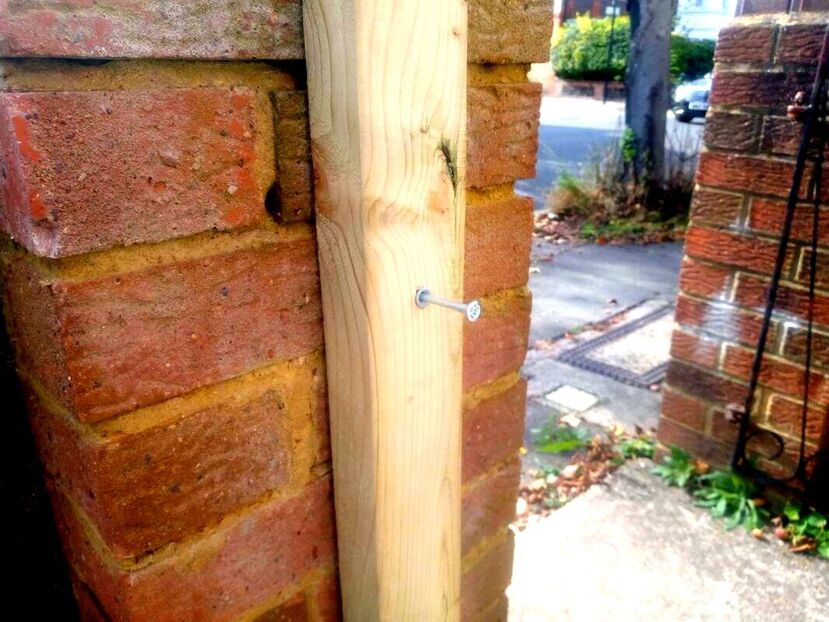
Step 3: Install your first post
The first thing to do is install your first post so it is set firm. Excavate a post hole so you have a minimum of 3 inches of concrete around the circumference of the post. Try to make your post hole between 500-600mm deep with no loose soil at the bottom. Either concrete your post in or use rapid setting postcrete. Postcrete is much faster! Simply fill your hole with water halfway and pour postcrete around the post. Make sure your post will reach the correct height for your panel and is set in plumb and level. 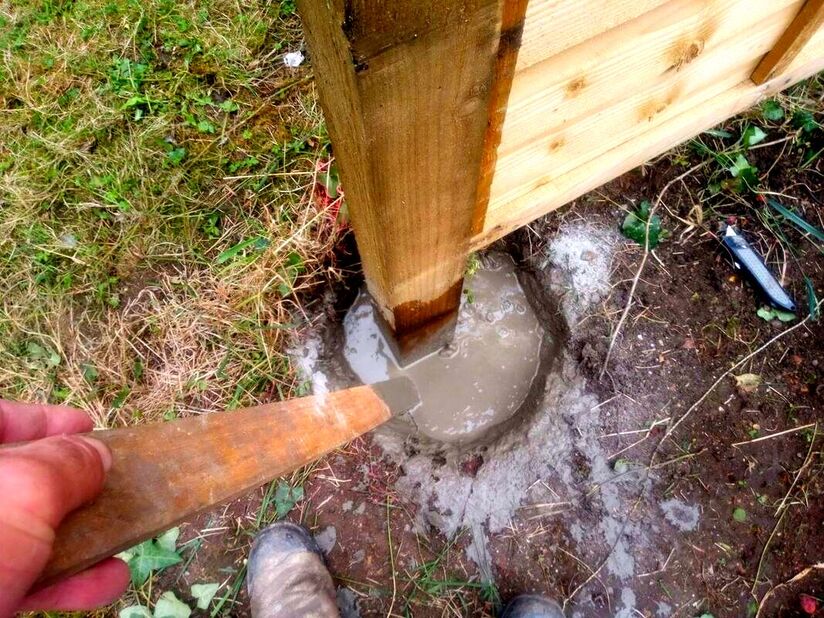
Step 4: Offer up your first Panel
Make sure your first post is relatively secure and then offer up the first picket panel. Observe the lie of the ground below the post, is it sloping? If so you may have to wedge the panel up to make it sit level and flush against the post. You do not want any of the panel touching the soil, raised it up with some makeshift wedges. Step 5: Fix panel to your first post
When your first panel is at the correct height and level, fix it to your first post. If you are using morticed posts and slotted panels slot the panels into the posts and fix them with screws. If you are using solid posts and straight edge panels offer them flush and screw the rails to the post. You can also attach fencing brackets to make fixing easier. 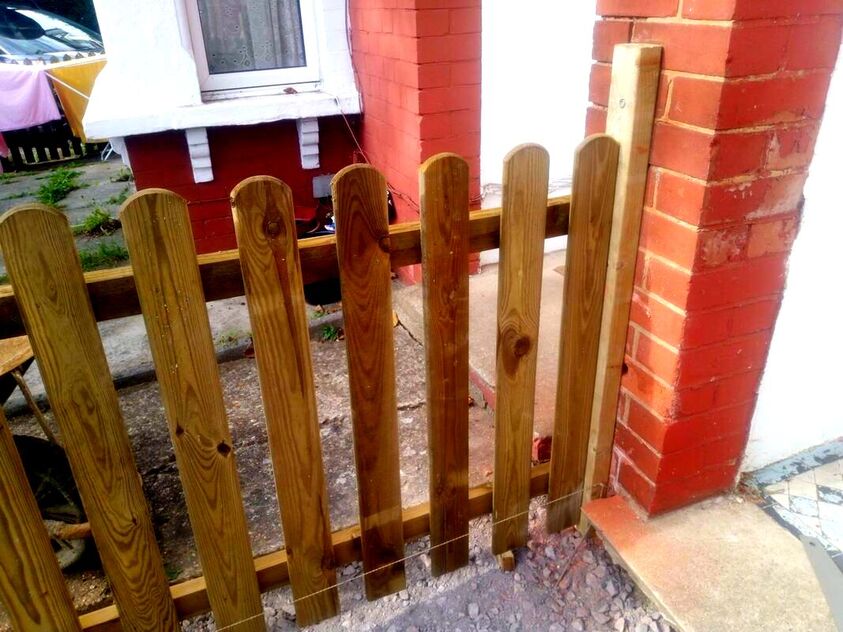
Step 6: Excavate second posthole
Using your string line as a guide mark out where your next post will be located. Now you can excavate out for your next post, taking care not to disturb the string line. Once again make your excavation as clean as possible with no loose material left in the hole. 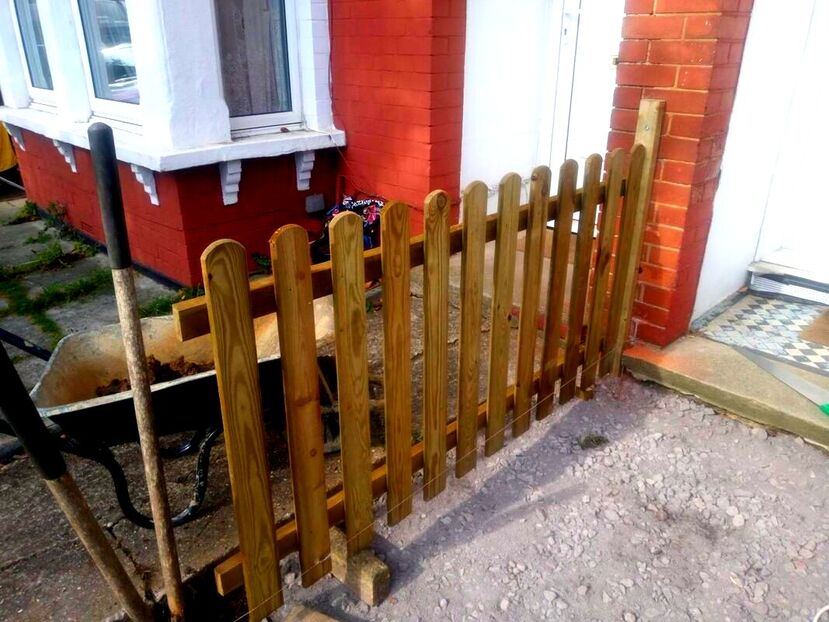
Step 7: Fix panel to your second post
Now place your second post into your posthole, it should offer up to the first panel perfectly. Make sure the height of the post correlates well with the picket panel. Now check the vertical level and its correlation to the string line. When these line up, you can fix your panel to the second post. Step 8: Concrete in your second post
Using postcrete, concrete your second post so it is plumb and level with the string line. 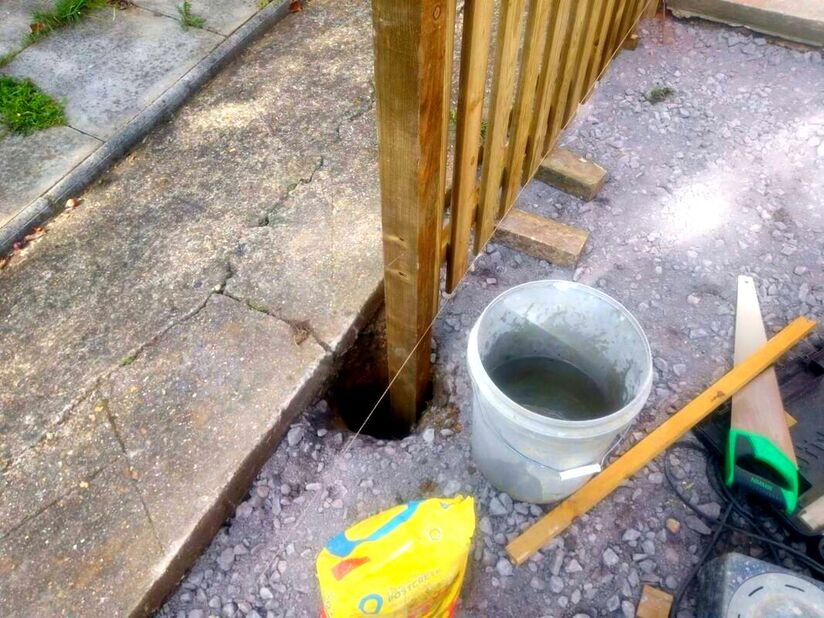
Step 9: Repeat the process
Keep repeating this process until you reach the end of your picket fence. You will probably need to cut down a panel at each end and fix the cut panel between two end posts. 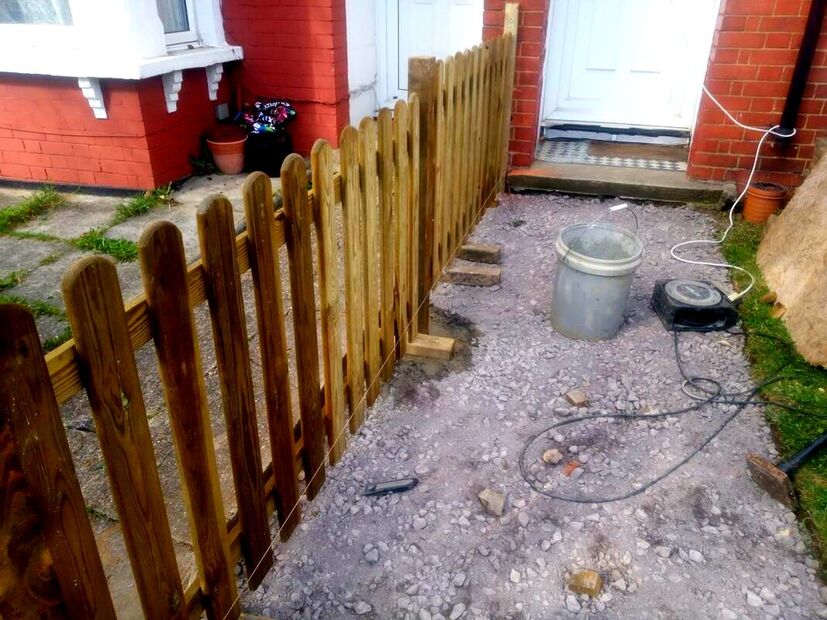
Step 10: Gate installation
If you need to install a gate to your picket fence you have two options. Either buy a pre-made gate or make a gate out of the picket panels. This is not as difficult as it sounds! You will just need to strengthen the section of picket with some timber braces. When you have created your new gate, set two gate posts within the fence line where you want the entrance. The posts should be a gate width apart with an extra 3mm on either side so the gate swings freely. Gate hinges and a bolt lock can then be fitted to the gate. 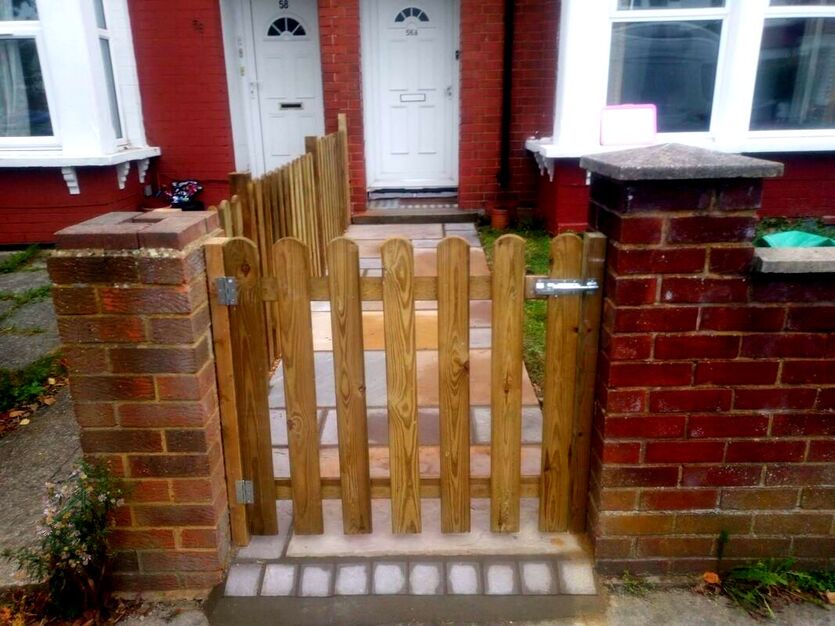
FAQS
Can you install a picket fence yourself?There is absolutely no reason why you cannot install a picket fence yourself! Like any new skill you will always make mistakes at first! However you will soon pick up a good process and experience as you go along. What are the best fixings for picket fences?Screws are best for fixing picket panels to posts. Screws allows you to unscrew panels if they ever need to be moved or adjusted in any way. However the vertical pickets I find better to fix down with nails if you are making whole panels. 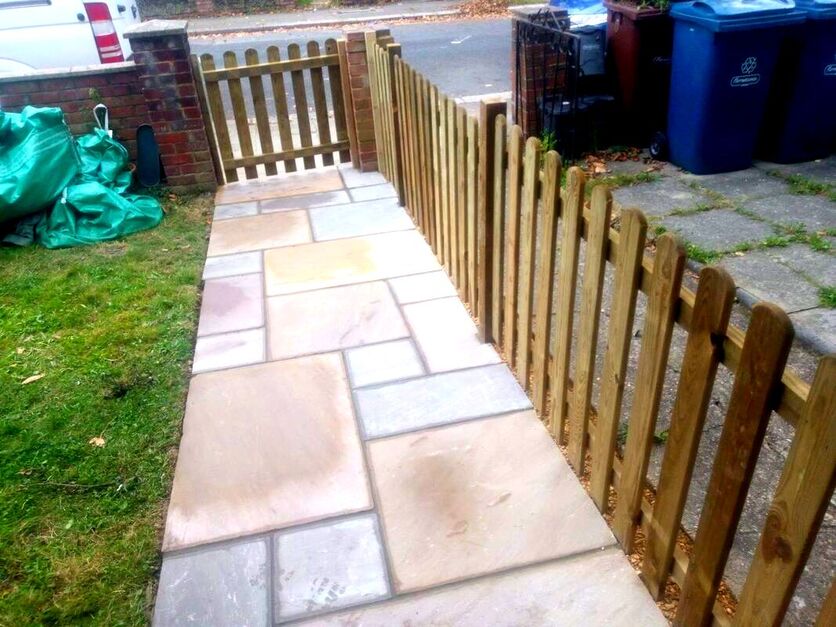
Should my fence pickets touch the ground?
Picket fences should be raised slightly off the ground or set on top of a gravel board. This is to prevent pickets from becoming too damp and rotting. What are the advantages of a picket fence?
Picket fences provide a robust and secure boundary without creating too much shade. They are an attractive way to fence off gardens while allowing good airflow and light penetration. Fencing services or picket fence installation Amersham Buckinghamshire
If you require picket or panel fence installation in Buckinghamshire including Amersham, Beaconsfield, Chalfont, Chesham, Great Missenden or High Wycombe do not hesitate to contact us. Why not check out our fencing installation service page below.
Thank you for reading our article on how to install a picket fence! Below I have linked to some other articles you may find useful.
'As an Amazon associates I earn from qualifying purchases'
This article contains affiliate links
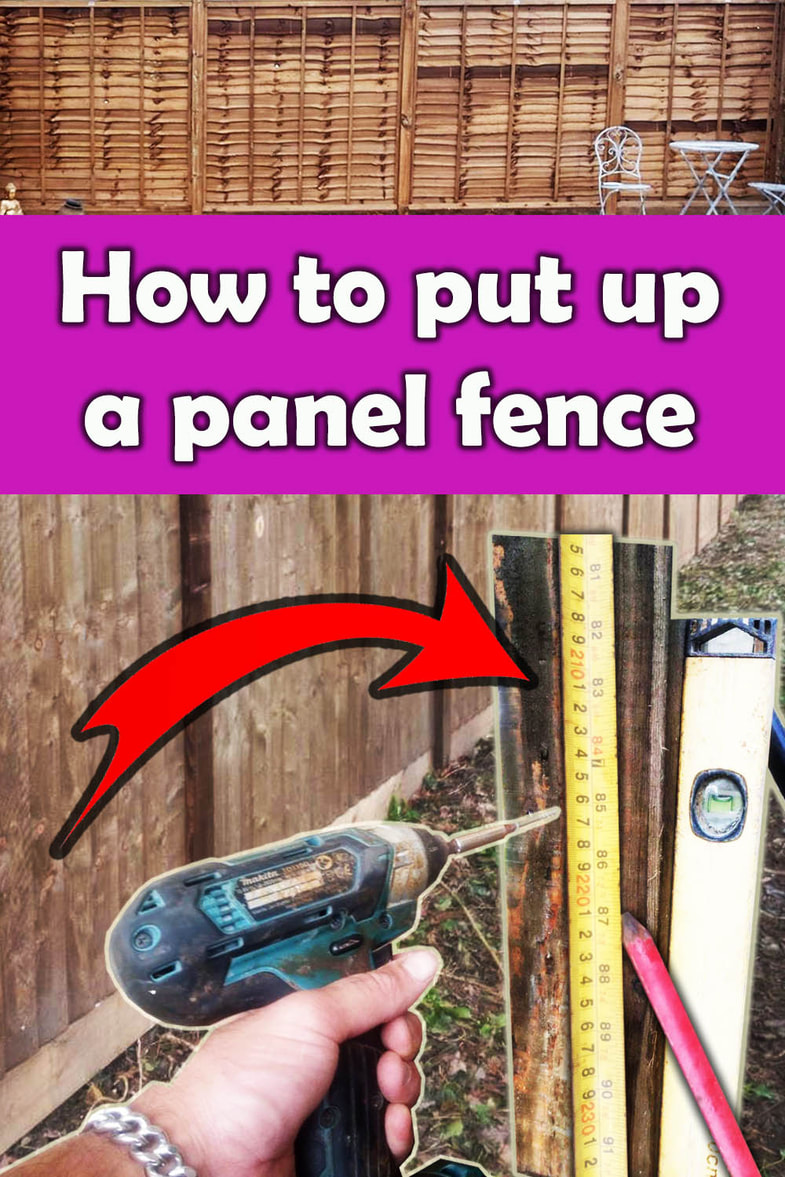
Timber fence panels have provided a fast and affordable way to put up robust and attractive boundaries for decades.
Today, fence panels come in a wide variety of styles, colours and sizes. Timber panels can give a clean and effective way to provide security and screening to your property. Although timber panels are more affordable that building masonry walls they can still be costly to install. Consequently, many decide to put up panel fences themselves. Installing wooden fence panels with posts is not difficult; however there are some pitfalls if you have no experience. In this article I will explain how to install a panel fence step by step with pictures. With over 20 years experience installing fences I will provide some expert advice and insightful tips along the process. I will illuminate general considerations and answer typical questions about timber fence panel installation. 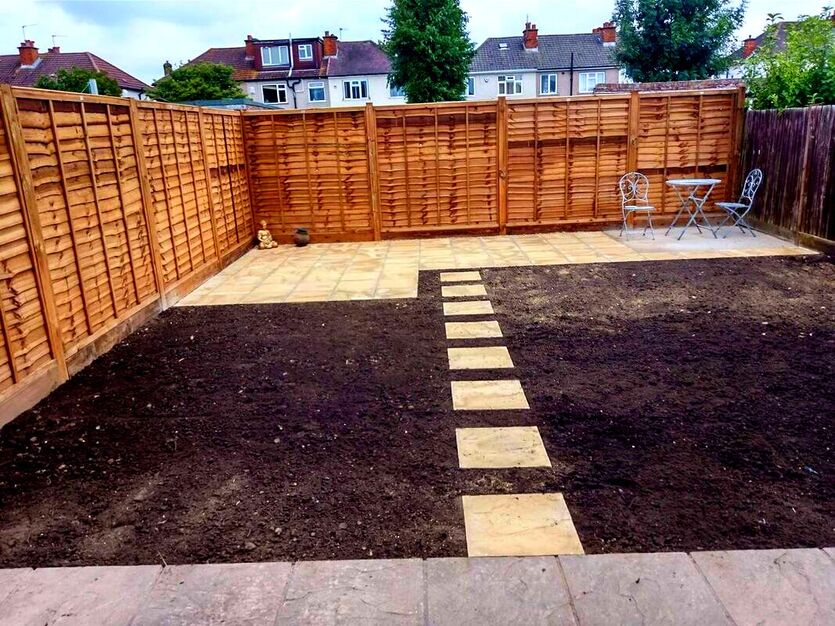
Considerations of installing a fenceBefore starting your fence installation there are few considerations you need to think about. Who owns the fence?
It is very common for one neighbour to own one side of your fence and you to own the other. Therefore, legally you are only obliged to replace the fence which comes under your authority. This can sometimes be problematic if you have neighbours or tenants who don’t have the money to replace their side. Either way, if you need to replace a fallen fence, communication and courtesy is the best approach. Find out who owns the fence and discuss your proposals so a consensus is reached. Unintended consequences
When replacing a fence there are often some unintended consequences of undertaking the work. A common problem is breaking out old posts along a neighbour’s patio line. Patios are occasionally paved right up to the fence line. This can result in next doors paving becoming broken and difficult to repair in a matching fashion. It is always good to have a peak over the existing fence first to expose any potential issues. Some other snags include trees growing on the boundary and old dilapidated sheds leaning on fence posts. When the fence is removed the shed collapses causing a dilemma. Some of these are rare but it is always worth predicting potential problems before you start. This way you can run the scenarios over with your neighbour before you begin. 
One of my fencing projects installing a timber panel fence
Neighbours & Boundaries
It is surprising just how possessive some get over very small amounts of land in regard to boundaries. Some sources claim you should check land registry deeds before replacing a fence. I personally think this can be a bad idea leading to misinterpretations of the boundaries. I would not do this unless there is obviously something questionable about the existing boundary. If the existing boundary has existed for years with no disputes erect the fence to the exact line, simple! Once again, discuss this with your neighbour first to extinguish any issues before the work commences. Health & Safety
Putting up a panel fence is generally a safe operation. Before you start digging deep holes try to make sure you aren’t excavating on top of services. I have to say it would be extremely rare for such services to run under a site boundary. Nonetheless keep an eye out for warning tape or buried cables as you dig. It is advised to always wear tough gloves and steel toe cap boots while installing fence posts. Tools for building a fence
Shopping list
How to install a timber panel fence step by step
Step 1: Existing fence removal
When putting up a new fence it is easy to underestimate the task of taking down the old fence. An old fence may look dilapidated but it will amount to a substantial amount of material. Make sure you allow extra time and capacity to take down and remove the old fence. Step 2: Ground clearance
It is typical for old fence lines to be littered with tree saplings, broken fence posts and other obstacles. Before you begin it is a good idea to clear the boundary of any perennial weeds or roots. It is also a good idea to level any bumps or level changes along the fence line. Step 3: Setting up your line
Before you begin you should set up a string line to identify the run of the boundary. Not all boundaries are perfectly straight! However a string line will allow you to get a feel for any imperfections to the boundary. 
Step 4: Marking post holesMark your first post hole with line marker paint, aim for around 100mm of concrete around your post. 
Step 5: Excavating first post hole
Start excavating your first post hole, the best tools for this are a spade, grafting bar and post diggers. Aim for a clean and circular post hole around 600mm deep. 
Step 6: Concreting first post
Place your first post into the hole making sure it is vertically level (plumb) while touching the string line. This is a good opportunity to measure the height of your post from the ground level. You want enough height for the post and gravel board with about 50mm extra on top. 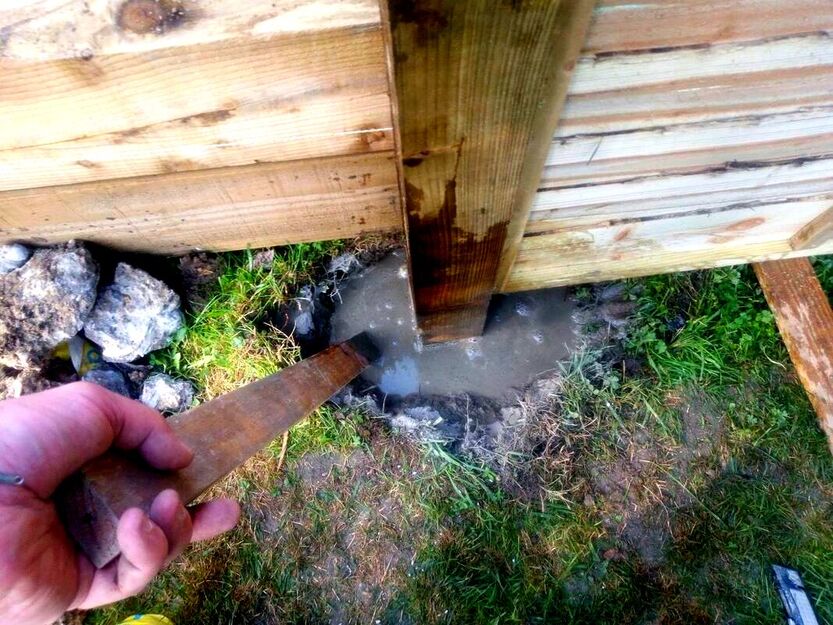
Step 7: Installing first gravel board
Mark on your post where the top of the gravel board is to be situated. If you are using 6ft panels this will be about 6ft 2inches (1,850mm). This allows you 6ft for the panel and two extra inches so your posts are proud of the panel tops. Offer up your gravel board to the first post and wedge it into position level. Concrete posts and gravel boards can be slot into position, for timber you will need to screw gravel boards to posts. This can be achieved by attaching cleats to the posts with screws. Cleats are small cuts of timber which allow gravel boards a firm fixing base to posts. This process can be seen in the image below. 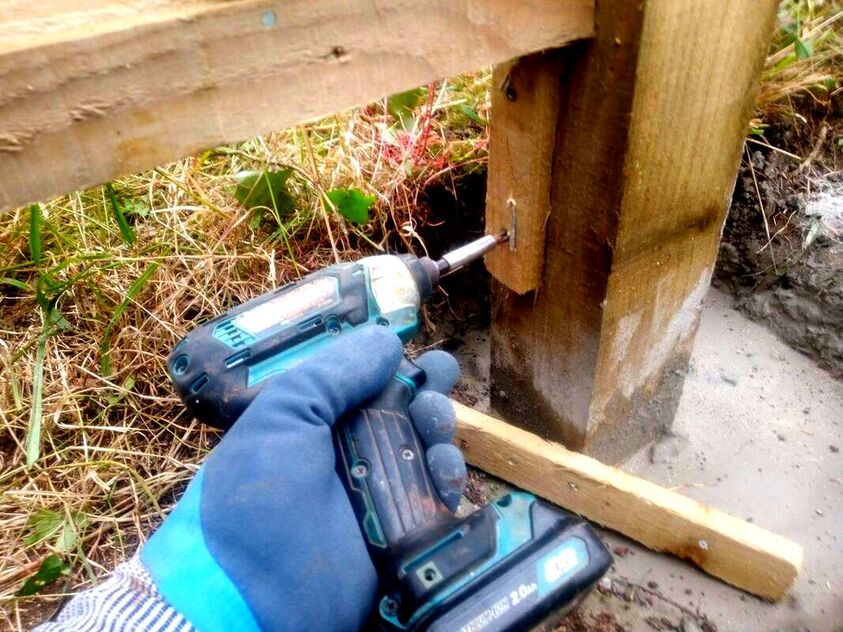
Step 8: Fixing your first panel
When your gravel board is fixed level, the panel can be perched on top. Push the panel tightly up against the post and screw it into position. Fix the panel within the centre of the post with an even gap all the way up the post. External grade screws can be used to fix the panel frame straight into the timber posts. Alternatively you can install fencing slot brackets to each post. Make sure your panel and gravel board is lined up well with your string line! You can now prepare the next post hole. 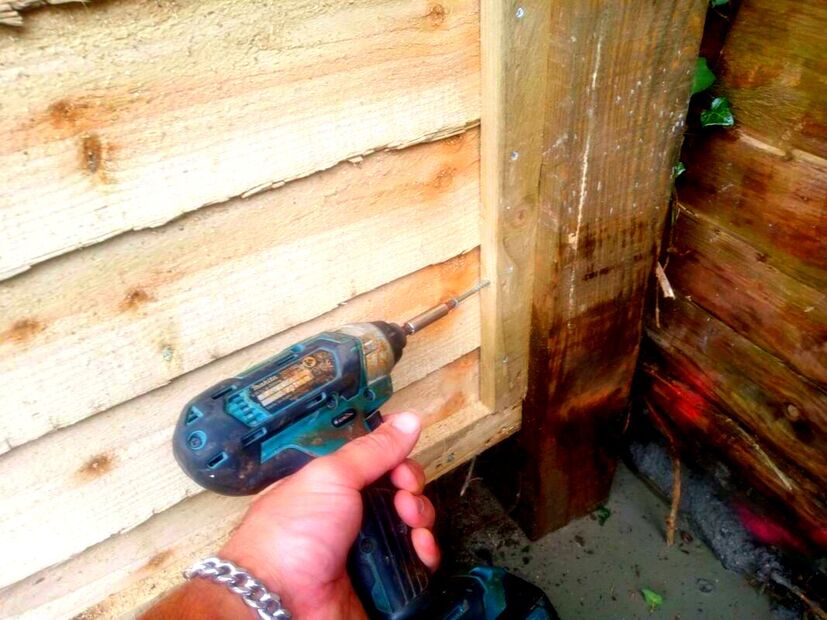
Step 9: Excavate next post whole
Start excavating your second post hole, the best tools for this are a spade, grafting bar and post diggers. Aim for a clean and circular post hole around 600mm deep with no loose material inside the excavation. Step 10: Offer up second post
Offer up your second post so it meets your gravel board and panel nice and flush. Make sure your post meets the string line when the post is vertically level. 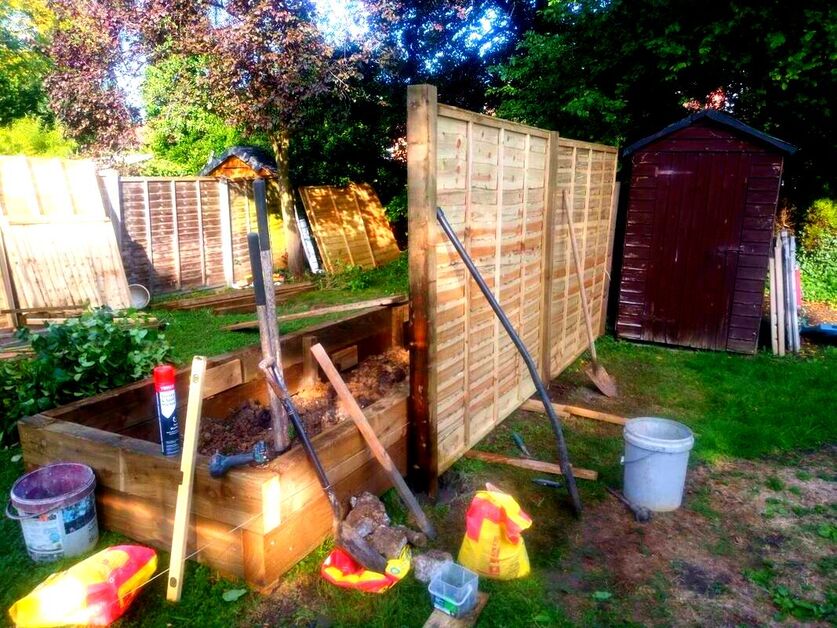
Step 11: Fix panel
Check your level and fix your cleat, gravel board and panel to the second post securely. It is best to fix 4, 80mm screws at even intervals along the height of the panel. 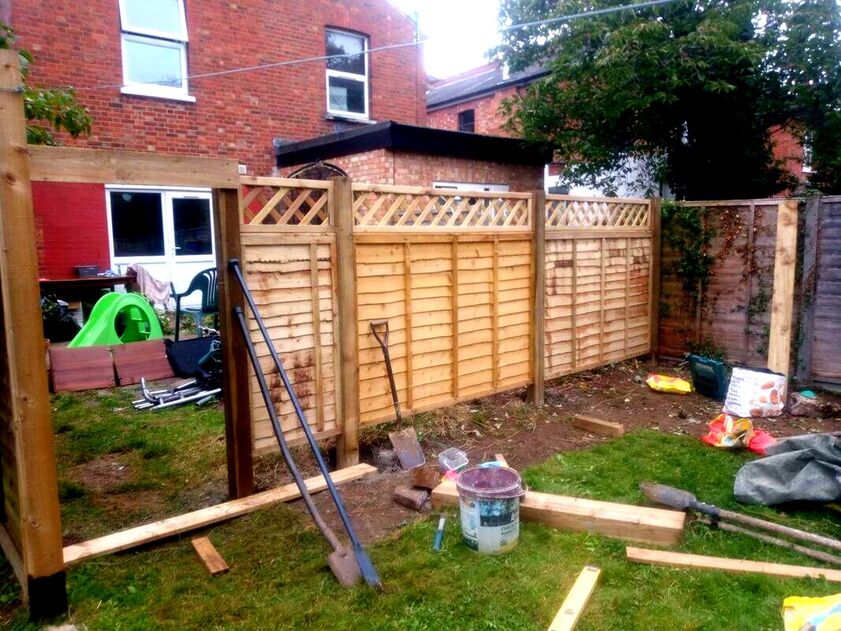
Step 12: Concrete second post
When your post is in position concrete it in securely, this is best done using postcrete. Fill the post hole with water half way and pour one bag around the hole. Using a long stick or ‘pokey stick’ swirl and mix the dry mix with the water well. The mix should start to set within the first five minutes making it easy to level your post. Fill your post hole until it is well filled with concrete, (about two 20kg bags). 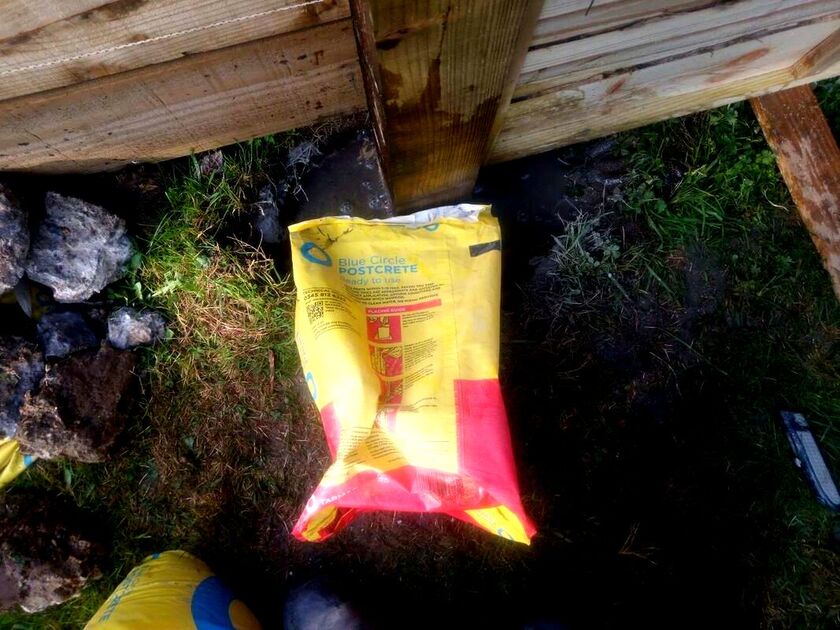
Step 13: Repeat the process
Now repeat the process all the way along your fence line until you reach the end. It is very common to have an irregular cut at the end of the fence line. You will have to install a post to the far end and cut down a panel to fit the gap. 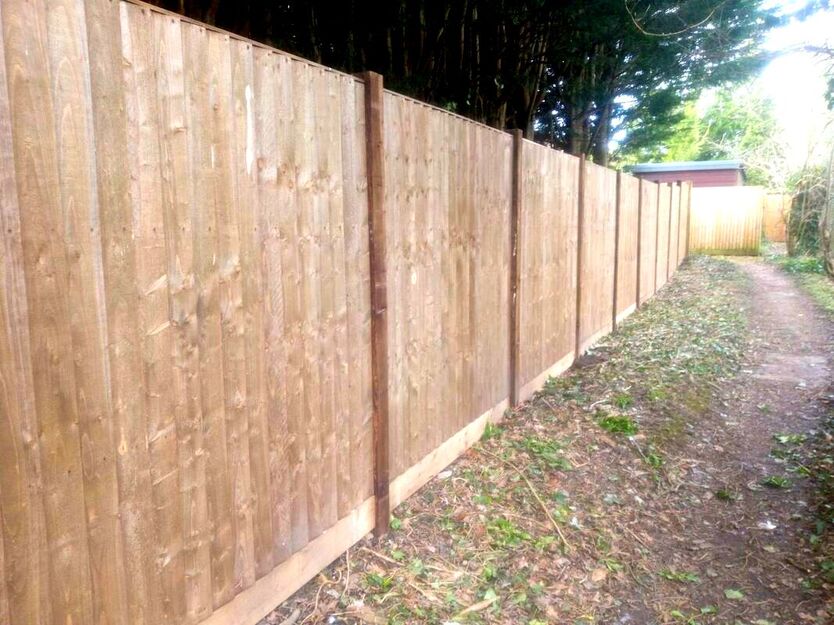
Step 14 Cutting down panels
Although cutting down a panel may seem like advanced carpentry it is really very easy! The most important thing is to measure carefully and cut slowly. Make sure you measure both the top gap and lower gap and draw a line between them. This can be achieved with a carpenters pencil and a long (2 metre) spirit level. 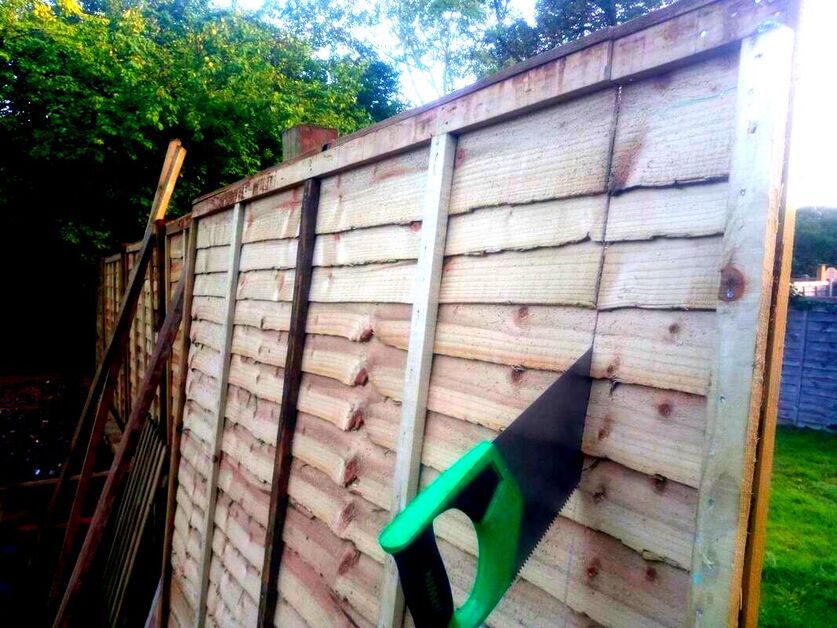
Once your panel is cut neatly, you can prize off the clamping beads from the cut off end. This can be done gently using a claw hammer or crow-bar.
The beads can then be overlapped the cut end and fixed into position. Your cut down panel can now be screwed in between the two end posts.
Your fence is now complete!
FAQ’SDo you need planning permission for a new fence?
When it comes to planning permission there is never a one size fits all answer. However, I will list some general guidelines on at least the likely hood of needing permission. If you are installing a new fence where one did not stand before it is likely you will need planning permission. When changing the height of an existing fence, particularly higher it is likely permission should be sought. Generally it is not an issue unless you go above 2 metres tall. Any taller than two metres means blocking neighbours light can become an issue. If your fence borders a public road or highway permission should be sought for major alterations. What do you put under fence panels?
It is always a good idea to install gravel boards under timber fence panels. These keep panels elevated, aerated and away from loose soil sitting against them. For most timber fences 150mm treated timber gravel boards are best. 
Is it easy to install a fence?
Generally the practice and principle of erecting a fence is easy. However in practice there are many scenarios which can make it challenging. Old fences covered in thick ivy can make installing new fences difficult. Such old fences can be very heavy and difficult to remove. The ivy will need to be cut into sections and all the stumps and roots removed from the soil. It is also very common for new post holes to be directly over old concreted posts. This means you have to individually break out each individual block of concrete. Consider moving the positions of your posts by adding a cut panel at each end to avoid this. Can you install a fence on your own?
You can certainly install a fence on your own if you install one post and panel at a time. However erecting a fence in this way can be awkward and tricky at the best of times. A good tip is to put the fence up in summer during dry weather. When the panels are dry they are much lighter and easy to work on your own. Storing your panels standing at an angle also helps them to dry out faster. 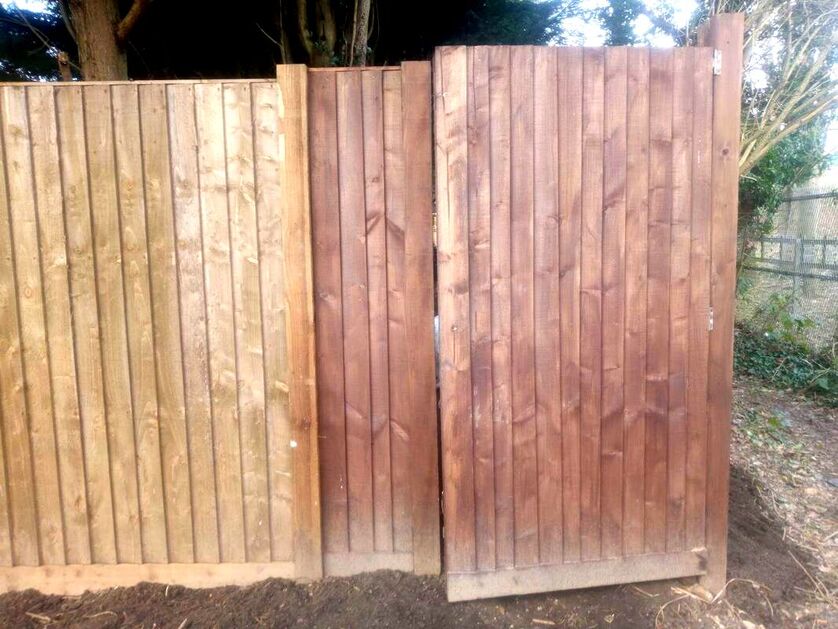
Should fence posts be higher than panels?It is always advisable to set posts in a little higher than panels. I normally aim for them to be about 50mm higher than the panels. Should a fence be level or follow the ground?
It is never a good idea to try to follow the ground level with a panel fence. If your panels are not level across the top your posts will be at an angle. This will not only look odd but the structure will not be as robust and sturdy. When installing on a slope you need to step he panels up or down according to the gradient. Can you attach fence panels to an existing fence?
It really is not a good idea to attach a new fence panel to an existing fence. It will add extra weight and burden to the existing posts. This can result in the posts breaking and the existing fence collapsing. Who should get the good side of a fence?
Theoretically you should give your neighbour the good side of the fence. Traditionally this has meant every garden has one good side and one less attractive side. However, it really does depend upon the specific situation and orientation of neighbouring properties. Fencing services in Amersham, Buckinghamshire
If you require garden fencing or fence installation services in Buckinghamshire including; Amersham, Beaconsfield, Chesham, Chalfont, Aylesbury or High Wycombe do not hesitate to contact me. Our fencing installers can erect a wide range of fencing products tailored to your specific site. Why not contact us below for a fence installation consultation and quotation.


Thank you for reading our article on how to put up a fence with timber panels! Below I will link to some other articles you may find informative.
'As an Amazon Associate I earn from qualifying purchases'
This article contains affiliate links
Garden ponds are one of the most effective ways to encourage wildlife into your garden.
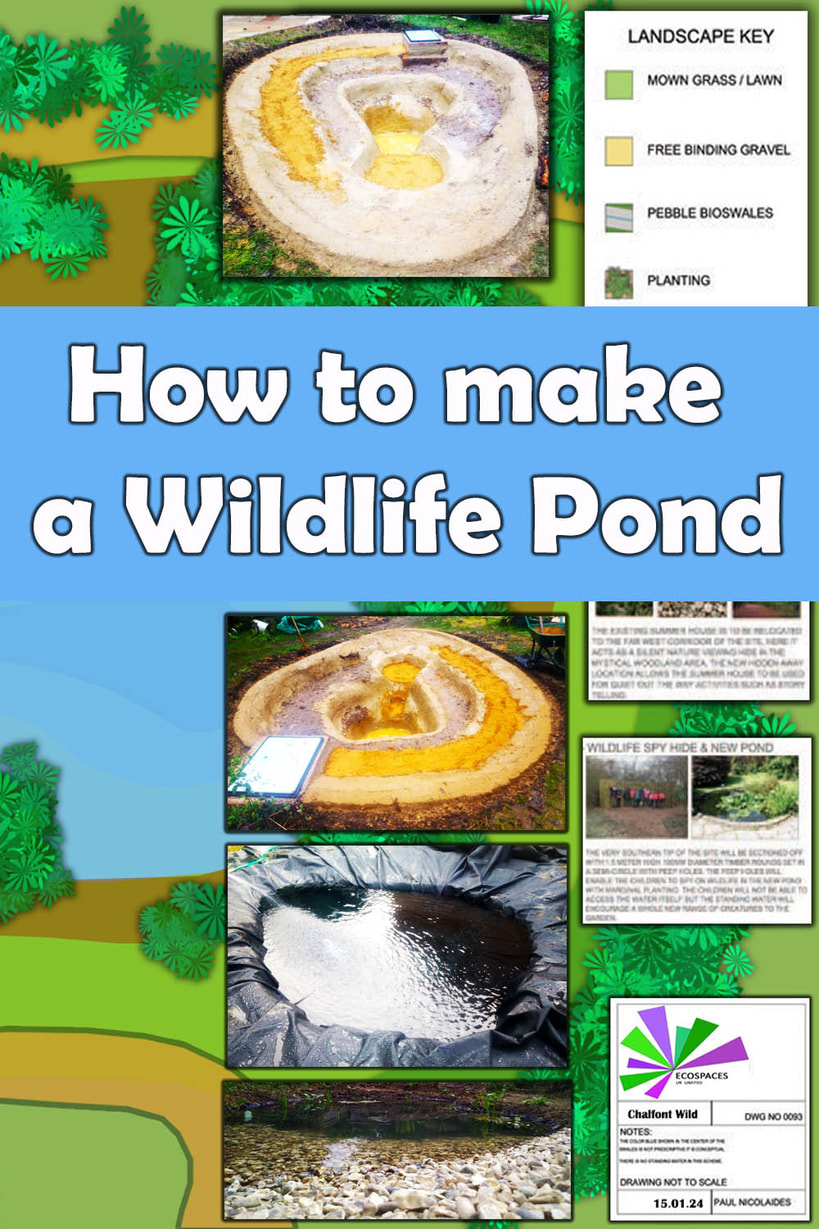
Not only do ponds create excellent habitats for wetland species they also provide drinking water for other creatures. For the nature enthusiast a wildlife pond can create hours of both entertainment and study. A successful wildlife pond will host multiple wetland habitats and contain varying depths and shelves. It is also beneficial if your pond looks as natural as possible within the landscape! This will look best visually and provide as much reassurance and security to wildlife. In this article I will explain how to build a natural looking wildlife pond step by step. I will include images of previous ponds I have built within wildlife garden landscaping projects. Planning your pond
One of the main factors to consider when planning a pond is its shape. The best ponds for wildlife have a deep central zone which has a large volume. This deep zone keeps the ponds water temperature stable during hot summers. It also provides a collection pit for inevitable amounts of dirt and organic debris which will accumulate within the pond. Try to plan for at least one gentle slope leading out of your pond. This will provide easy access for amphibians and warm shallows for aquatic insects. You will want to pan your pond with plenty of varying shelves and depths. It is a good idea to sketch up a basic design of the profile of your pond before begin excavating. The image below is of a wildlife pond I built in Buckinghamshire to give you a look at the shape. 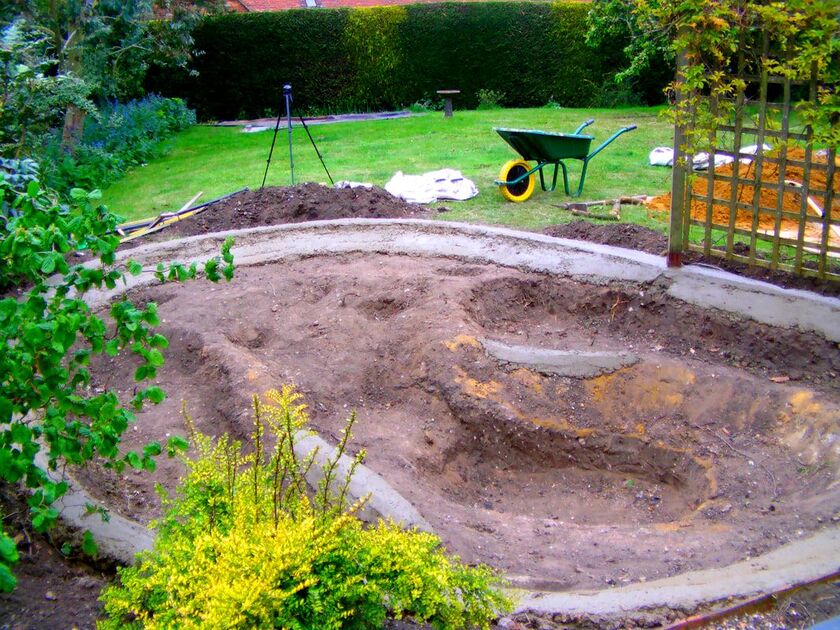
One of our wildlife ponds in Winslow Buckinghamshire
Positioning your pond
Positioning your pond so it is the most beneficial to wildlife as possible is paramount. It is always better to locate a pond where there is the best access to surrounding habitats. This typically means closest to green corridors and garden boundaries. Wildlife prefers to have a sheltered access from the pond to other parts of the garden. A pond slap bang in the middle of a patio may look nice but may be problematic for some species. It is advantageous to integrate a wildlife pond within a well planned, planting scheme. Try to position your pond away from the canopies of large trees to prevent leaf clogging in autumn. It is best to locate your pond where it gets at least 6 hours of direct sunlight every day. This will enable pond plants to thrive and submerged plants to boost oxygen levels. 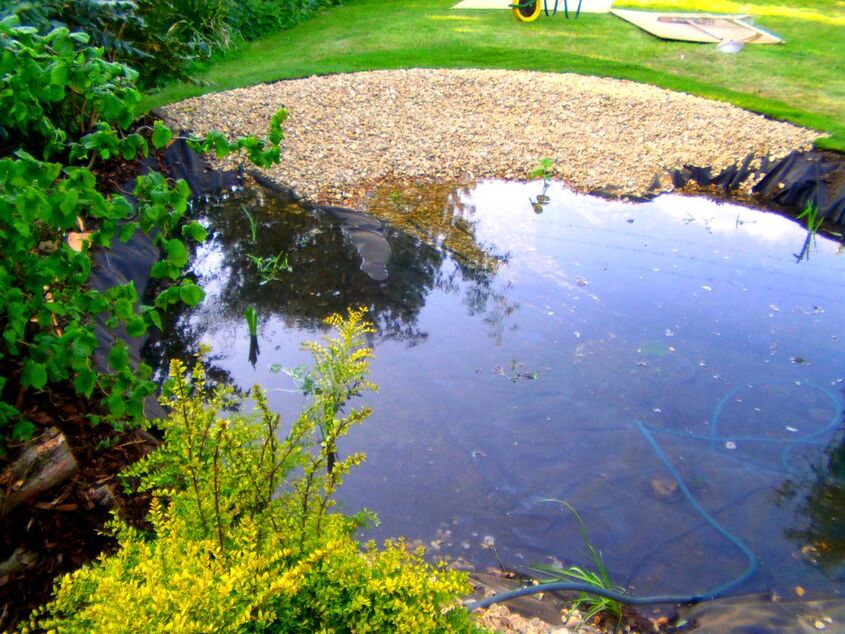
Our wildlife garden in Winslow Buckinghamshire
How big should you build a wildlife pond?As a general rule the larger a pond you build the better it is for wildlife! Do not underestimate however the benefit even very small ponds provide. The trick is to ensure your pond has enough volume to host a stable environment. Very small and shallow ponds can become very warm in summer and freeze right through in winter. For small ponds you should really aim for a minimum depth of 450mm. However in a perfect world you will have a larger pond with a sizable deep zone of 1 metre. 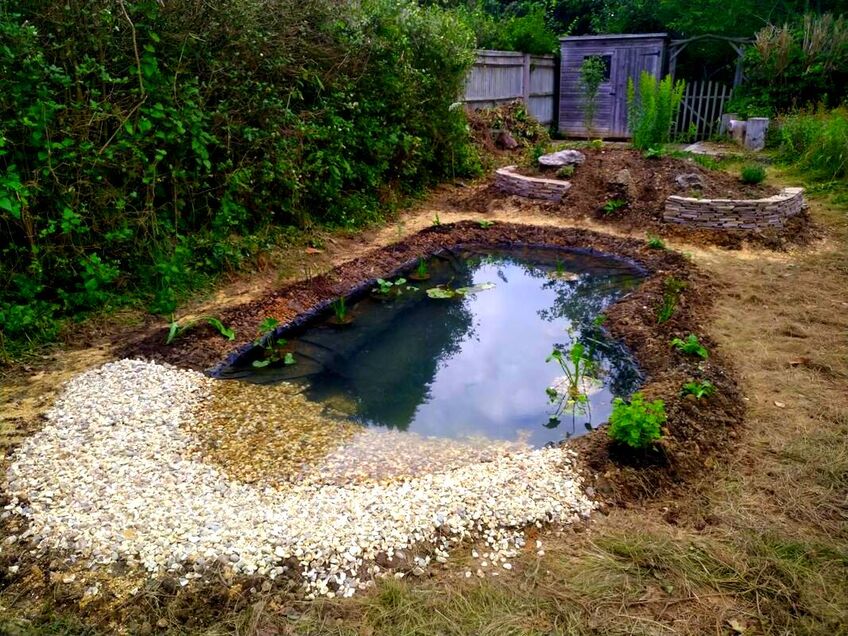
Our wildlife pond project in Amersham
This will allow for a large body of water which has a stable and consistent temperature. It is optimum to incorporate multiple shelves at varying depths to cater for a broad range of species. A gentle sloping section can create 'warm shallows' which are beneficial to specialised species. I would say a good average size for a wildlife pond is 3 x 5 metres and about a metre deep. Pond safety
Pond safety can always be a consideration especially where children are concerned. I always recommend fencing off your pond not just for children but for wildlife too! A 1.2 metre tall perimeter picket fence can provide added security to wildlife and increase safety. A picket fence will give a feeling of privacy and reduce the chance of wildlife being disturbed by pets. Enclosed wildlife ponds also lend themselves to more quiet study and relaxation than open ponds. How to build a natural looking wildlife pond step by step
Step 1: Excavation
Excavate your pond from the centre outwards digging the deepest section first. This makes it easier to gently dig in your shelves and slopes into your ponds profile. Digging with a digger is good for large ponds but can be messy. You may need to hire a skilled operator for excavating neat shelves and slopes. I find its best to use excavators when it’s warm and dry. If your garden is wet you can end up making a real mess! 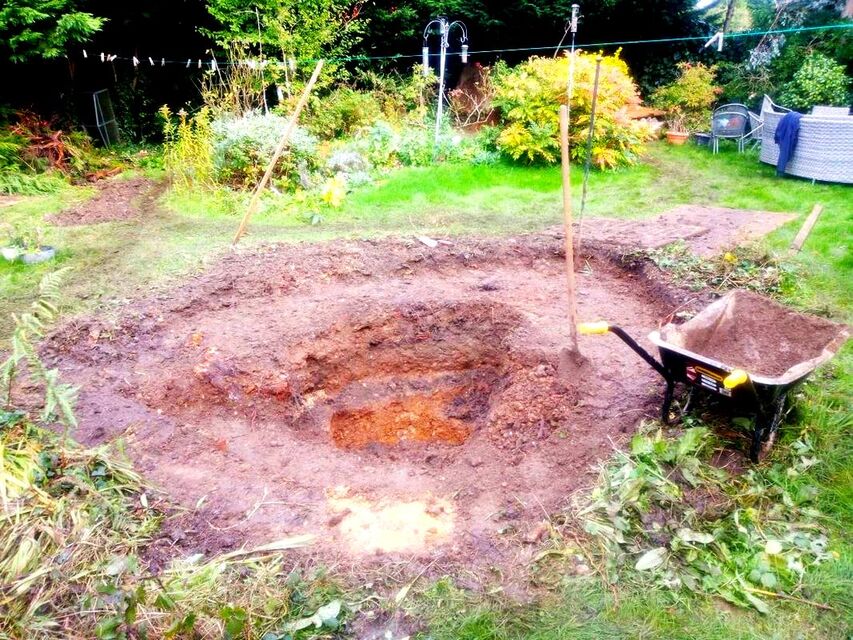
Step 2: Spoil removal
It’s easy to get carried away with the actual digging of the pond and not the spoil removal. Excavating ponds can create a large amount of bulky subsoil. This is best loaded into a skip using a wheel barrow. Alternatively you can use the spoil to fill in garden low spots and create mounds. 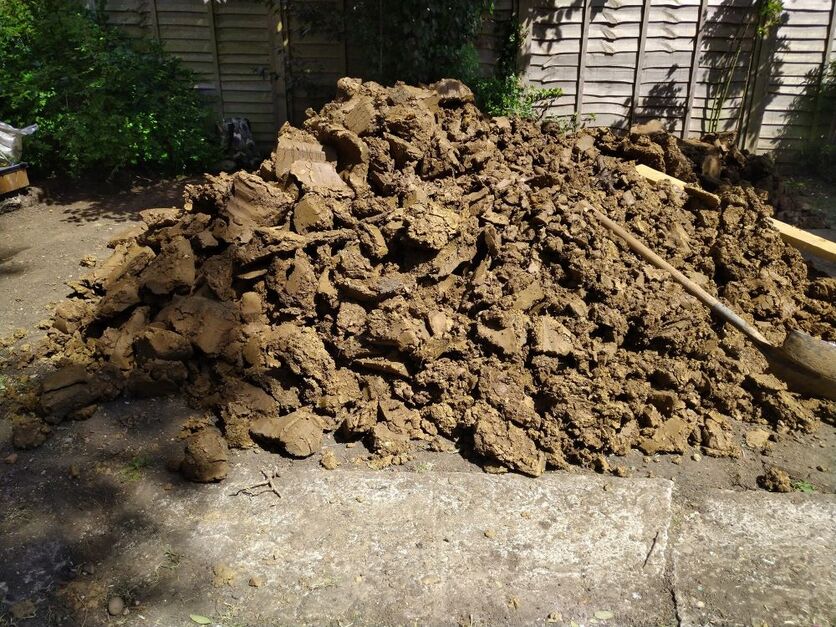
Step 3: Shaping your pond
Shaping your pond can be tricky especially if you have never done it before. Combining sheer force and sculpting out consistent shelves and slopes can be difficult. The best tools for this are spades, mattocks and digging bars for tough ground. 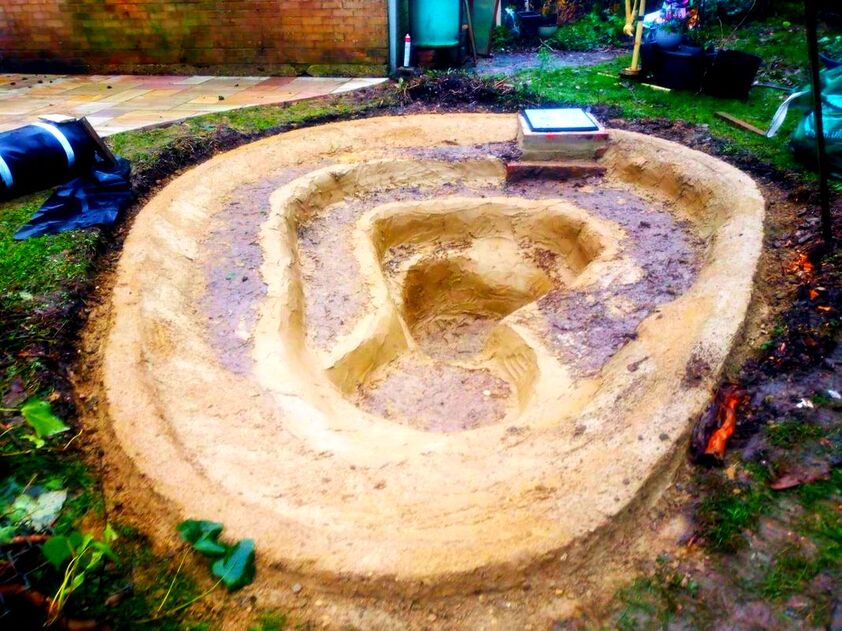
Step 4: Levelling your sides
To make your wildlife pond look as natural as possible you need to create level sides. This will allow the water level to completely hide your pond liner. I like to tap timber pegs level all the way around the perimeter of the pond. You can do this with a club hammer and a long spirit level. Then mix up some stiff concrete and create a level plinth all the way around the pond. This will enable you to lap your liner over the concrete and into the anchor trench. 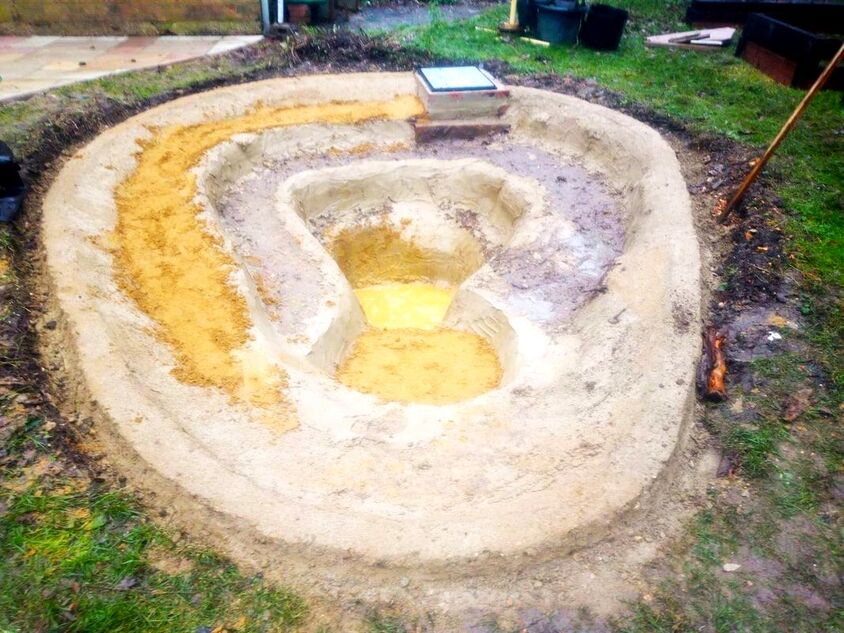
Step 5: Digging an anchor trench
An anchor trench is a perimeter trench around your pond that anchors your liner firmly into position. You need to excavate a narrow trench about 150mm wide and 200 deep around the outside of your pond. This will enable you to bury the liner when the pond has been filled with water. 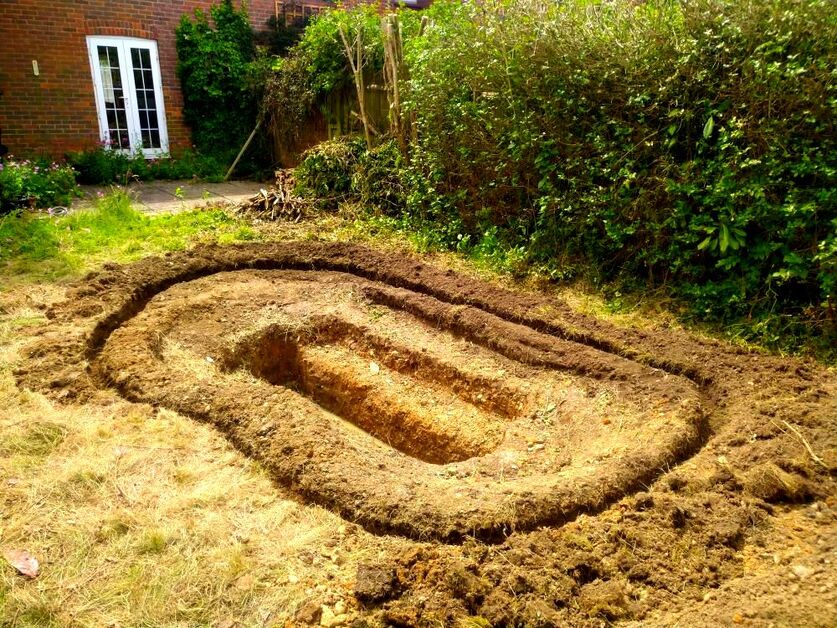
Step 6: Smoothing verticalsAfter shaping your ponds slopes and shelves you will need to check the vertical parts of the ponds profile. You want to make sure there are no sharp protrusions present which may puncture the liner. This is not such a problem on soft clay but can be an issue on rocky soils such as flints. In such case you will want to smooth out the verticals with a cement based render. This can be seen from our latest wildlife pond project in the image below the next paragraph. Step 7: Softening depths & shelves
In a similar fashion the bottom of the pond also needs some softening from protrusions. Even with a robust under-liner installed softening the base of the depths and shelves is always advised. This is best achieved with a 25mm (1 inch) layer of soft builder’s sand. 
Step 8: Laying your underlay
Lay your underlay to the surface profile of your wildlife pond. Try to push any slack into every bulge and shelf of the pond. Step 9: Laying your liner
Roll out and open up your pond liner fully next to the pond. Then lower the liner gently into the pond, this is best done with two people. Hold the liner at each end and walk it over the centre of the pond. Gently lower the liner into the void and mould it into position. 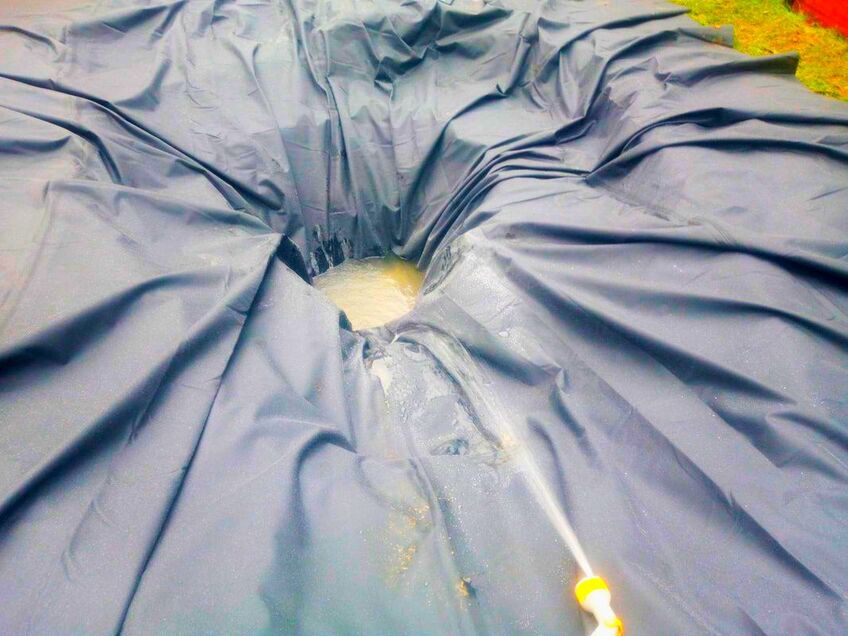
Step 10: Filling your pond
In a perfect world a wildlife pond would be filled with rainwater. However, in most cases this is not realistic so tap water can be used to fill it. Run your hose into the base of the pond and allow it to slowly fill. In a substantially sized pond this can take a while! Let the weight of the water push your liner flat along the ponds profile. Keep running the tap until the water meets the top of the level perimeter. 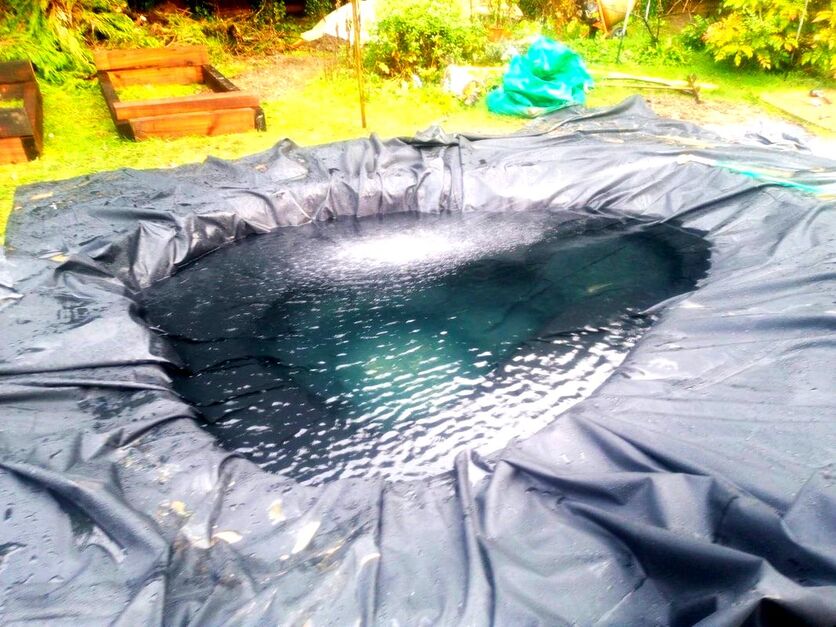
Step 11: Anchoring liner
Cut the excess liner away making sure you have enough excess to fold into the anchor trench. Fold the excess liner into the anchor trench and back fill the trench with consolidated soil. 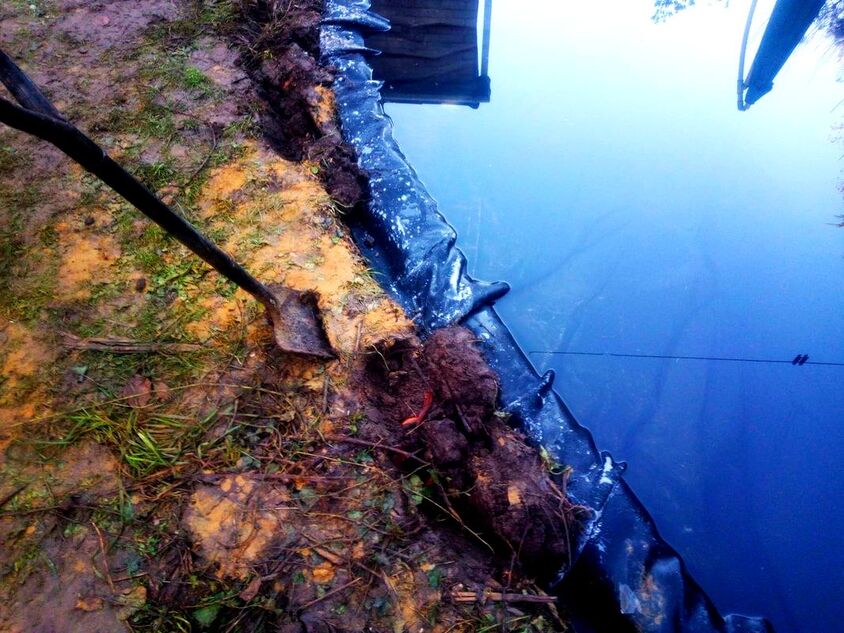
Step 12: Soiling edges
Gently grade soil around the top of the pond where the liner meets the anchor trench. Try to slope and consolidate the topsoil so it looks as natural as possible. Your sides should slope gently enough so soil can be spread under the water line. 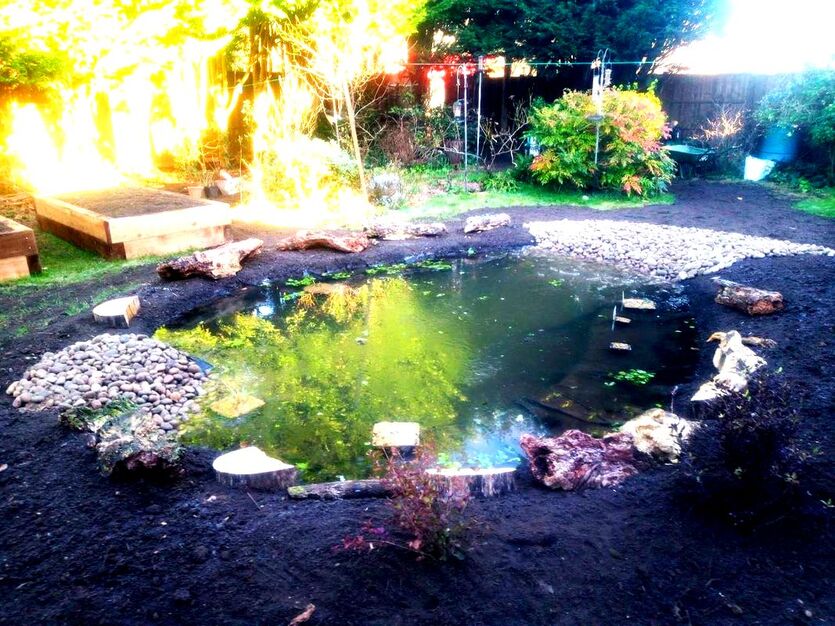
Step 13: Planting your pondNow that you have created your natural looking wildlife pond you can start to plant it. You can plant native wetland species into the pond itself using perforated baskets and aquatic topsoil. Plants beneficial to wildlife can then be planted around the outside of the pond and watered well. 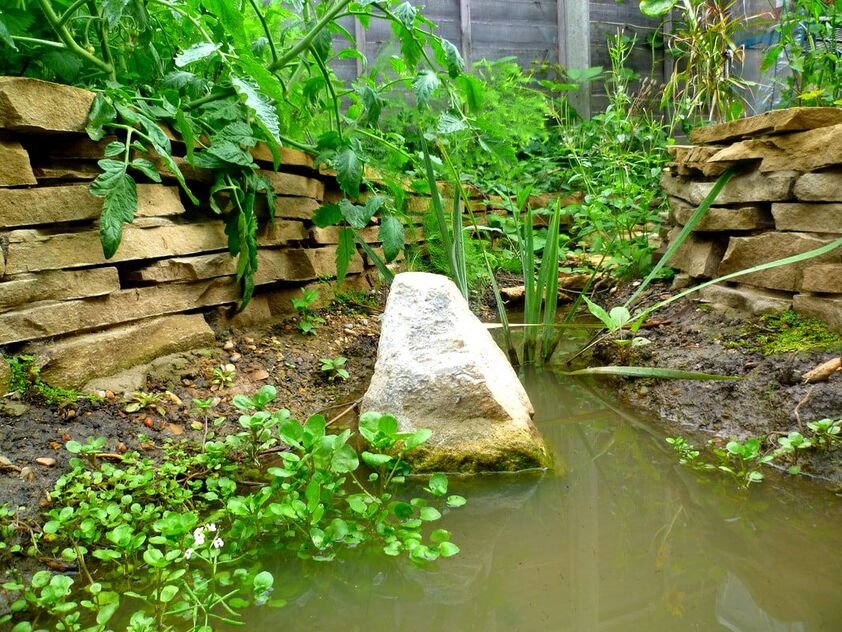
Making your wildlife ponds sides look naturalThe most effective way of making the sides of your pond look natural is with a gradual gradient. By gently sloping your sides up to the waterline soil can grade down into the shallows. It is common for wildlife ponds to be incorrectly built with steep cliffs around the sides. This is not good both visually, or for wildlife. Furthermore exposed plastics and liners can be subject to degradation from sunlight overtime. To get your sides sloping correctly, excavate your pond a little wider than you need by about 200mm. 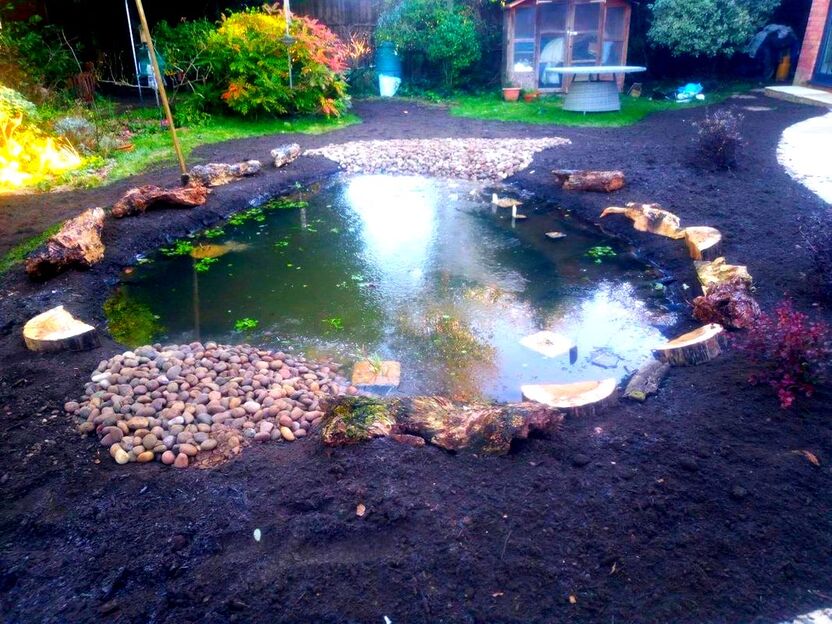
You then need to create a perfectly level plinth all the way around the pond. I find the best way to do this is with a strong concrete fillet about 100mm thick.
You can then form a gentle slope down from the level fillet with more concrete and a trowel. The liner will fold over the concrete resulting in the water level reaching the top of the concrete. This means when full the water will cover any exposed pond liner. 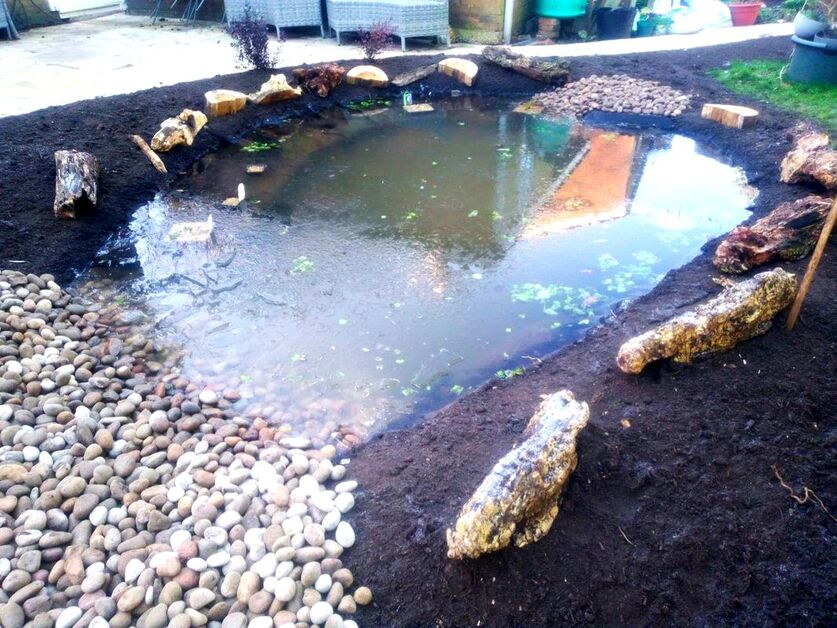
You can then gently fill soil around your edges to fill around the gentle slope. This is best achieved before the last section of the pond is filled to prevent over silting.
You then have the option to lay turf or even wildflower turf around the ponds edges. This is where you can let your creative juices flow! A ponds edges can be landscaped with rocks, dead wood and planting to make them look more natural! Should you add soil to your pond?
There is some debate about whether or not you should add soil to your new wildlife pond. There is no doubt a little soil initially is fine and actually beneficial to wildlife. However for smaller ponds in particular it is wise to not add too much soil, at least initially. If you put too much soil inside your pond you could find it becomes very overgrown too quickly! In a natural wetland a series of different depths and animal life keep plant communities in check. However, in smaller ponds these can soon take over if they have too much sediment. It is always best to plant up your new pond in planting baskets, at least initially. 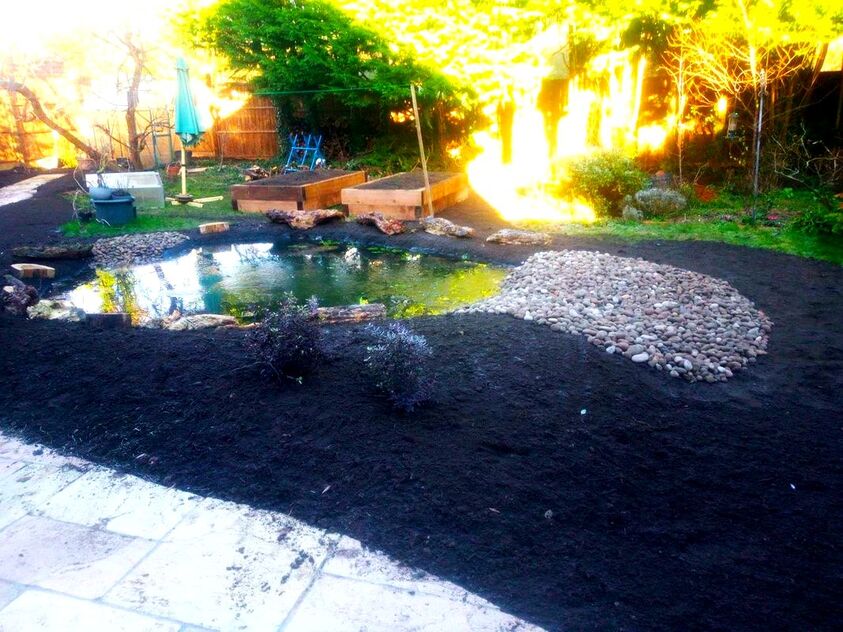
This can help contain pond plants without them turning into an overgrown marsh. Your pond will naturally accumulate a soil base from airborne dust, and organic particles.
A little soil submerged around the edges is ok; too much can lead to cloudiness and aggressive plant growth. If you are going to add soil to your pond add nutrient poor soil such asaquatic compost. Using fertile garden soil or compost will lead to excessive algae, minimal oxygen and stagnancy. The larger your pond is the more acceptable it is to add some loose soil to its depths. My advice would be, start small and plant in baskets first. It is very hard to remove soil and robust root masses once they are established. Create a gravel beach
Having gentle sloping shallows in your pond can provide an opportunity for a gravel beach. This is where you lay pebbles into the shallows that emerge onto a pebble beach. Pebbles can be based with landscape fabric to create a plant free zone at one end. This can become an attractive feature which allows for clear views over the pond. The gaps within the pebbles create the perfect hiding places for aquatic insects and tadpoles. Below is an image of such a pebble we created in our last wildlife garden pond project. 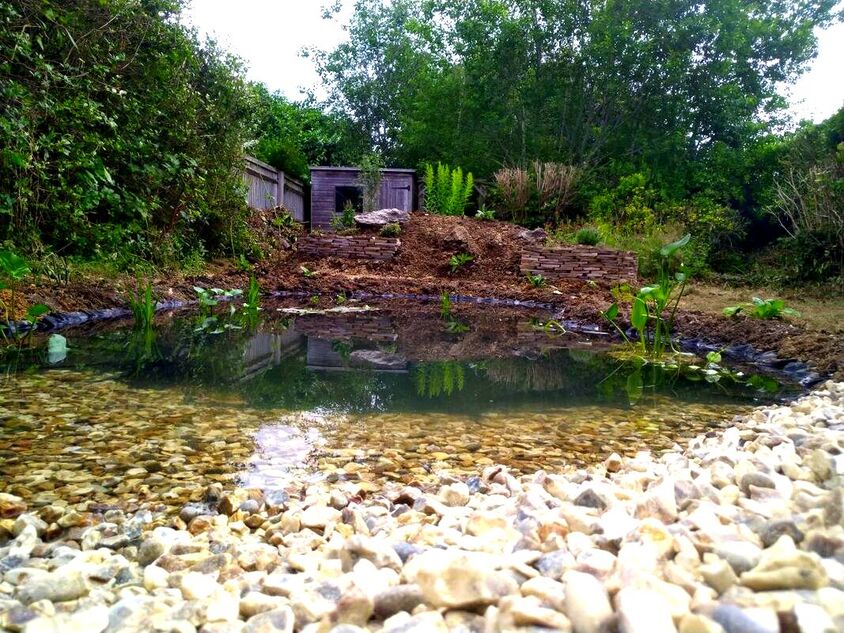
Gravel beach in one of our Amersham wildlife ponds
Planting in your wildlife pond
Some of the first plants you should establish in your pond are oxygenators. These are normally long and thin pond plants like ‘HornWort’. These can be anchored to the bottom of your pond to root within the sediment. The best way to do this is by tying the base of the plants to small stones. This helps them to anchor them to the bottom securely while they root. These plants will gradually begin to release oxygen into the water as they photosynthesise. The next stage is to plant some larger plants into your wildlife garden. Pond plants are typically characterised by their growing level in relation to waterline. 
Marginal plants inhabit a ponds edge while submerged plants grow under the surface. A good range of diversity is always advised when planting a wildlife pond.
For maximum wildlife benefit try to stick to pond plants native to your country or region. I typically plant one water Lilly and many marginal’s to the shallows. This provides plenty of security to creatures leaving and entering the pond. Pond plants are naturally very aggressive growers so it is best to plant in perforated baskets. Make sure you use nutrient poor soil so your pond isn’t susceptible to algae blooms. Planting around your pond
When planting a wildlife pond the planting around the waters edge is just as important as the plants inside. Dense vegetation around the pond will provide plenty of security for wildlife. Groundcover plants are a really great choice as they provide dense vegetation without blocking out light. 
A wildflower meadow leading up to the ponds edge is very effective for making a pond look natural.
Native plants or ecological planting which attracts beneficial insects are also a good idea! For a sunny pond flowering herbs such as fennel, rosemary, thyme and mint are great for pollinators. For frogs and newts plant large leaved plants like Bergenia and Rhubarb to provide damp shade. Creating shelter around your pond
Another great way to make your pond attractive to wildlife is to create shelter. This can be as simple as some log piles or even manmade burrows. Dry stone wall structures are really effective for creating hiding places for small creatures. Newts particularly like to shelter in the warm and damp crevices inside the wall. Hibernacula’s can also be put together in-between planted areas. These are simply masses of vegetation, sticks, old masonry and soil which create nesting opportunities for small creatures. 
Wildlife pond maintenance
During warm weather you may find that pond weed can become quite overgrown. This can be removed by wrapping it around a stick and pulling it out of the pond. After a few years you may notice that pond plants will become overgrown. It is always good to clear out excess vegetation when it gets too extensive! As a general rule you will want a decent amount of visible open water. This will enable sunlight to penetrate the depths and keep oxygenators active. Every few years get into the pond and reduce the size of plants. Try not to use sharp tools and risk puncturing the liner.
Thank you for reading our article on how to make a wildlife pond.
If you require wildlife pond design and build services please do not hesitate to contact me. We cover most of Buckinghamshire and surrounding counties, we now also cover Norfolk. Although most of our wildlife pond projects are undertaken locally around the towns of; Aylesbury, Amersham, High Wycombe, Beaconsfield, Berkhamsted and Chesham. Below I will link to some other articles you may find useful.
'As an Amazon Associate I earn from qualifying purchases'
This artcile contains affiliate links
Building raised beds in your backyard can have multiple benefits for your gardening endeavours.
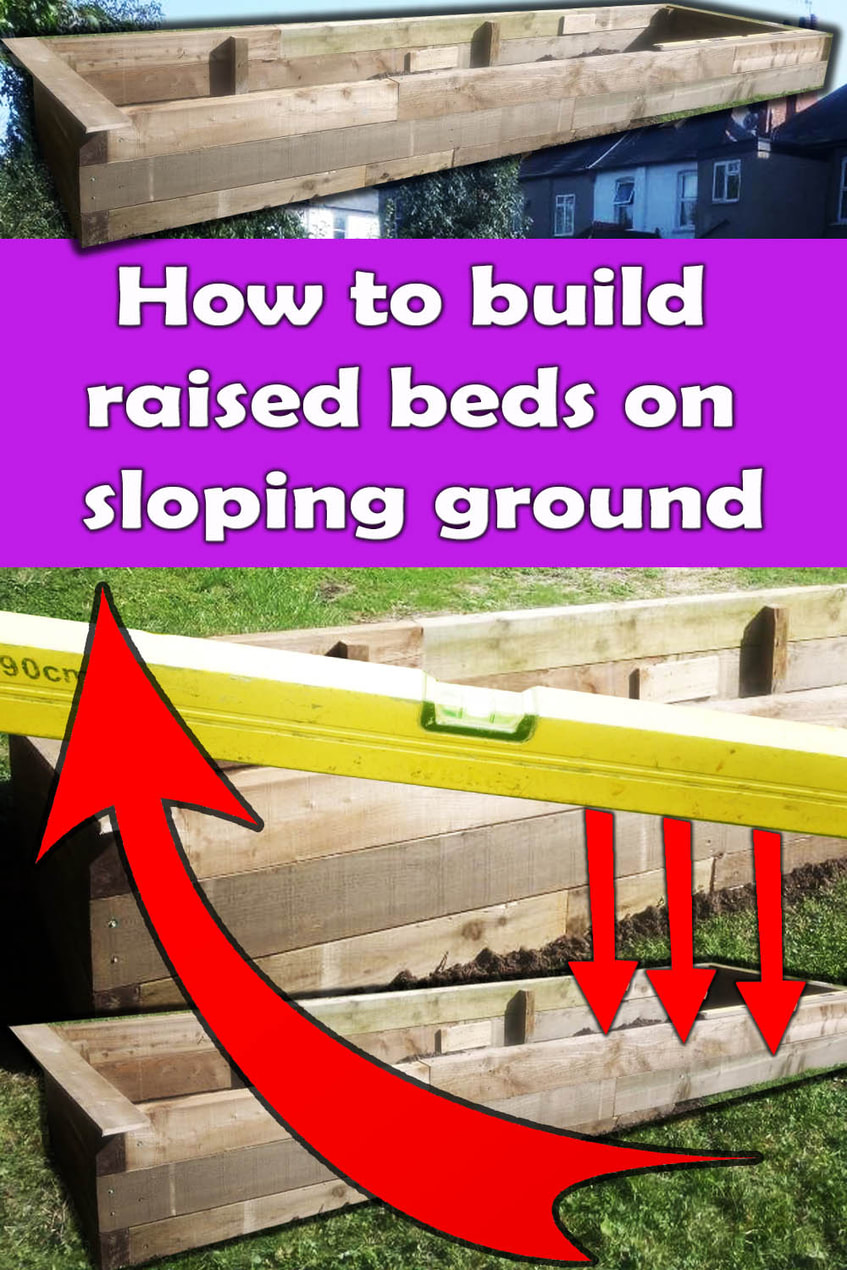
Firstly, raised beds give you have more control over your soils quality and fertility. A deeper and better quality soil means both larger and healthier plants. Although building raised beds is normally a straight forward process, sloping ground can be problematic. Any retaining structure should always be built square and level for maximum stability. Therefore the question presents itself; how do you build raised beds on a slope? There are actually a couple of ways to build raised beds on a slope with timber and sleepers. For brick, block and masonry materials there is only really one way. In this article I will explain how to build raised beds on a slope step by step. The problem with raised beds on sloping groundOne of the main problems with raised beds on sloping ground is moisture and nutrient distribution. I learned this from personal experience in my own vegetable garden. I initially built my raised beds to the gradient of a slope to save time and money. However the problem was the plants at the lower end always grew better than those at the higher end. This was because both nutrients and moisture were running towards the lowest end. Consequently, it is always best to build your raised beds level upon a slope. Furthermore level raised beds look much more aesthetic and orderly within a garden space than sloped. 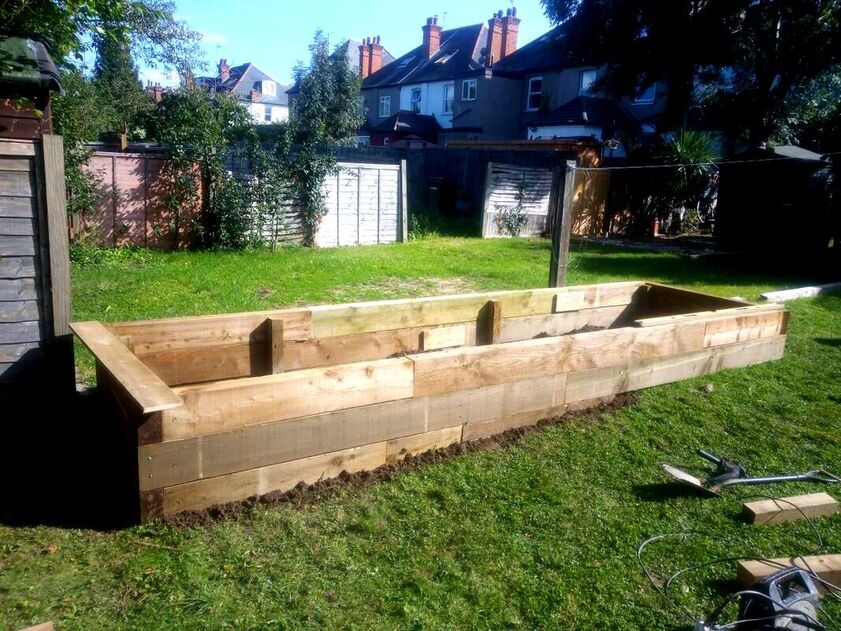
one of our raised bed projects on sloping ground in Amersham
How to make your raised bed level on sloping groundFundamentally the best way to build raised beds on sloping ground is to excavate into the slope to form a level base. This means one side of your bed will be slightly buried while the other is standing proud of the lowest point. This way you can have multiple, level, raised beds stepped up and down the landscape. 
Create a level concrete foundation
The best way to build raised beds level on any slope is to create a level perimeter foundation with concrete. If you are building raised beds with brick, rocks or concrete blocks you will need this anyway. Even with timber sleepers however, a firm and level base will make beds stronger and easier to build. 
How to build a raised bed on a slope with concrete, or rocks
The best way to build a raised bed on a slope with masonry materials is to excavate a stepped foundation into the slope. A concrete foundation can then be laid and stepped 100mm under the sloping ground level. Blocks can then be built into the slope to create a level raised bed. 
One of our concrete block raised beds in Ickenham
How to build a raised bed on a slope with sleepers
If you want to build a raised bed on a slope with sleepers the same idea applies. It is best to excavate a level platform first into the slope. However, if this is too much digging for you there is another way for timber beds. This involves lifting one end up opposed to burying the bed at the high end of the slope. You will have to fix your elevated end to strong timber posts and then fill in the lower sides later. Below I will show you how to build a raised bed this way, step by step with pictures. Step 1: Positioning
The first step when building raised beds is to plan out and decide their positioning. It is always best to position beds in full sun within reach of a water source. Positioning raised beds on a slope will be easier if they run across the gradient. This will enable them to step down in a terrace fashion helping to retain the slope. It will also mean less laborious excavation into the front of the slope. Step 2: Marking out
Mark out the position of your new beds with line marker paint or string lines.

Step 3: Setting levels
Get an idea of your levels by pegging out along the slope with timber pegs and a long spirit level. 
Step 4: Setting out Sleepers
When building raised beds with sleepers it is effective to set out your timber lengths first. You want as little wastage as possible so try to make your beds the length or width of a full sleeper. When you have set out your raised beds you can start marking your cuts. 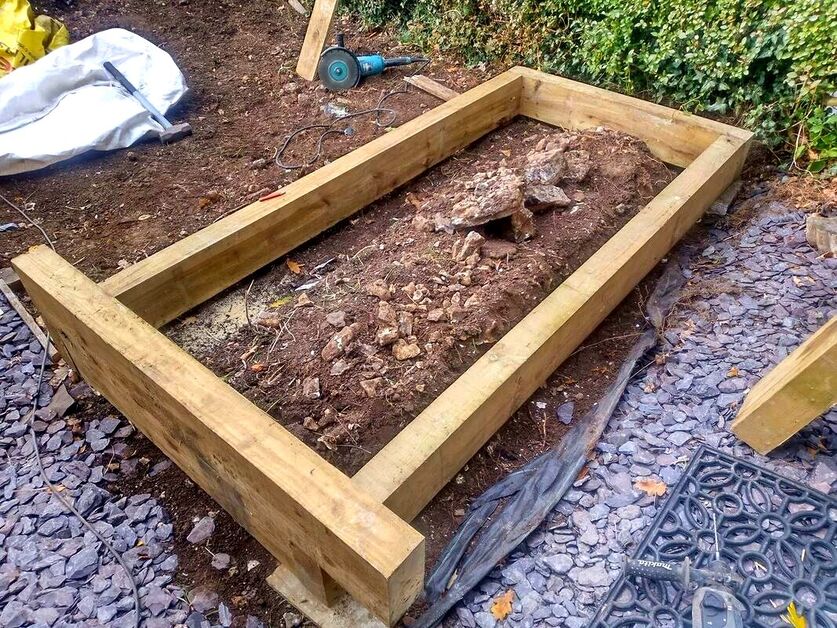
Step 5: Cutting Sleepers
Measure and mark your cuts squarely and accurately so your sleepers fit together well. 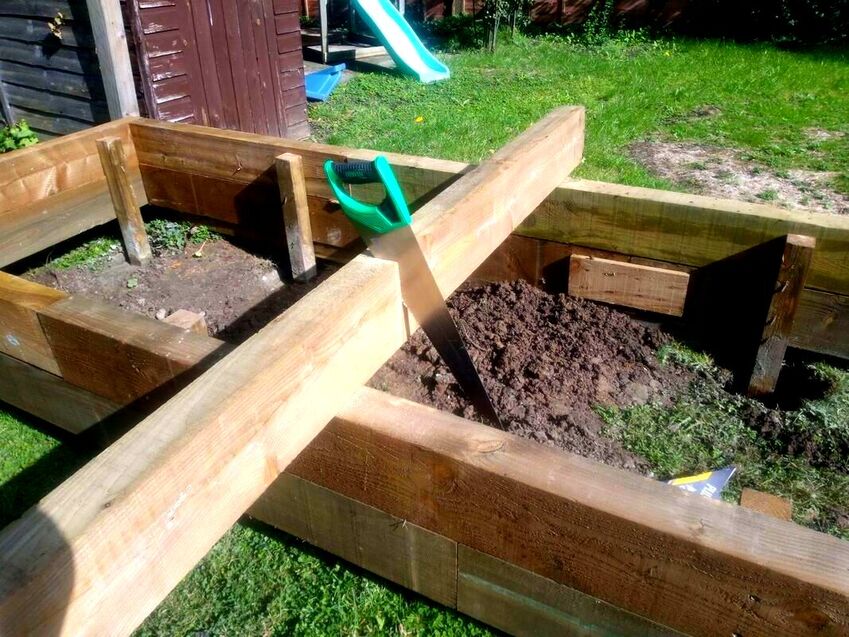
Step 6: Fixing your base frame
When you have your first course cut you are ready to fix your sleepers together. Place sections you need to fix together on a flat and level surface. Drill pilot holes from one sleeper into the adjoin section. Then fix them securely together using robust timber lock, hexagonal head screws and a power drill. For mid-length section joins brace sleepers together with 25mm x 150mm gravel boards and external grade screws. 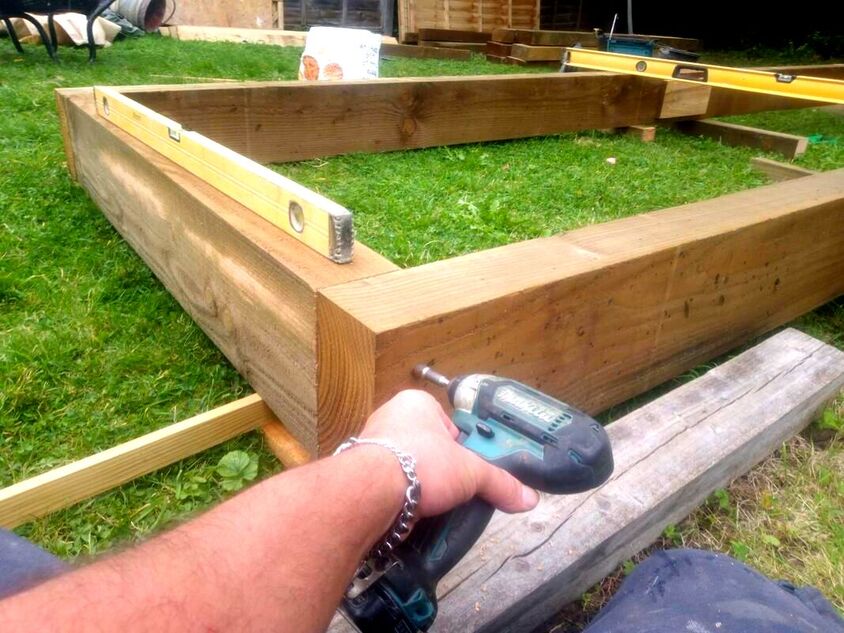
Step 7: Levelling your Base frame
You will now need to raise up the lower end of your base frame to make it level. Lever up your low end with a spade or iron bar and wedge it up until its level. Wedge up your frame with concrete blocks or bricks to hold it up level. The height of your wedges will depend upon how steep your slope is. 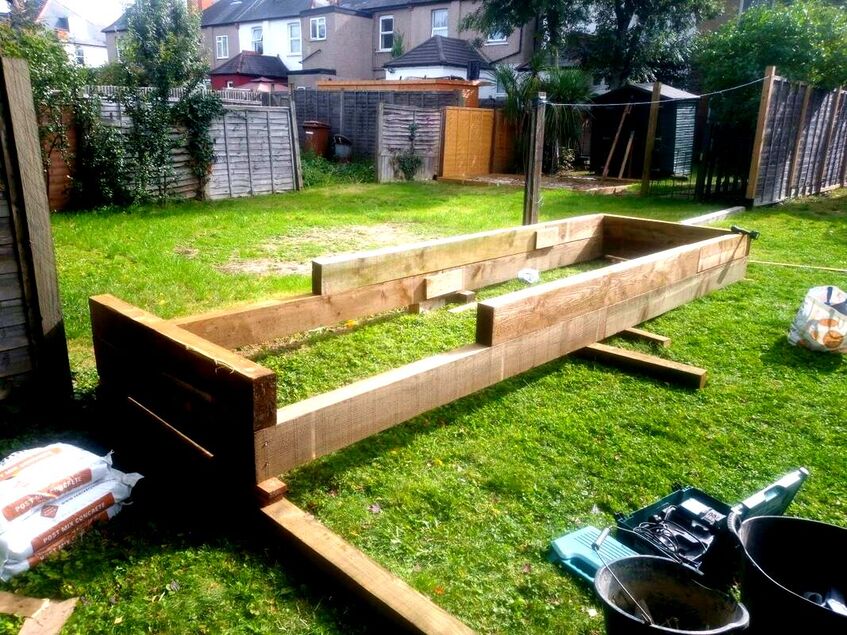
Step 8: Fixing your Base frame
Once your frame is level you will need to fix it into position. The best way to do this is by installing 75mm thick timber posts to the raised up corners. Excavate post holes down at least 400mm deep into the soil. Fix the sleepers into the posts so they are vertically level and concrete them in withpost-crete. When your posts have set you will have a free standing and level raised bed. 
Step 9: Building your beds
Now your bed is raised up level, complete the building process by adding any additional courses. Make sure any joins between sleepers are layered over by full sections to create stability. Fix down your sleepers securely with timber-lock screws. 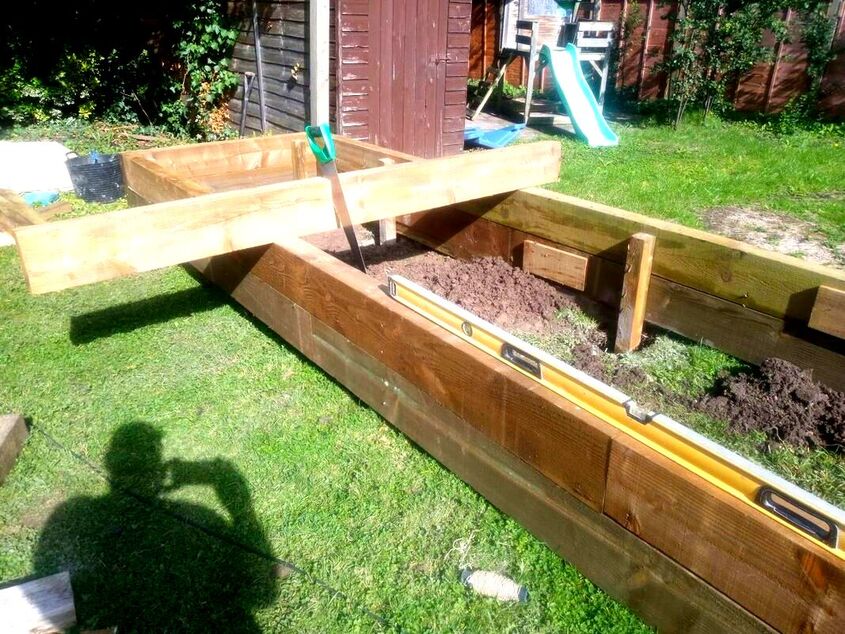
Step 10: Filling in bottom gaps
Although there is little excavation for this method of building raised beds on slopes there is a glitch. You will have to brace angled timber cuts to the raised up sides of your structure. To fix them securely you may need to concrete in more vertical posts to the raised end. Once you have cut in the infills neatly and secured them you can fill up your beds. 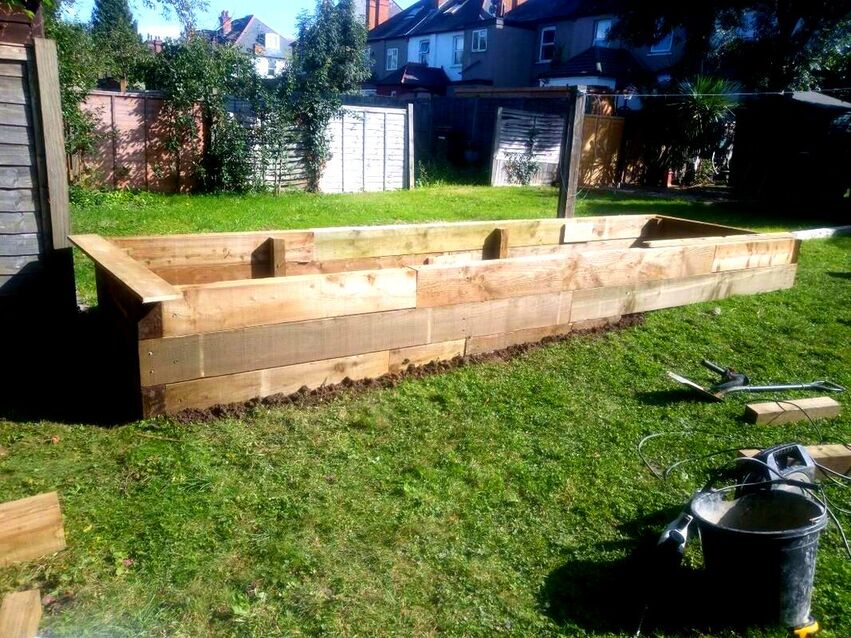
Step 11: Fill up your raised beds
Now your sleeper raised beds are completed you can fill them with soil. This is best undertaken using a scaffold board, wheel barrow and rake.
Why not visit our article on what is the best soil for raised beds here. 
FAQ’sCan you put a raised bed on a slope?
You can certainly put raised beds on a slope if you want to. However, if you run the bed to the sloping ground it will create unbalanced growing conditions. You may find plants grow better at the lower end of the slope than the higher end. This is because gravity will pull water and nutrients to the lower end of the bed. Consequently you are better off building level beds on sloping ground. 
Do raised beds need to be perfectly level?
Raised beds do not have to be ‘perfectly level’, however it is best to build them as level as possible.
This is particularly so if you have many beds together or level structures and buildings in the background. If your beds are not level the human eye may pick up upon the imperfections.
Thank you for reading our article on how to build raised beds on a slope. If you require raised bed building services please do not hesitate to contact me.
We build sleeper, brick and concrete raised garden beds. We cover most of Buckinghamshire with typical projects in; Amersham, Chalfont's, Aylesbury, High Wycombe, Beaconsfield Chesham and Berkhamsted. I have linked to some other articles below you may also find useful.
'As an Amazon Associate I earn from qualifying purchases'
This article contains affiliate links
Timber is one of the most affordable and easy to install garden edging materials. Not only does it have attractive natural tones it is also strong and flexible.
Even better, standard timber products such as gravel boards and 6x2 treaded boards can make perfect landscape edging. This means timber edging is readily available and in keeping with other garden features and structures. Generally there are two main types of timber landscape edging installed: Straight flush edging made from 6x2 or 4x2 treated timber or curvy flush edging made from treated 1 inch thick fencing gravel boards. In this article I will explain how to install such timber edging step by step. How to install straight timber garden edgingTools you will need
Wood saw
Spirit level String line Tape measure Hammer Power drill Drill bits Set square Spade Wheelbarrow Shopping list
6x2 treated timber
50mm x 50mm treated timber pegs 80mm external grade screws Step 1: Marking outMark out where you want your new, straight, timber edging to go. It is typical to want your straight edging to travel at a right angle to square patios and seating areas. If your boundary is not completely square you may want you’re edging to run parallel to your fences. Mark out the final route of your edging with marker spray or a string line. 
Step 2: Working out levels
As timber boards are cut into straight lines you will want to keep the top of your edging flush. Consequently it is a good idea to work out the level of your completed height. This can be achieved with a tight string line and timber pegs. 
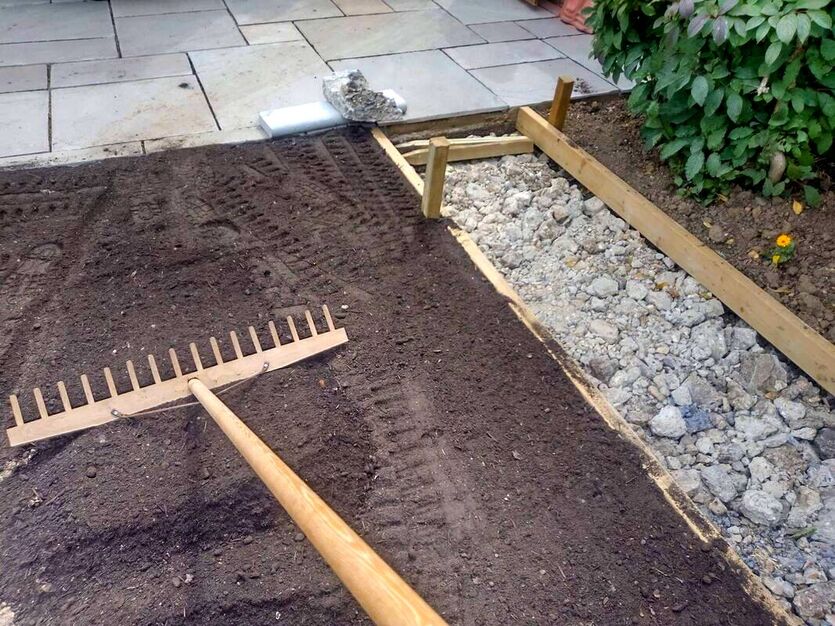
Step 3: Excavation
Excavate a narrow channel along the route of your new timber edging. The excavation should be the perfect depth and width to sink the edging flush with the surrounding ground. 
Step 4: Setting your boards
Place your boards into the excavation and work them into their finished level and position. 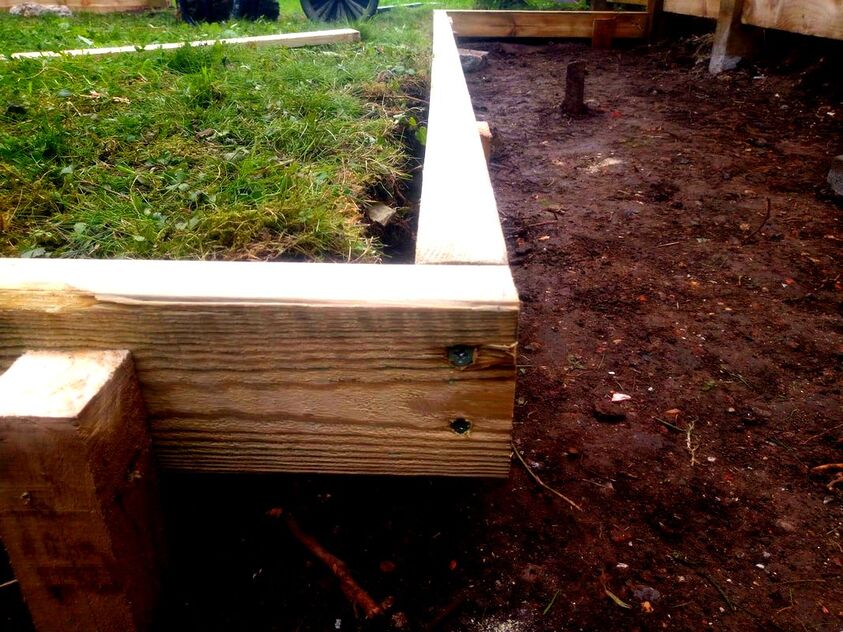
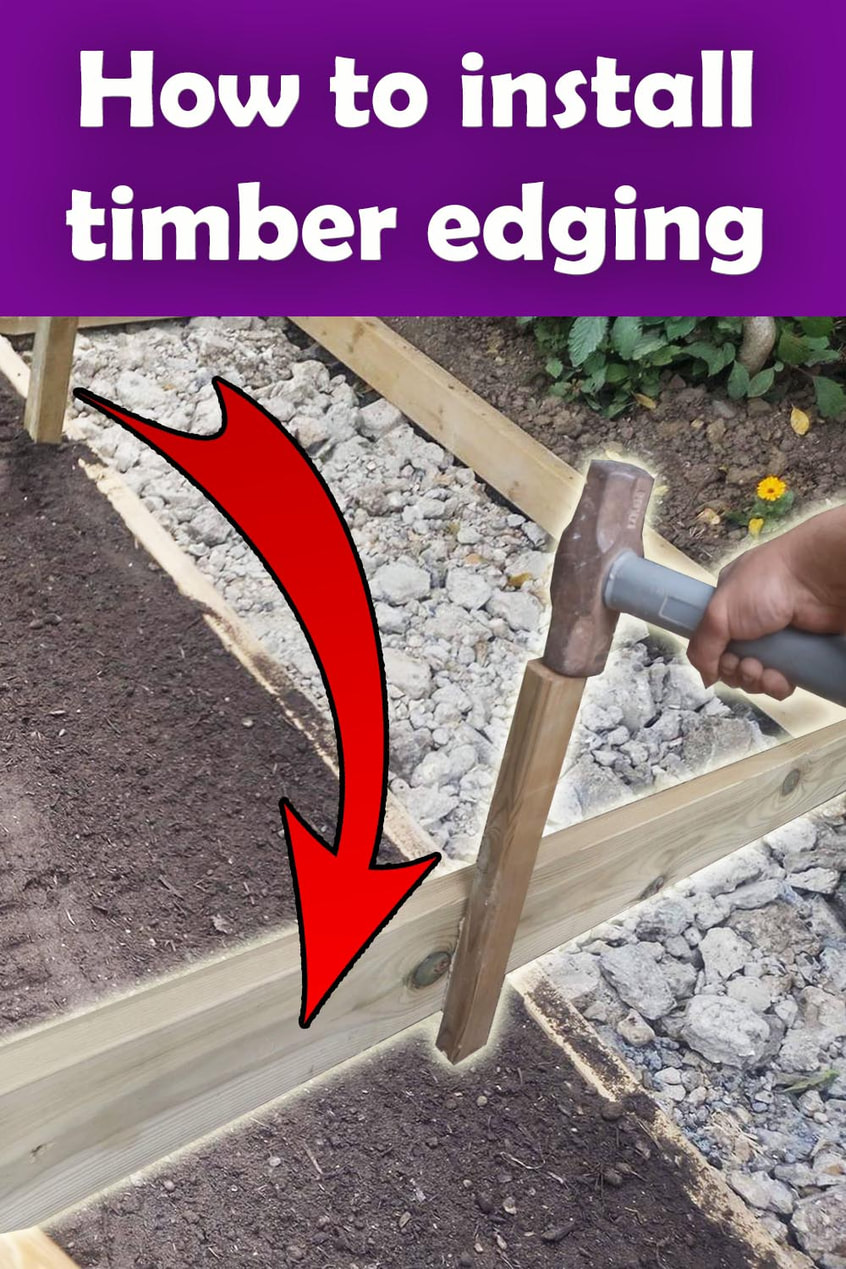
Step 5: Pegging & Fixing
Once your boards are in position, tap pegs vertically flush at the back of the timbers using a hammer. Tap the pegs until they are lower than the finished height of the straight edging. When you are happy with the board’s position fix them to the pegs using external grade screws. 
Step 6: Backfilling and levelling
When your edgings are fixed into position, backfill and level any loose soil around the timber edging. 
How to install curved timber garden edging
Tools you will need
Wood saw Spirit level String line Tape measure Hammer Power drill Drill bits Set square Spade Wheelbarrow Shopping list
150mm x 25mm treated timber gravel boards 50mm x 50mm treated timber pegs 80mm external grade screws Step 1: Marking outMark out where you want your curved timber edging to go. For delicate curves it is sometimes best to mark out shapes with a hose pipe first. When you are satisfied with the shape, mark out your edgings with a marker spray. Step 2: Working out levels
As timber boards are cut into straight lines you will want to keep the top of your edging flush. Consequently, it is a good idea to work out the level of your completed height. This can be achieved with a tight string line and timber pegs. Step 3: Excavation
Excavate a narrow channel along the route of your new timber edging. The excavation should be the perfect depth and width to sink the edging flush with the surrounding ground. 
Step 4: Setting your boards
To make your gravel boards bend as much as possible you can cut score lines across your boards. Cutting about a third to half way through every inch is enough to create very curvy boards. It is also easier to curve and bend gravel boards with a high moisture content. If your boards are very dry try to soak them in a deep barrel for 24 hours first. Place your boards into the excavation and bend them along your curved route. 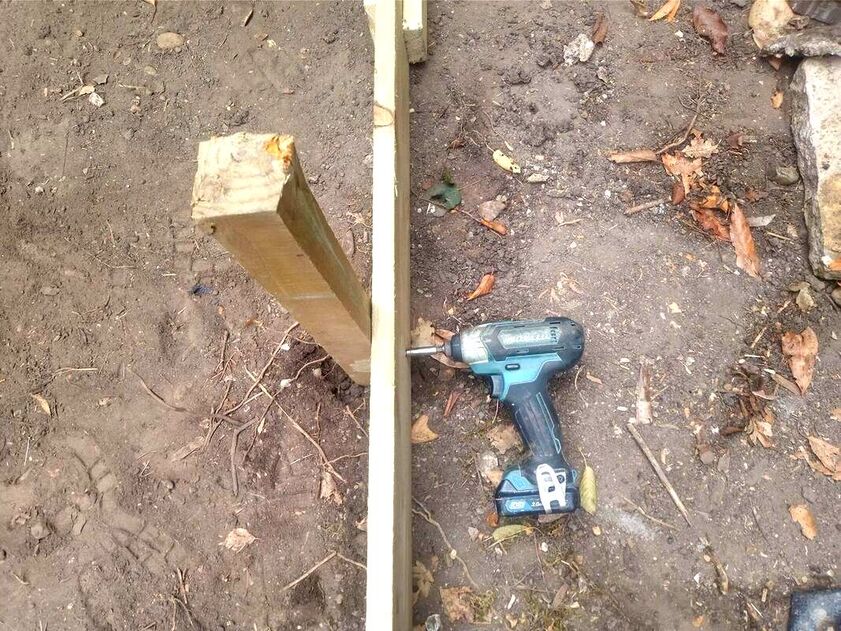
Step 5: Pegging & FixingOnce your boards are in position, tap pegs vertically flush at the back of the timbers using a hammer. Tap the pegs until they are lower than the finished height of the curved edging. When you are happy with the board’s position fix them to the pegs using external grade screws. 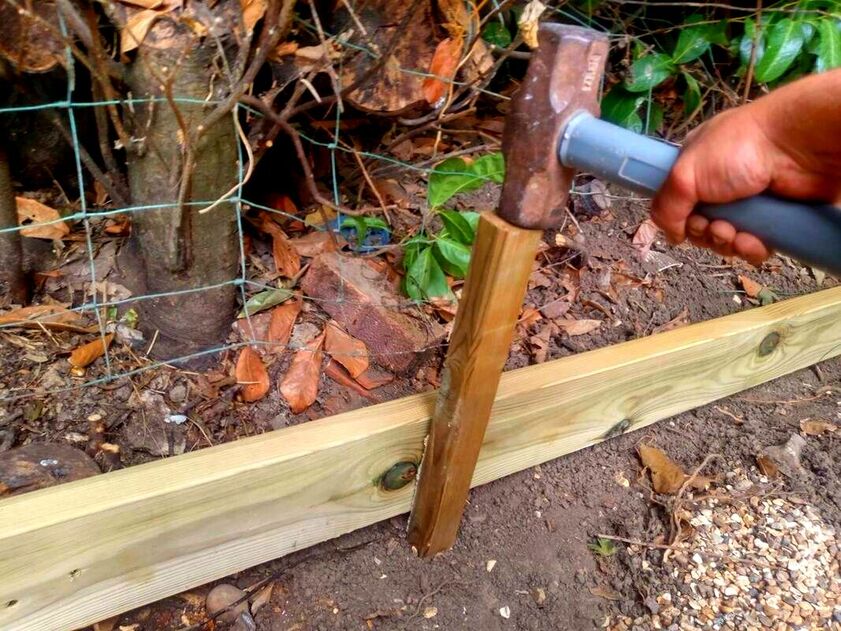
Step 6: Backfilling and levelling
When your edgings are fixed into position, backfill and level any loose soil around the timber edging.
FAQ about timber garden edging
How do you curve timber garden edging?
The best way to curve timber edging is by cutting multiple scores into the timber across the grain. Cut about half way into the boards every inch along its length, this will enable the boards more flexibility to form curves. It may also be a good idea to soak your timbers as they are easier to bend when wet. For curved timber edging it is best to use thin treated boards no more than an inch thick. Consequently, timber gravel boards are the best for making curved edging. 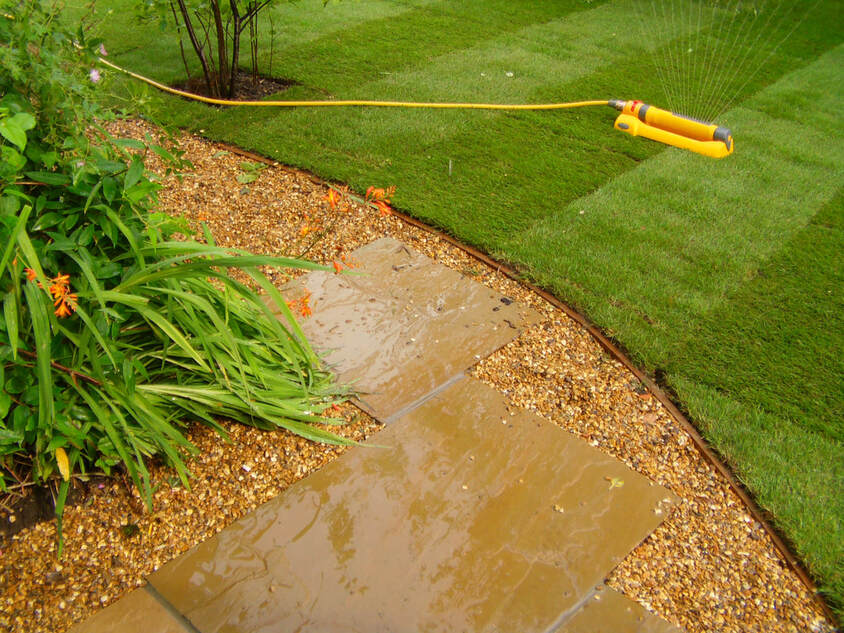
How do you fix timber garden edging?
The best way to fix timber garden edging is to timber pegs which have been tapped securely into the soil. Timber edging can then be screwed to the pegs using 75mm external grade screws.
How do you install timber garden edging on a slope?
For fixing timber edging on a slope there are two main options, run with the slope, or step down. Running with the slope means laying your edging on an angle going with the sloping ground. The draw back with this is edging can look uneven on undulating ground. The second method is to step and down on the slope. This involves keeping edging level across the top but stepping up and down with varying ground levels. What is the best wood for edging a lawn?Generally the best wood for edging lawns is dense, hardwood, timber or a treated soft wood. If you want flush lawn edgings or mow strips timber between 25mm and 50mm is ideal. For curvy timber edging gravel or decking boards are very effective. For straight lawn edging 6x2 treated timber is an effective choice. 
Thank you for reading our article on how to install timber edging. Below I will link to some of our other edging articles you may find useful.
'As an Amazon Associate I earn from qualifying purchases'

This article contains affiliate links
There is nothing more exciting than making a wildlife garden and watching wildlife move in!
Perhaps you're a nature lover and want to create a wildlife haven in your backyard. Or maybe a gardener that wants to create more ecological balance for a healthier environment. Whatever your motivations, I have compiled a list of 23 ways to make your wildlife garden as rich and diverse as possible. 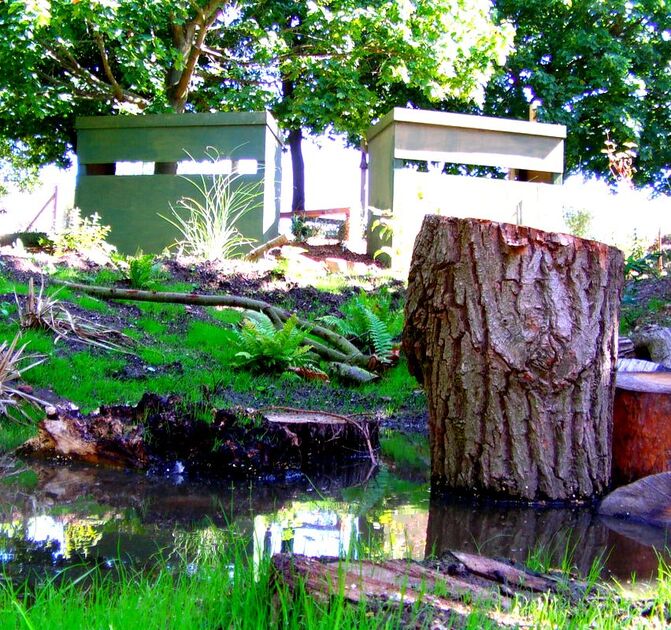
One of our school wildlife gardens in West London
From implementing rare habitats to harnessing microclimate and providing shelter, you'll find it in this article.
By creating your own wildlife sanctuary from this list you will not only be creating a great garden! You will also be playing an important role in local conservation. So let’s dive in and discover how to bring nature closer to your home with our top 23 ways to make a wildlife garden. 1. Native plantingThe interdependence of native flora and fauna was long misunderstood and underestimated. Local wildlife has evolved alongside local plants and soils for millennia in natural balance. This makes choosing native plants for your wildlife garden of upmost importance. Local wildflowers, shrubs and trees will provide the perfect habitat for creatures in your region. Don’t forget there are also some non native pants also great for wildlife too! 
2. Hibernacula’sHibernaculas are a collection of natural materials placed together to form nesting and shelter for garden wildlife. Layers of rocks, logs, vegetation and earth are piled up to provide cosy crevices for wildlife. Many small mammals, reptiles, amphibians and insects need such places to nest, breed and hide during the winter months. In the image below displays an example of a Hibernacula I built for a school wildlife garden in West London. 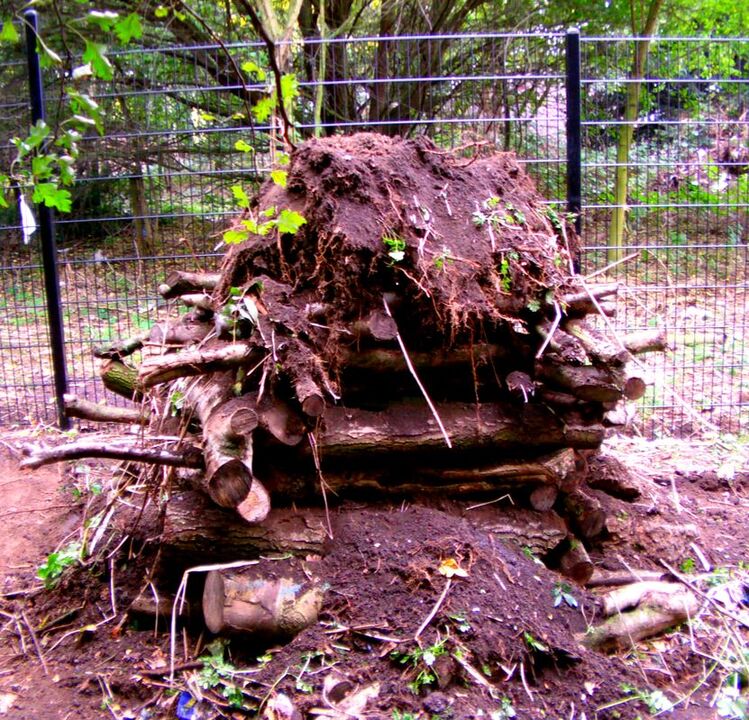
A Hibernacula at one of our school wildlife gardens
3. Fruit trees
Not only are fruit trees a great food resource, they are also extremely beneficial for wildlife. Being mainly smaller than most trees fruit trees are quite easy to plant in averaged sized gardens. As they blossom early during the spring, they produce lots of nectar for pollinators when winter reserves are depleted. During the summer and autumn they also provide a banquet for mammals and bird life. 
4. Plant diversity
Although it is good to have plenty of native plants in your garden diversity is key for wildlife. Try to incorporate many different types of beneficial plants in your garden. A greater diversity of plants will mean a greater diversity of wildlife. Choose plants with varying functions such as; fruits, pollen, nectar, shelter, transitions and enclosure. Remember there are some non-native plants great for wildlife such as 'Butterfly Bush!' 
5. Wildlife pondsWildlife ponds can really add an amazing boost to wildlife gardens! Not only do they provide a place for animals to drink they host a whole ecosystem of aquatic life. Some creatures require water to complete transitions within their lifecycles such as frogs and dragonflies. When it comes to wildlife ponds the larger the better however even a small pond will have a huge impact! 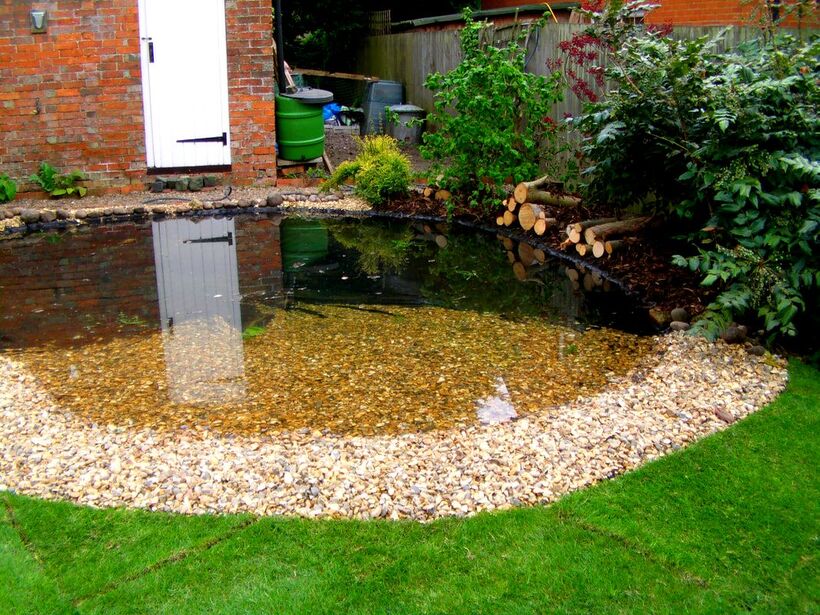
One of our wildlife ponds in Winslow Buckinghamshire
6. Evergreen shrubs
Although most deciduous trees and shrubs are beneficial to wildlife they can be very bare in winter. If your wildlife garden is devoid of vegetation during winter foraging animals may not feel as secure. This is especially so for birds and mammals trying to hide and feed during the leaner months. Evergreen shrubs can also provide some protection from cold and wet weather. 
7. Bird boxesBirds naturally prefer to nest in dense vegetation and high in trees where they are safe from predators. A dramatic decline in forests however has led to reduced nesting opportunities for birds. Bird boxes provide an inexpensive and fast way to create nesting opportunities for birds. Boxes come in a range of sizes and styles to suit various species. Make sure you position your box correctly to increase the change of local birds nesting. 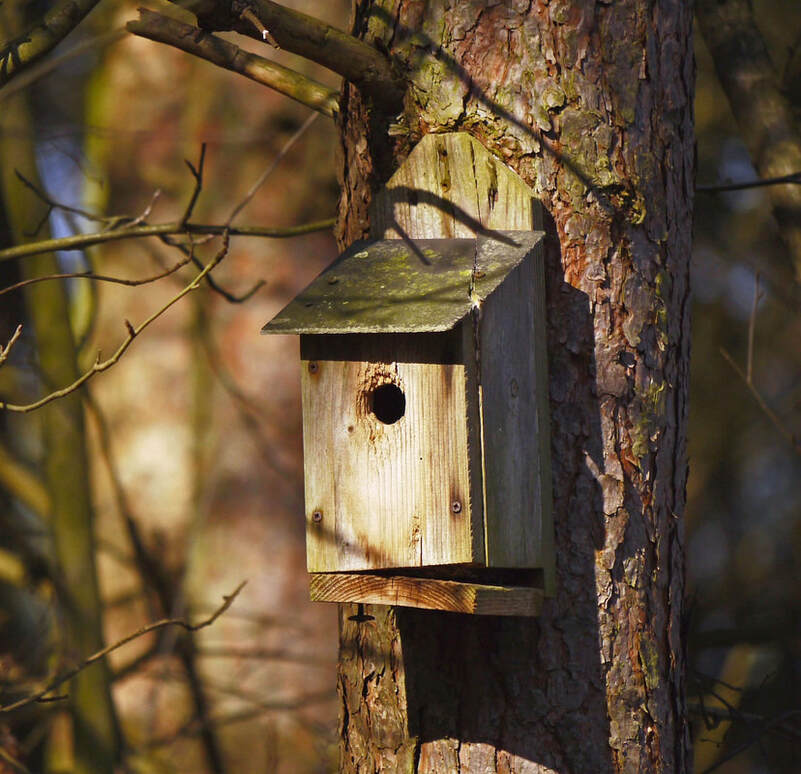
8. Mixed hedges
Hedges provide dense vegetation for garden birds to forage, feed and shelter. Hedgerows became extremely crucial habitats for wildlife after the felling of ancient woodland. Diverse and mixed hedges can include species providing a broad range of seeds, nuts and berries. Hedges also provide sheltered corridors where small creatures can travel safely and securely. Some suppliers sell native and mixed wildlife hedging specifically for wildlife projects. 
9. Wet soil
Wet soil and mud may not seem like a likely addition to a wildlife garden. However, such habitats do occur extensively in natural landscapes and its importance as a habitat is underestimated. Wet soil and mud is used by many species of solitary bees and birds for building nests. This naturally occurring building mortar can also cater to the life cycles of specialised insects. Seasonally flooding soil and bare earth is a recognised and important habitat for many species of insect and invertebrate. 
10. Fence openings
One of the biggest barriers wildlife gardens face is their potential isolation from other local habitats. This is not a problem for birds and insects but can be an issue for amphibians, reptiles and mammals. Therefore it is a good idea to create openings and tunnels under garden boundaries. This way, wild animals can have easy access to your wildlife garden. 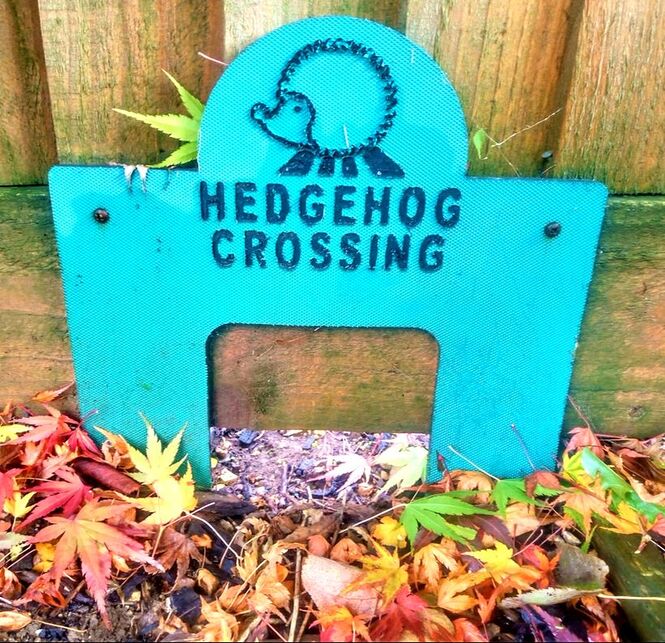
11. Standing dead wood
Standing deadwood is extremely common in ancient forests and wild woodlands. When trees die they degrade slowly while still standing amongst the canopy. As the wood softens it becomes an extremely rich habitat for hundreds of species. Birds nest within nooks and crannies while specialised insects, beetles and invertebrates feed upon decaying wood. 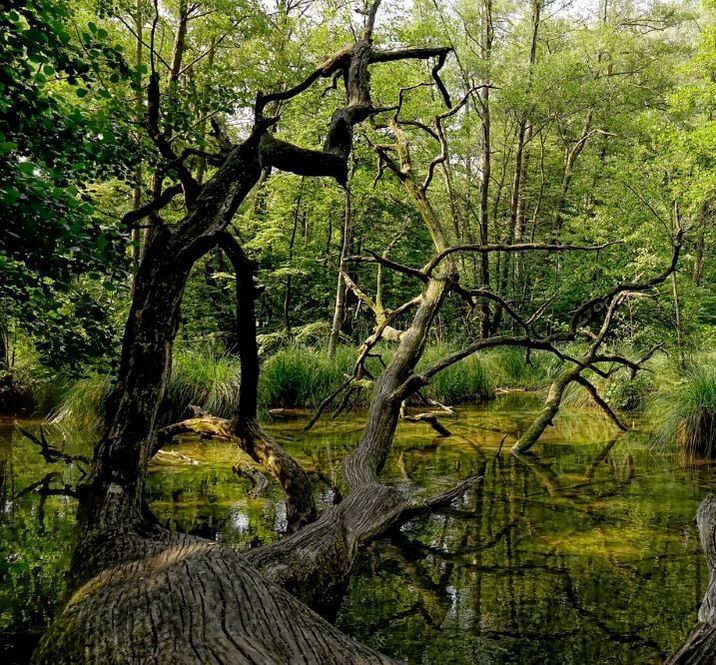
12. MulchesMulching is the application of well rotted organic material to the soils surface. This feeds the soil, keeps it moist as well as protecting it from extreme weather. Such an organic mulch layer is naturally occurring in many woodland habitats. This organic layer becomes a rich habitat for decomposers and soil ecosystems. This leads to more food and abundance higher up your wildlife gardens food chain. Mulches can be made from collected leaves or bought in the form of bark mulch. 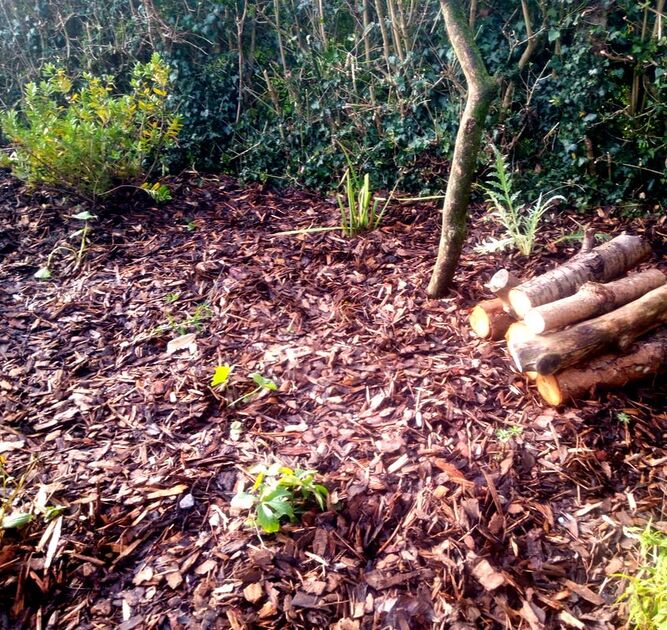
13. Insect hotels
Insect hotels are a collection of varying materials compiled together to create shelter and nesting opportunities for insects. These hotels come in a wide spectrum of different shapes and sizes. Many prefer to build their own custom insect hotels with waste materials. However, smaller insect hotels can also be bought online making a fun addition to wildlife projects. 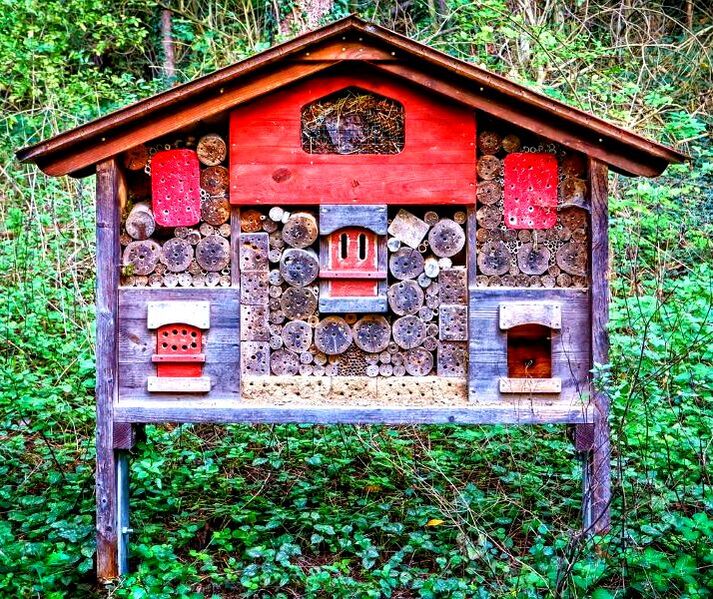
12. Bat boxes
Bats are incredibly beneficial flying mammals and extremely impressive to watch fly. Historically bats relied upon rocky crevices, caves and old trees to roost during the day. However when old forests were cleared bats numbers declined greatly. Due to modern development and a lack of habitat bats need all the help they can get. Bat boxes are a great way to provide the vital roosting they need. 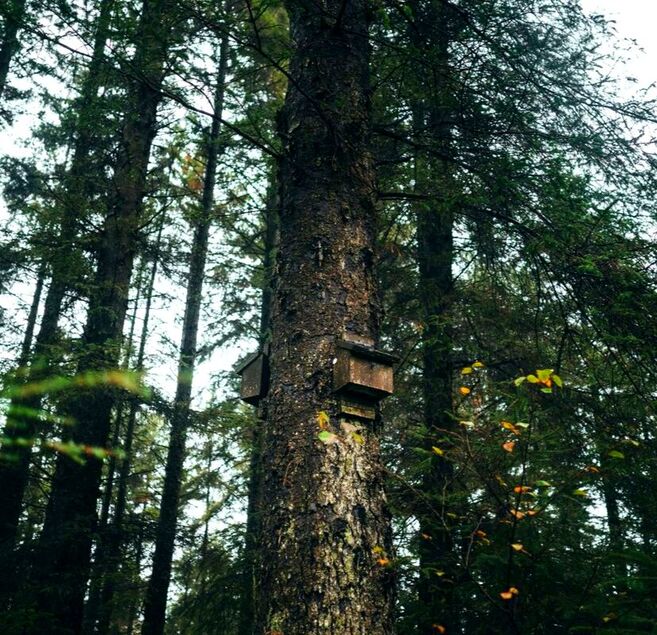
13. Feeding stations
Although wildlife gardens can produce a natural source of food adding feeding stations can really help certain species. This is especially so with certain species such as butterflies and birds! If there’s a specific species you want to encourage create a feeding station and provide its favourite food! 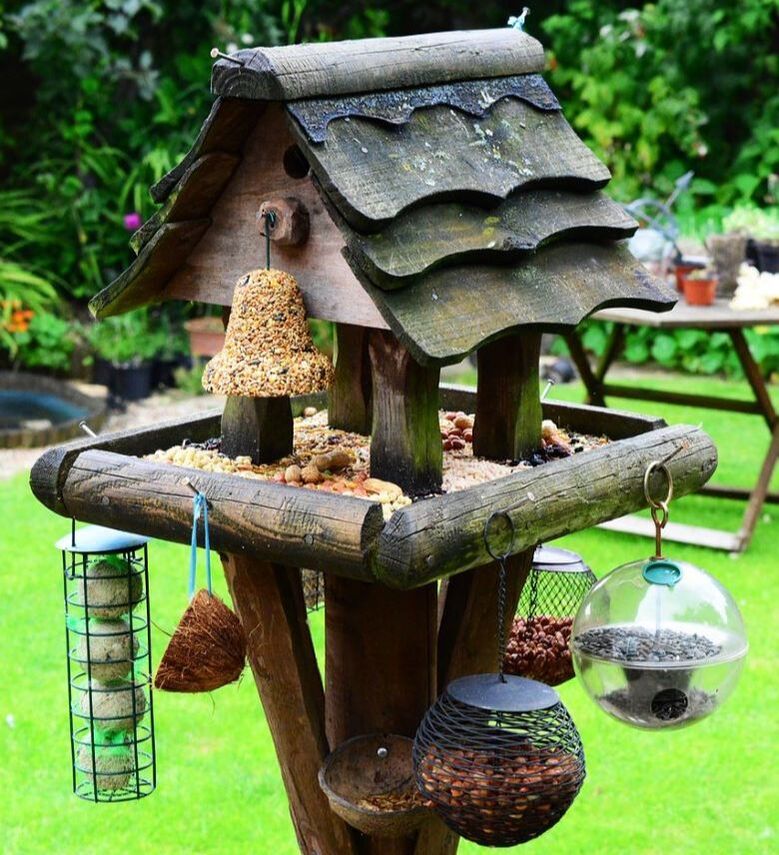
14. Ground cover planting
One of the most important planting types for wildlife gardens is groundcover planting. Groundcovers provide that dense vegetation for small creatures to pass through undetected. This is especially important for reptiles and amphibians which can fall victim to areal predators. Groundcovers such as Hypericum, Geranium, Aubretia and Bergenia are very effective in this regard. 
15. Dry stone walls
Dry stone walls are characteristic of many old, rural landscapes in the north and West of England. Dry stone walls not only look very attractive they create amazing habitats for wildlife. The cracks and crevices provide safe quarters for a wide range of species. During sunny weather rocks heat up allowing reptiles and butterflies to sunbathe. 
A York stone dry wall on one of our wildlife garden projects
16. Seasonal flowers & Fruits
One of the most important factors when planting a wildlife garden is seasonality. Rather than choosing flowers which only flower in summer, aim for more seasonal interest. There are many plants which offer flowers and fruits at different times of the year. This can not only provide more seasonal food for wildlife but a more exciting garden for you! 
17. Hedgehog homes
Hedgehogs are small, spiky mammals famous for their ability to roll into a perfect ball. Unfortunately hedgehog numbers have dramatically declined over the past few decades. This is mainly due to habitat loss and a lack of suitable nesting and hibernation sites. Hedgehog homes are a great way to provide these endangered creatures with the shelter they need. 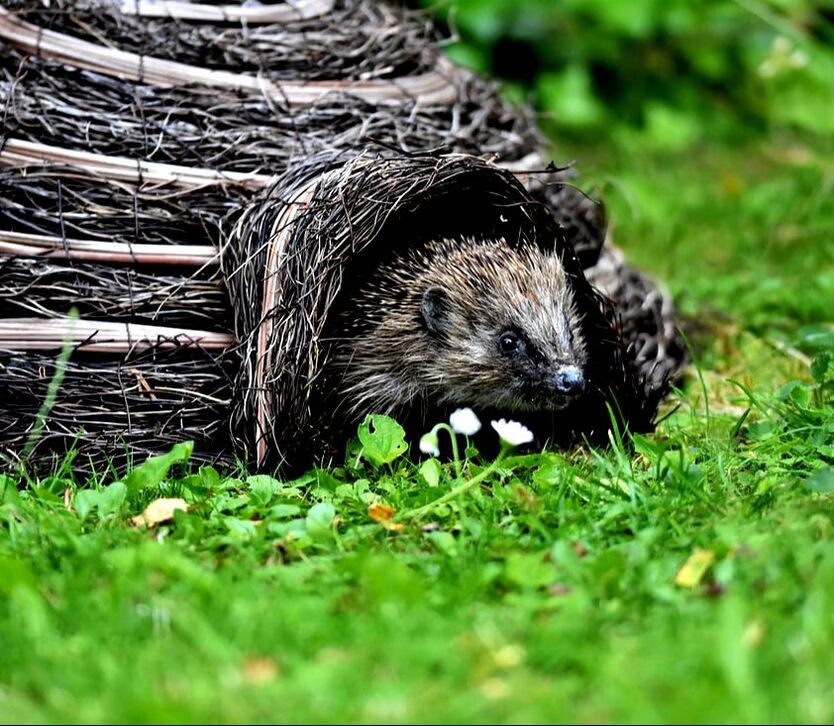
18. Compost heaps
Composting is a great way to recycle organic material within your backyard. However, compost heaps can also be a real benefit to certain types of wildlife. As organic material breaks down it produces lots of heat. This can provide warm and moist places for reptiles to hibernate and raise young. The diverse range of insects and invertebrates which feed upon composting material can provide food birds and mammals. 
19. Log piles
Log piles represent a very important habitat which has become increasing rare in recent times. Deadwood habitat was once common place within the landscape providing food and shelter for numerous creatures. Log piles can provide safe and secure places for wildlife to hide and feed. As logs break down over time they create food for decomposer species and help to enrich the soil. 
20. Man made burrows
One of the main threats to garden wildlife is household pets and predation. Therefore it is best to include as much security within your wildlife garden as possible. A great way to do this is by building man made burrows. These can be simple brick boxes buried within landform or retaining walls. Specific species can be encouraged by the size of entrance holes and cavities. Below is an example of a hedgehog burrow I built on one of my wildlife garden projects. 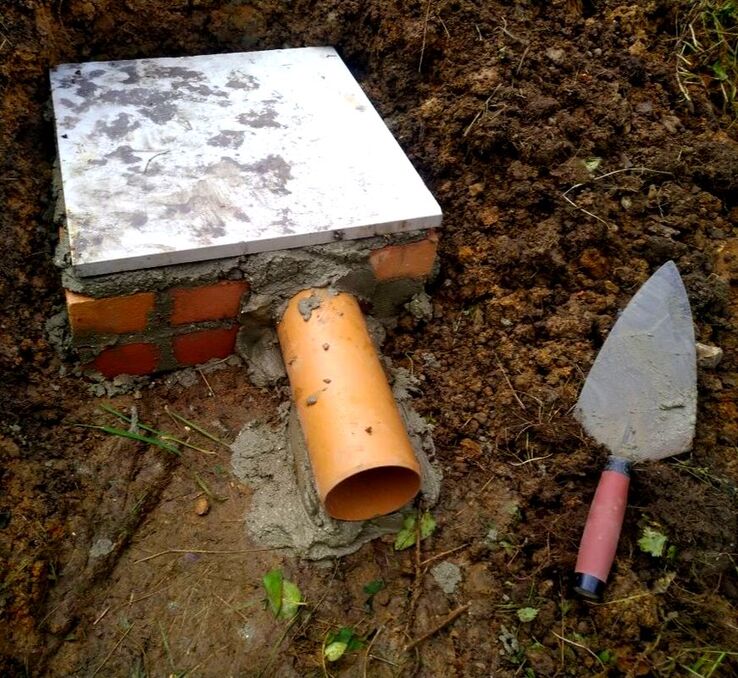
21. Wildflower meadows
Wildflower meadows were once a common feature across the rural landscape. These rich and diverse grasslands were grown annually and harvested to feed farm animals during the winter months. The dense tapestries of wild grasses and wildflowers provided a rich habitat for wildlife. The thick vegetation provided plenty of food and shelter for invertebrates, insects, reptiles, small mammals and birds. Consequently, creating a wildflower meadow in your own wildlife garden can be extremely beneficial to wildlife! 
22. Green roofs
Green roofs have become a great way to make use of otherwise disused roof space within urban areas. However such roof space can often be a missed opportunity within gardens. Sheds, storage units and garage roofs are perfect candidates to be fitted with green roofs in wildlife gardens. Such spaces encourage extra insect and bird life to your wildlife project. 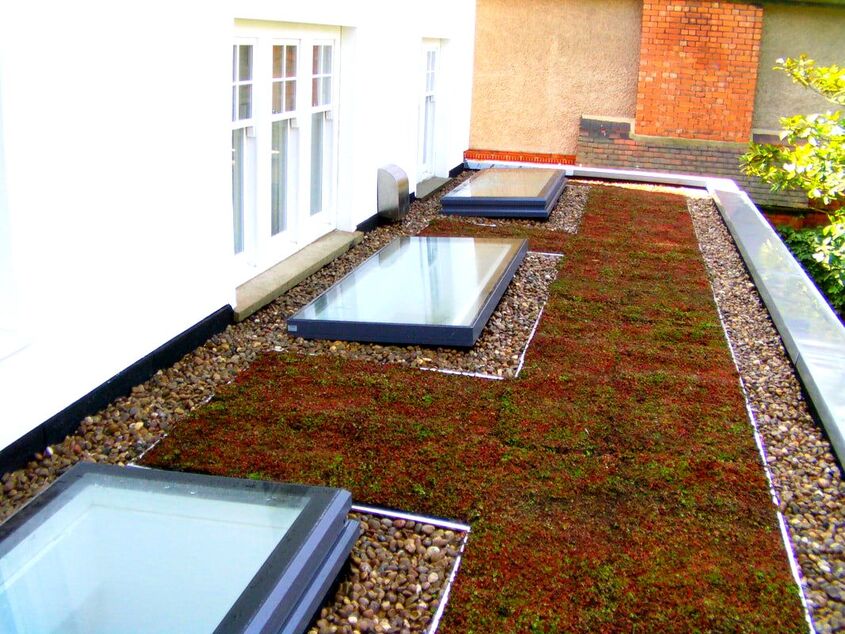
23. Wildlife hides
Wildlife hides are by no means an essential element of a wildlife garden. However, they can certainly become the most enjoyable element for people. It is always beneficial to have some separation between people and wildlife. This allows wild creatures to feel safer and secure when people are around. A well positioned hide can add some extra interest and some fun wildlife garden encounters too! 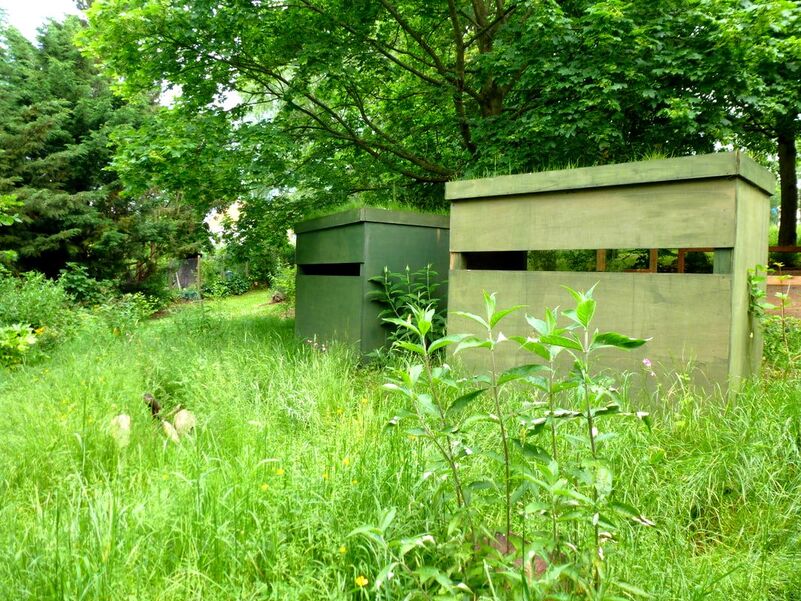
Thank you for visiting or article on essential elements when creating a wildlife garden.
Below I will link to some of your other wildlife garden articles you may find relevant. If you are interested in our Eco and wildlife garden design and build services contact us here.
'As an Amazon associate I earn from qualifying purchases'
This article contains affiliate links
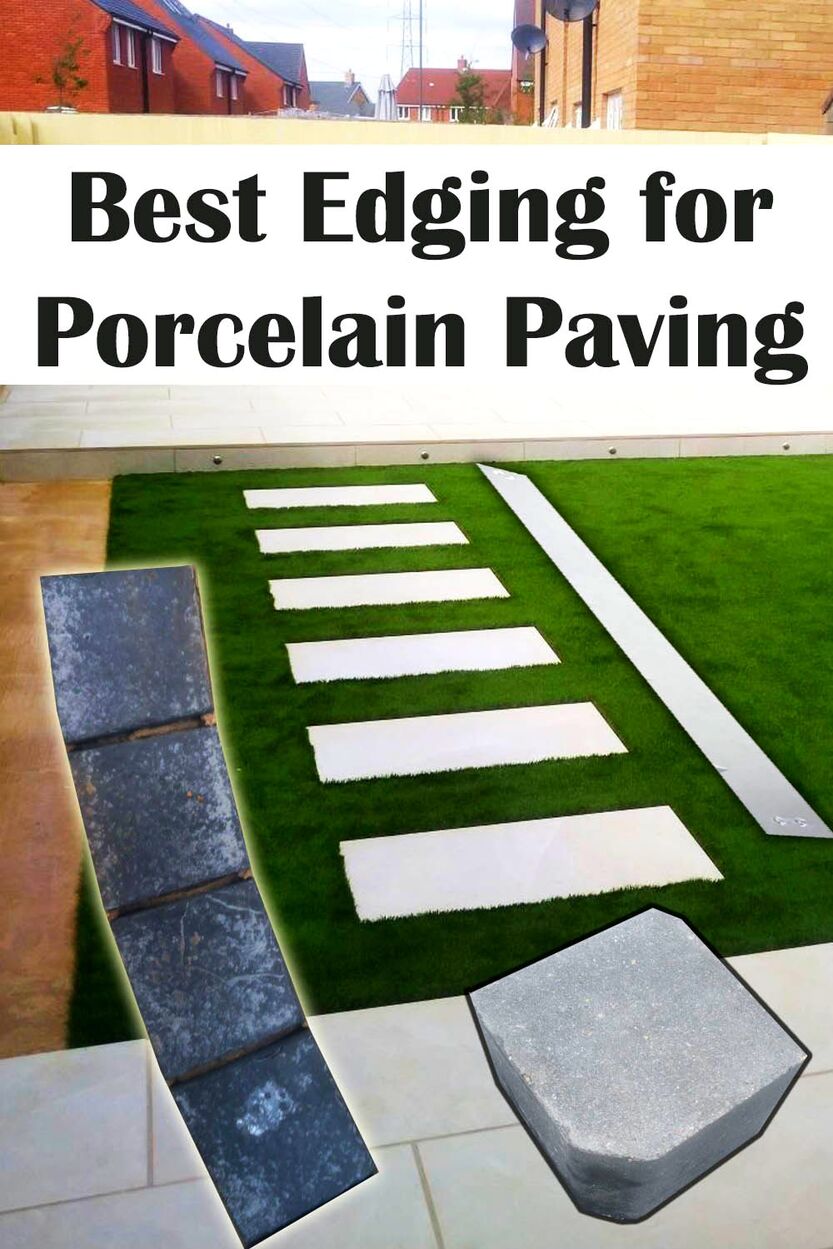
Porcelain paving has risen to become one of the most favourite paving materials in recent times.
With a love of the 'contemporary style' many have gravitated to the clean and sleek look of porcelain. However, porcelain paving does lend itself to visual separation and bold contrasts. Although clean and modern, large areas of porcelain paving can look plain and lifeless. Consequently, porcelain can benefit greatly from well conceived edging and border design. The best edgings for porcelain will frame and enhance its visual qualities while facilitating functional necessities. From creating bold borders of contrast to retaining borders, we have compiled 8 of the best edging materials for edging porcelain below. 7 of the Best edgings for porcelain Paving1. Contemporary block pavingBlock paving may not be the first idea when considering edgings for porcelain paving. Thought of as a 'standard paving product', more common block paving certainly would not be a good choice. With so many block paving products on the market however there are some options that can compliment porcelain paving. Blocks such as Marshalls Savannah charcoal linear and Marshalls Drivesett Argent are good examples of these. These block pavers can be laid to create impressive patterns, borders and edgings to porcelain paving. 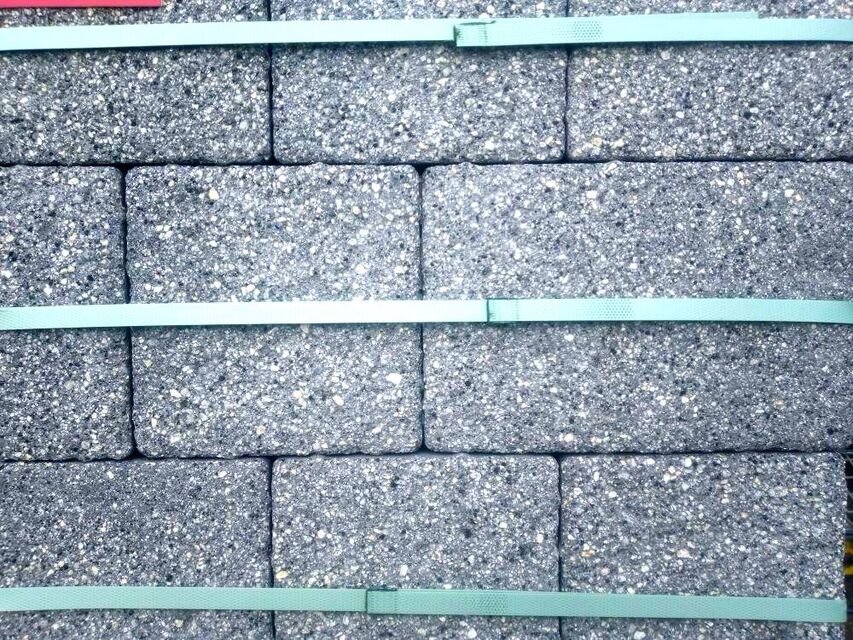
2. Kerb edgings
Kerb edgings come in a wide variety of products shapes and styles many of which are extremely versatile. Most edging kerbstones on the market are designed to integrate into driveway projects. Made of precast concrete many kerbs range from brindle to light greys and charcoal tones. Particularly charcoal kerbs can make excellent edgings for porcelain including retaining features such as steps and borders. A good example would be Bretts Drivestyle Kerb edging blocks but there are many similar ranges on the market. 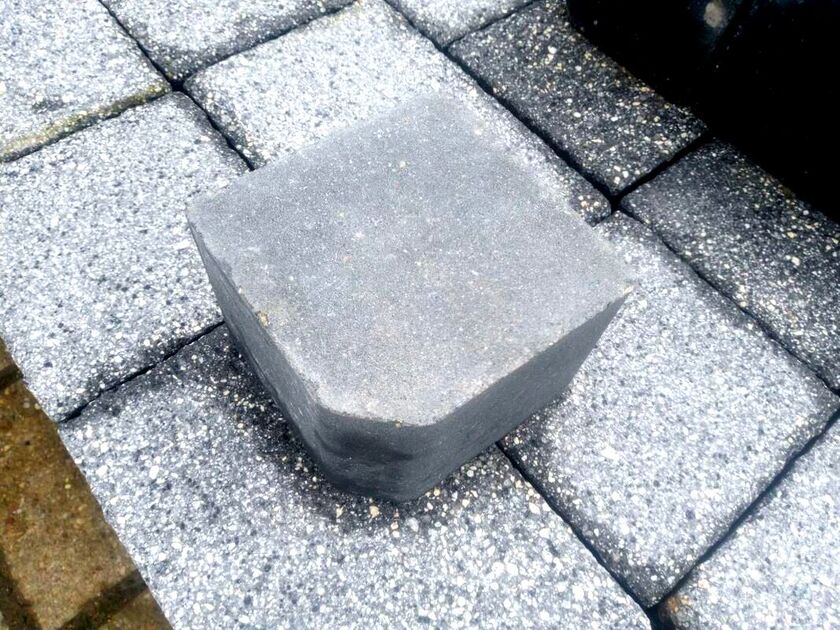
3. Granite sets
Granite setts have always been a timeless commodity in hardscaping of all types and styles. These cubes of granite are extremely durable and hardwearing, perfect outdoor conditions. Such attributes have meant granite setts have been utilised for surfacing for hundreds of years. It is ironic they visually work very well within modern garden and patio design. With their rustic surface they can create the perfect contrasting border to light coloured porcelain. Their bulk means they are also suitable for edging raised borders and level changes. 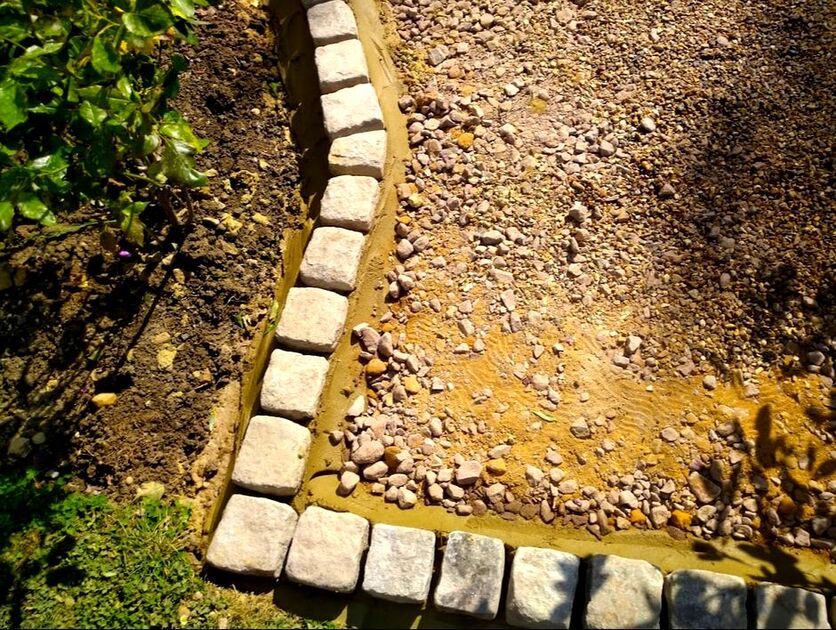
4. Black slate
Slate as a natural stone has many similar qualities of porcelain paving which is manmade. Like slate, porcelain has a smooth and clean finish which works well with contemporary patios. Very often porcelain is manufactured to look natural with natural riven patterns within the surface. As slate regularly contains such patterns these two paving products generally work well together. This is particularly the case where black slate is used as border edgings to lighter coloured porcelain products. Black slate can be cut into sett or block shapes to create the perfect edging for porcelain paths and patios. 
5. Blue engineering bricksBlue engineering bricks are very well known being typical construction materials. These dark blue, purple bricks are almost black in colour making them perfect for creating contrasts against lighter materials. Fired at very high temperatures the silica within the brick becomes glazed like a tile. Such qualities mean they are extremely impervious and resistant to weather penetration. This makes them suitable for creating bold and contemporary modern looking edging borders to porcelain paving. Being a dense brick they can also be used to form retaining edgings to walls borders and steps. 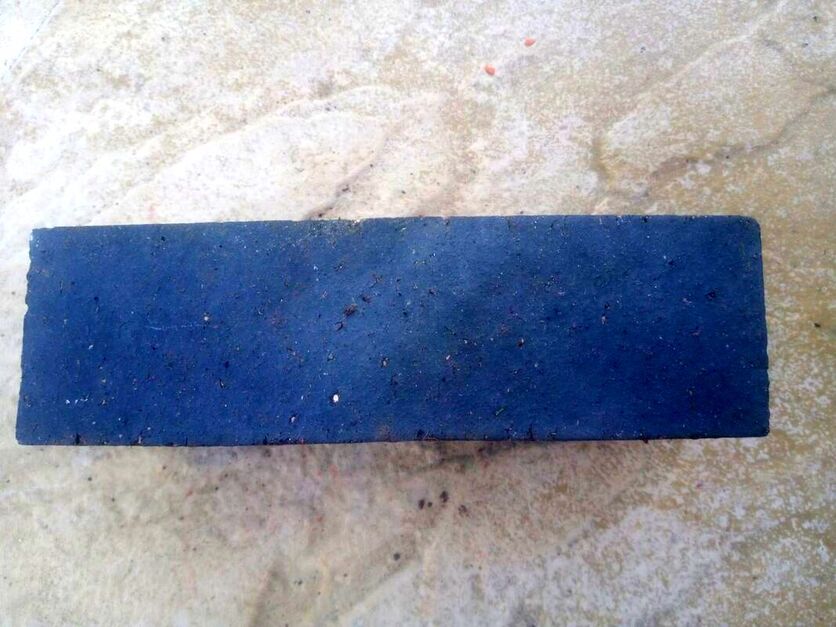
6. Rendered block
When it comes to raised edgings for porcelain, rendered, concrete, block has always been a versatile option. Firstly concrete blocks can be laid to almost any shape or configuration a design dictates. Concrete blocks are also extremely dense and hard wearing making them perfect for outdoor construction. When rendered well, concrete blocks take on a clean and contemporary look with a finely coarse texture. Render can then be painted to any colour desired! A typical choice is rendered block painted white or grey to compliment either dark grey or lighter tones of porcelain. Rendered block is a very effective raised edging to borders, steps and walls around porcelain paving. 
7. Stack claddingStack cladding is a relatively new product which is loved for its coarse visual texture and contemporary feel. Although technically not an edging product they can be installed as edging if they are fixed to a parent material. They are designed to be clad onto masonry, brick with concrete block being the most obvious host. This means stack cladding can make an effective and modern looking edging to porcelain paving. This cladding can be fixed to all vertical surfaces within a gardens design including beds, borders and walls. Stack cladding provides the perfect contrast both in colour and texture to the smooth and clean lines of porcelain. 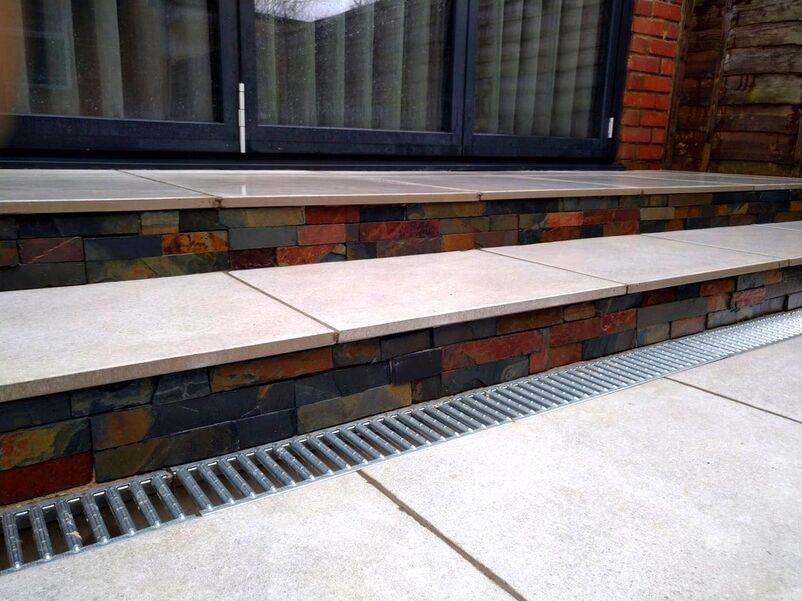
Thank you for visiting our article on the best edging materials for porcelain paving. Below I will link to some other articles you may also find useful.
'As an Amazon associate I earn from qualifying purchases'
This article contains affiliate links
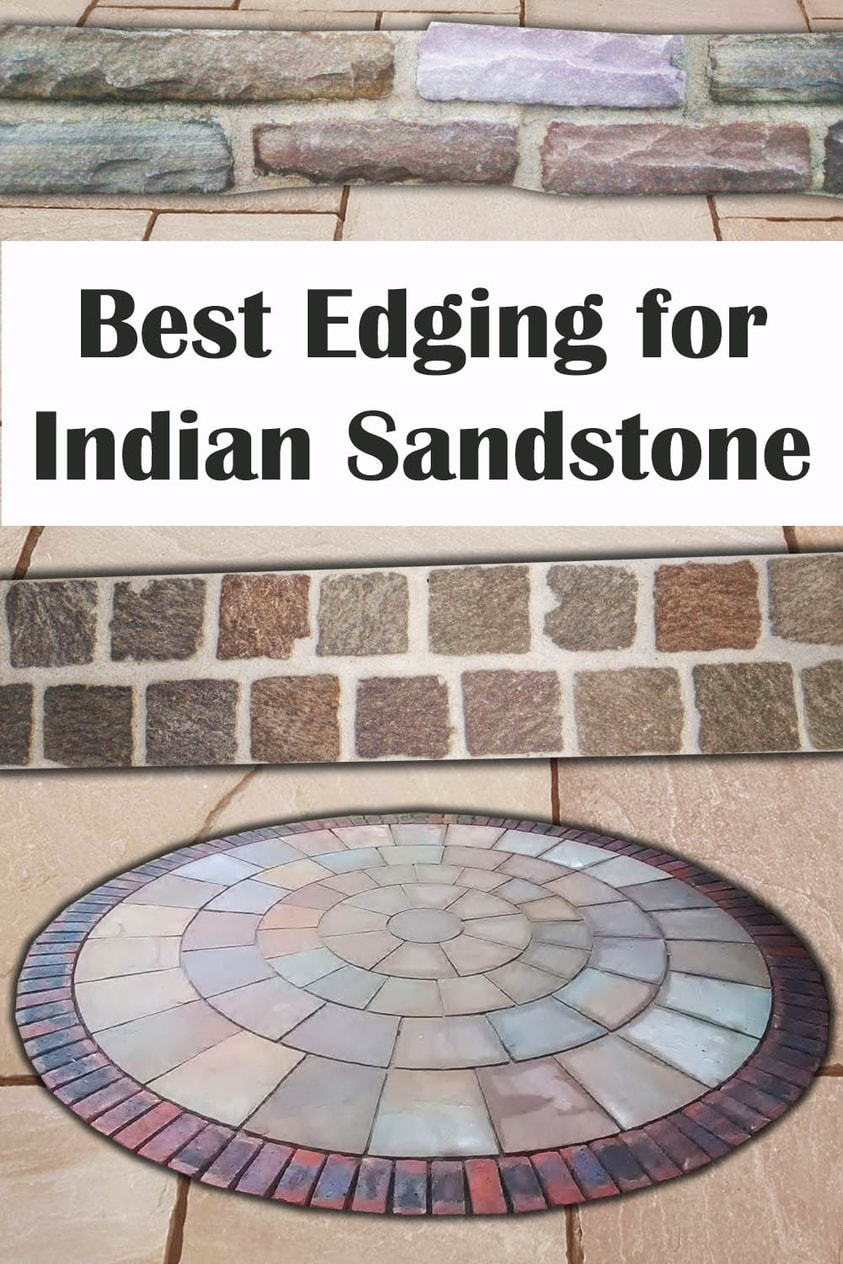
Indian sandstone has grown to become one of the most popular paving materials across the country.
Not only is this natural stone full of interesting colours textures and styles it is also very affordable! As well as interesting colour variations there are also occasionally fossils of prehistoric plants and animals present. Identifying the best edging for your Indian sandstone however can often be challenging. As Indian sandstone comes in various colour tones it can be troublesome visually matching to surrounding elements. The correct border or edging material for Indian sandstone can substantially boost its appearance. Consequently in this article I will list and summarise the top 7 edging choices for Indian sandstone paving. Design
The raw aesthetics of Indian sandstone has great appeal however appropriate edgings can help frame paving and provide bold contrasts. Very often, paving materials become less impactful over larger spaces. Consequently strong edges and borders can add visual interest and increase a designs impact. The natural colour and texture of Indian sandstone has found it easy to adapt to so many garden styles. In the UK, Indian sandstone has provided an affordable ‘look alike’ option to the once popular York stone. 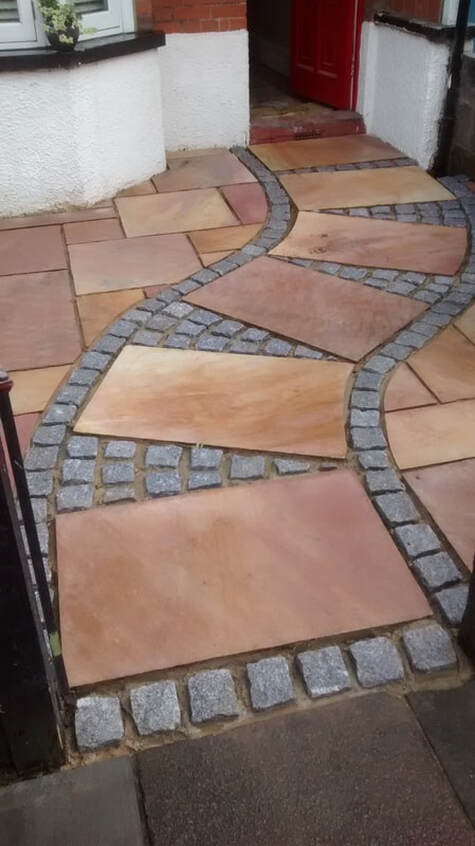
This means Indian sandstone fits in well with the colours of existing buildings and garden themes.
Please find the list of our top 7 edging materials for Indian sandstone below. The edgings listed below work the best with the more typical cream, yellow, orange and brown Indian sandstones. If you are laying more modern looking grey sandstone you may want to visit our slate edging article. You may find some of the edging materials featured there more effective for grey Indian sandstone. Best edging for Indian sandstone PavingKerb edgings
There is now a multitude of different kerb edging stones available on the market. Many kerb edgings make perfect borders to Indian sandstone paths and patios. For flush edging borders and flat edgings consider certain types of rustic block paving. Some of these include drivesett, slimset and Tegula block pavers. For more substantial, retaining edging, kerbs designed to accompany block paving are effective. Rustic kerbs such as Alpha Antique are an effective choice as well as other rustic bull nose and chamfered kerbs. I find the best colours to accompany block paving are autumn tones, brindle and light grey. 
Indian sandstone setts
Indian sandstone setts are robust cubes of Indian sandstone cut at around 100mm cubed. These are effectively the Indian sandstone version of granite setts. Like granite setts their generous size and weight allow them to form robust borders around patios and pathways. These can be raised higher than the paving itself creating a separation barrier to other surfaces. Indian sandstone setts can also provide retaining edges to flower borders and gravel paths. When laid in a double row the setts can make perfect edging borders for Indian sandstone patios. The setts can also be laid inside the paving itself like in our example project below. 
Rustic yellow bricks
Most Indian sandstones come in buff, cream and brown tones making yellow colours match in well. Consequently rustic yellow bricks can make extremely effective edging for Indian sandstone paving. Bricks such as New Stocks, Sevenoaks Yellows and Thames Yellows are perfect for such edging. With their slightly bowed shape and black speckling they provide a good compliment to the earthy tones of Indian sandstone. Alternatively, for more rusticity, an older reclaimed London stock may be best. These bricks were made during the Victorian era by hand, mostly with child labour! Each brick is effectively an antique with plenty of imperfections and character. 
Rustic red & purple bricks
Rustic red, purple and multi tonal bricks are perfect for edging Indian sandstone. There dark contrasts to the lighter paving make them perfect for bold borders and retaining edges. The multi-tonal red and purple shades match well with the colour variations within the sandstone. These bricks typically have speckles blotches which form during the intense heat of the firing process. These imperfections create real character and a rustic visual texture which matches Indian sandstone well. Typical examples of these bricks include; Ashdowns, Chaileys and Red Multi Stocks. Such bricks are manufactured to withstand outdoor conditions and are extremely robust. These bricks can be used to build steps, walls and raised beds integrating paving into a broader garden theme. 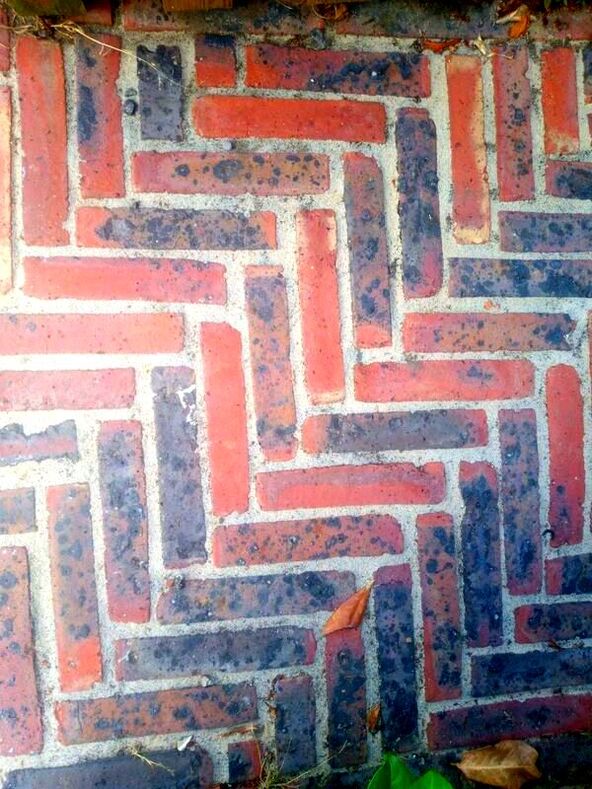
Rendered block
Indian sandstone has a natural ability to match with many different materials and landscape styles. For example, rendered block is often thought of a more contemporary finish with a contemporary feel. However concrete blocks with smooth, cement render work very effectively with Indian sandstone. Although its use as edging is limited to raised or retaining edgings it can provide a very clean look. When painted light cream or white rendered block makes the perfect raised edging to a patio or path. A good example of this is one of our past projects featured below. Concrete block is a very versatile and affordable building material. This makes it easy to implement to any wall, raised bed or other vertical structure within your garden design. 
Natural stone cladding
Many would not associate stone cladding as edging for patios, however it can be implemented for such a purpose. Natural stone cladding such as dry wall sandstone cladding can be very effective with Indian sandstone. This is especially so in rustic garden designs such as cottage, Tuscan and Mediterranean gardens. Typically the cladding will need to be bonded to brickwork or retaining concrete edges. However such cladding can be mortared flush around the outside of the paving. As with other retaining features clad surfaces can run throughout a landscapes broader design. 
Timber edging
Timber edging is not always thought of as the best edging for paving due to its tendency to expand and degrade. However, timber has a natural aesthetic which works extremely well with Indian sandstone. Its natural shades and tones blend easily with the stone but at the same time bring a softer feel. The most typical timber product for edging Indian sandstone is sleepers. Sleepers are long and robust sections of timber commonly used in landscaping. Originally used to base railway lines, sleeper dimensions are normally 2.4m x 200mm x 100mm. The sleepers can be concreted in around the base of paving to create a retaining edge. This can be observed in our example project featured below. They can also be used to build retaining walls and raised beds around paths and patios. 
Thank you for reading our article on the best edging for Indian Sandstone paving. Below I will link to some other articles you may find relevant.
'As an Amazon Associate I earn from qualifying purchases'

This article contains affiliate links
Over the past couple of decades slate has become a favourite and valued natural stone for paving and patio projects.
Its sleek aesthetics and radiant tones make it perfect for both contemporary and traditional garden styles alike. As slate has a dense structure it can be worked to numerous different grades and finishes. Its dense structure and impervious nature has made it perfect for external construction. With its typical Grey, Black, Blue and green tones slate can pack a visual punch to any garden surface. Finding the best edging for slate however is not always an easy task! Slates bold tones and smooth surface can make it challenging to pair with the best edging partner. In this article I identify and summarise 7 of the best edging materials for slate paving and patios. Design
Patio and walkways are an important part of our properties surroundings. Our external surfaces are an extension of our daily lives and the design of such should be carefully considered. Historically slate has been a contextual paving material featuring in areas with local slate deposits. This is why many rural homes in mountainous regions use slate as a paving and edging material. However many of these gardens have a traditional feel paying testament to slates versatility. 
During present times however slate is often associated with more contemporary gardens.
This is due to slates neutral colours, clean lines and smooth surfaces. Consequently some of the best edging for slate paving compliment its aesthetics while also providing some contrast. This is why smooth materials with light colours generally work well with slate paving. Below I list the 7 best edging materials which visually work well with slate paving. 7 Best edging materials for Slate Paving1. Kerb edgings
Kerb edgings come in an extensive range of edging products and styles. Precast kerb edgings like slate are well known for their durability and longevity. As concrete naturally has a light grey tone and smooth texture it can make the perfect accompaniment to slate. One of the biggest advantages of edging slate with concrete kerbs is they can act as a retaining feature. 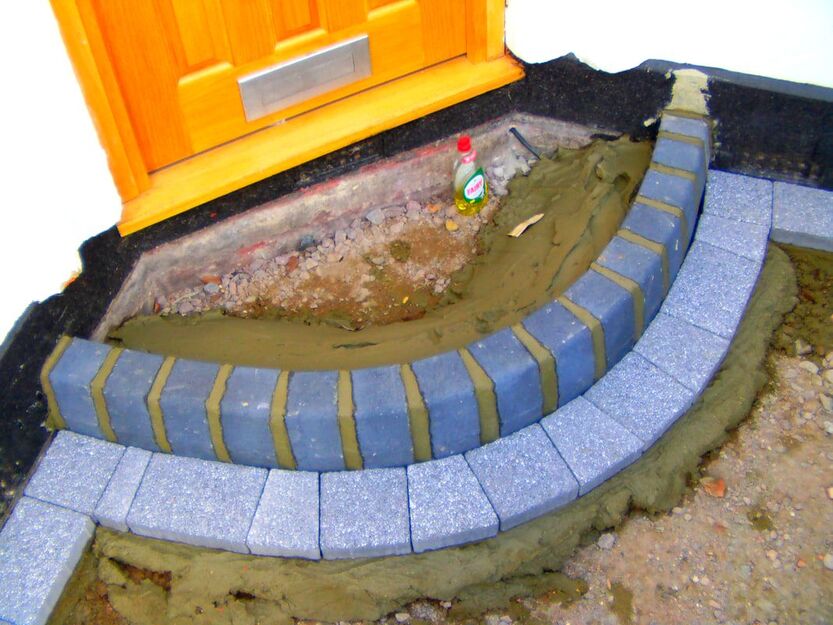
For example, larger kerbs can be utilised to retain soil back from raised borders keeping surfaces clean. Path edging kerbs such as PC edgings can help retain slate walkways and patios especially upon sloping ground. As Kerb edgings are designed to take knocks and heavy loads they can protect slate paving from chipping and fractures. 2. Granite sets
Despite being two completely different types of natural stone, granite and slate visually work very well together. Granite surfaces are speckled with different crystal formations containing blotches of black, white, pink and grey. This gives them a coarse visual texture which works extremely well with slates smooth and riven surface. Like slate, granite does come in a variety of colours which can be matched to different slate varieties. 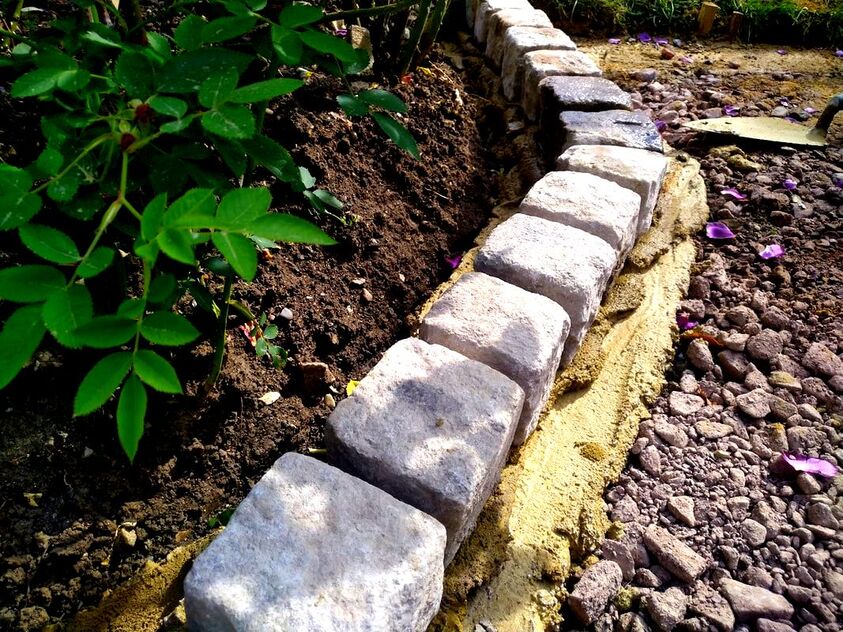
Generally the light tones of traditionally grey granite sets work a great contrast against darker tone slate paving. Like concrete kerbs granite setts are extremely robust and hard wearing. These 100mm cubes of stone can withstand extremely heavy loads and hard impacts. This makes them a rustic but sophisticated edging for slate paths and patios. 3. White glazed bricks
Many designers believe the best way to appreciate a material fully is to create contrast. By edging dark coloured slate with white glazed bricks you can create such a dramatic effect. These bricks bring a purity and elegance to any garden design and are also extremely versatile. White glazed bricks can easily fit in to any themed garden such as cottage, Victorian and modern to name a few. 
This makes contrasting white glazed bricks with slate paving a visual recipe for success. The extra benefit of utilising bricks is they can be laid as edging in a wide variety of ways. Bricks can be laid as retaining edging to hold back soil and other materials. This enables you the ability to run a consistent theme throughout your landscaping. Due to their impermeable qualities glazed bricks are extremely weather resistant helping them to look pristine for decades. 4. PorcelainLight coloured porcelain can make the perfect accompaniment to slate paving in a variety of contexts. Not only can you create border edging, you can also integrate patterns into slate paving by utilising porcelain. As well as buying porcelain edgings you can also cut porcelain pavers into setts and strips for versatile edgings. Like slate, porcelain is incredibly durable and can withstand everything the outside has to throw at it. This means its great colours and manmade features will not fade over time. 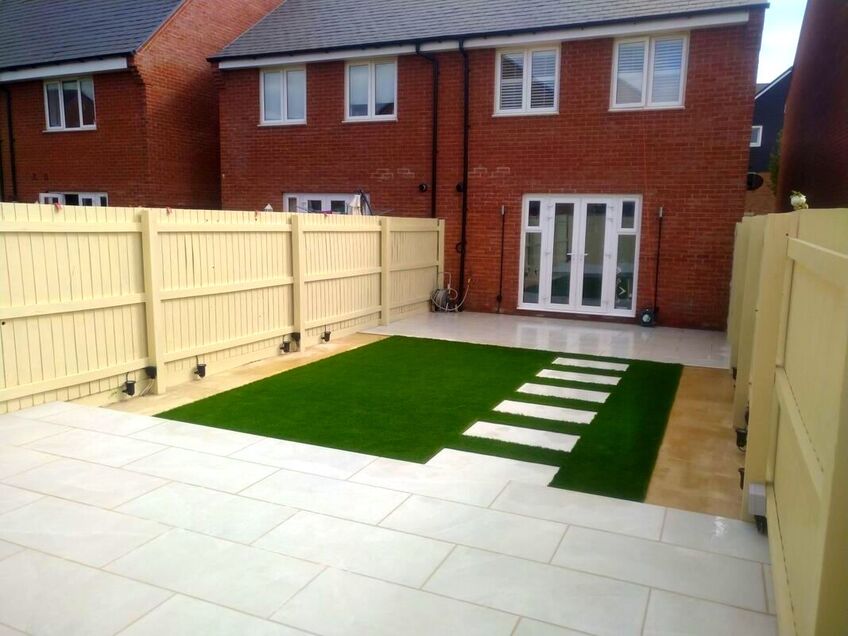
Light coloured slate comes in a range of shades, finishes and textures which will compliment any type of slate paving. Furthermore, porcelain paving is often made to replicate natural paving. Consequently, porcelain can seamlessly blend with any grade of slate including honed, textured or chiselled. Porcelain can also act as retaining edgings with many kerbs, setts and blocks entering the market. 5. Blue engineering bricksBlue engineering bricks are well regarded within the construction industry for their unparalleled durability and impervious nature. Not only are they robust to weather outdoor conditions they also look very attractive. Their dark blue colour works very well with dark natural stones such as slate. This makes blue engineering bricks a great edging choice for slate paving. Dark slates such as black, blue and purple paving slabs work particularly well. 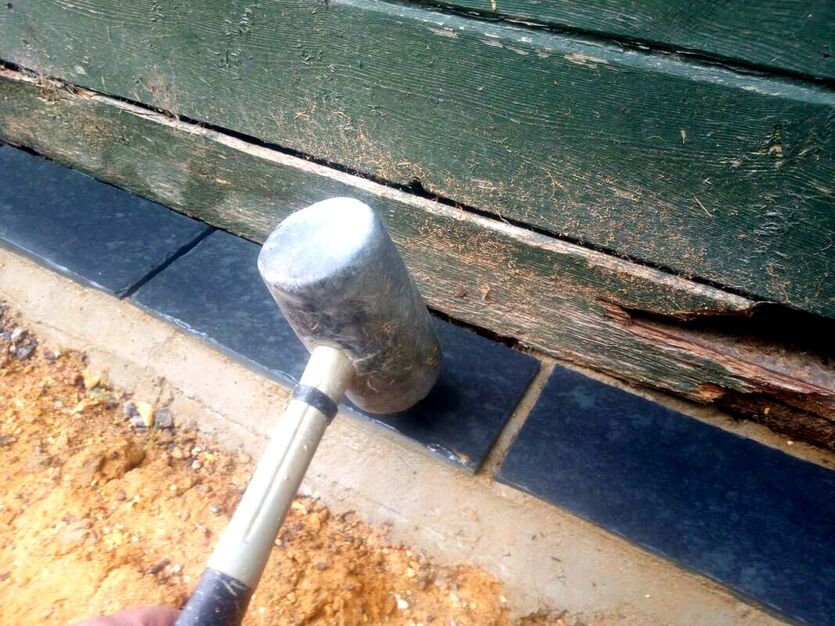
Their typical edging application for slate paving is a double soldier course bordering lawns and flower borders. As a versatile construction unit engineering bricks can be used to edge slate steps and other retaining features. Blue engineering bricks are also effective for building raised beds and garden walls to match slate patios and pathways. These can then be capped with copings made from the exact slate paving. This makes blue engineering bricks a very comprehensive material for edging slate paving. 6. Rendered blockRendered concrete blocks can become an effective low edging or retaining edge to slate paving. The fine but coarse texture of the render provides a satisfying contrast when positioned around slate surfaces. Rendered concrete block looks even more effective when it is painted light tones of cream and white. As already mentioned concrete has a high compressive strength and durability. This means it is very suitable for adding protective borders and edgings to natural stone paving. 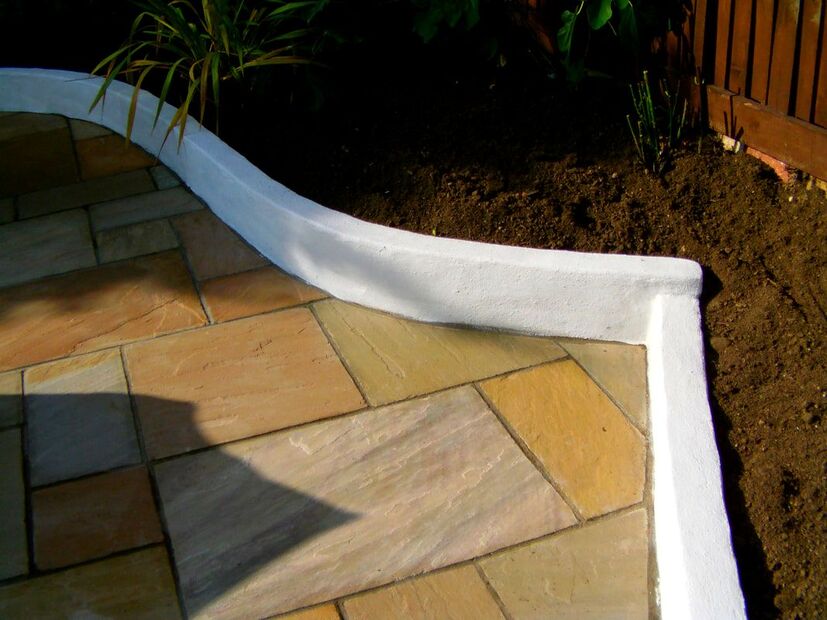
With a good quality weather resistant render concrete blocks are resilient as much as they are versatile. The great thing about concrete block is they can be laid to any shape or form. This makes it easy to incorporate them into any design or specification. Like in the image above they make very effective low wall edging to patios and flower borders. These can look even more appealing capped with slate copings to match the paving below. 7. Porcelain stack claddingMore of a cladding material than an actual edging stack cladding can be installed to any concrete or stone surface. This means it can provide a new aesthetic to any concrete, block, brick or existing kerb edging. The stacked arrangement of this cladding means it provides a dramatic visual texture to vertical features. This can also include retaining edging including low walls and borders. Porcelain stack cladding works very well with slate! The cladding itself is made up of small sections of fragmented looking porcelain. It offers a contemporary feel and a bold contrast to black slate in particular. 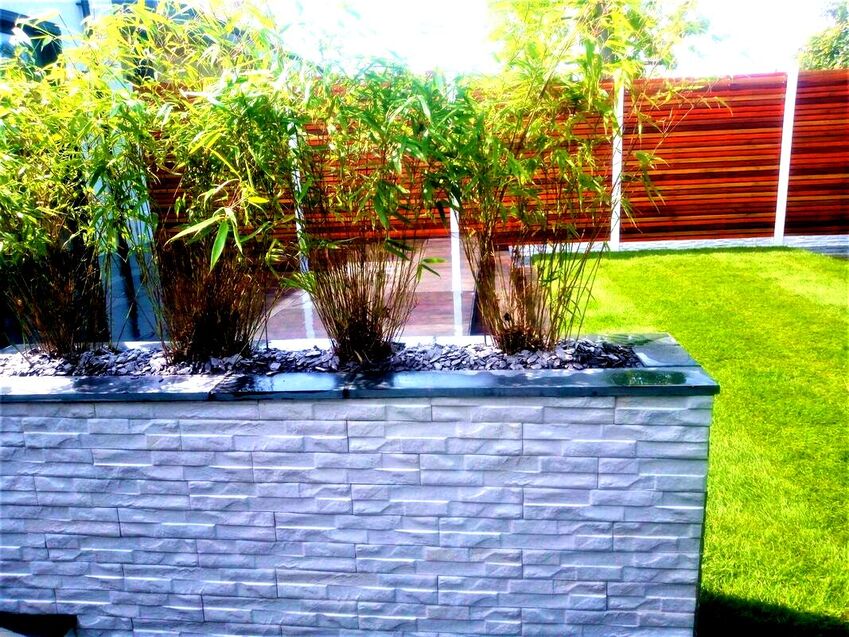
The best way to utilise stack clacking as edging for sate is by cladding kerb edgings and concrete blocks. For flush edgings they can be set into strong mortar or fixed to concrete with external adhesive.
Thank you for reading our article on the best edging for slate paving and pathways. Below I have attached some more articles you may find helpful.
'As an Amazon Associate I earn from qualifying purchases'
|
The Author
|

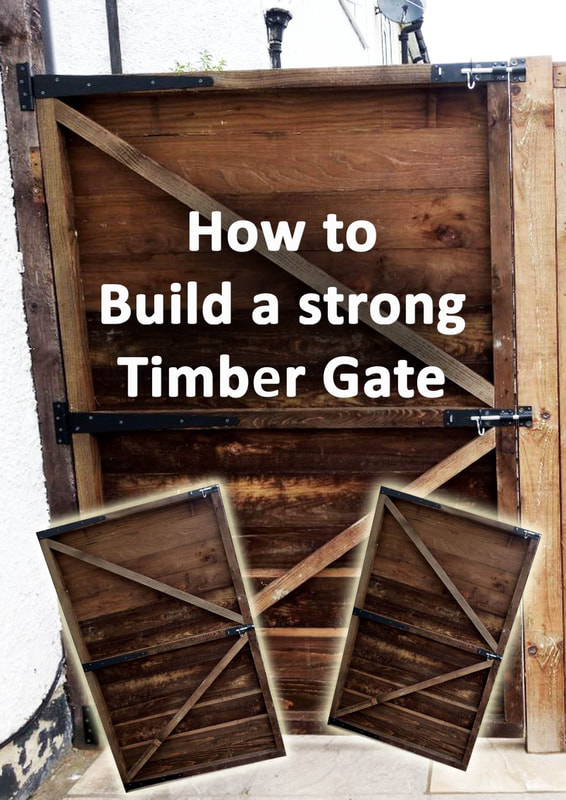
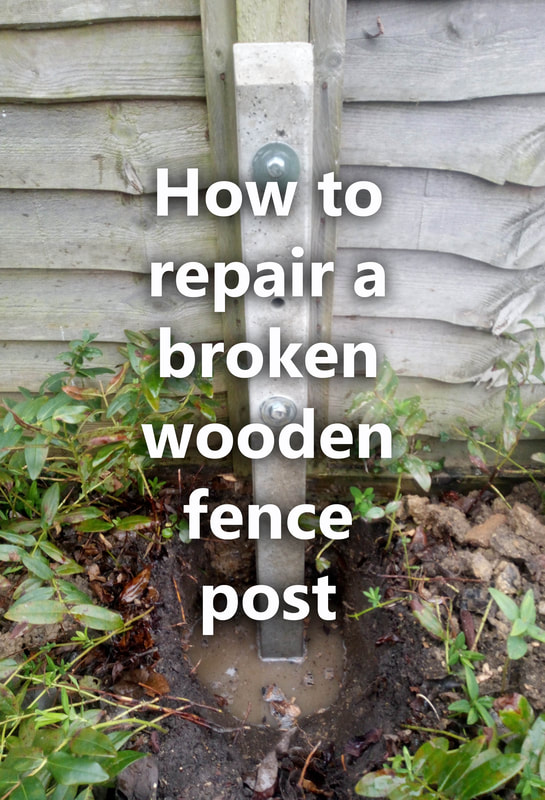
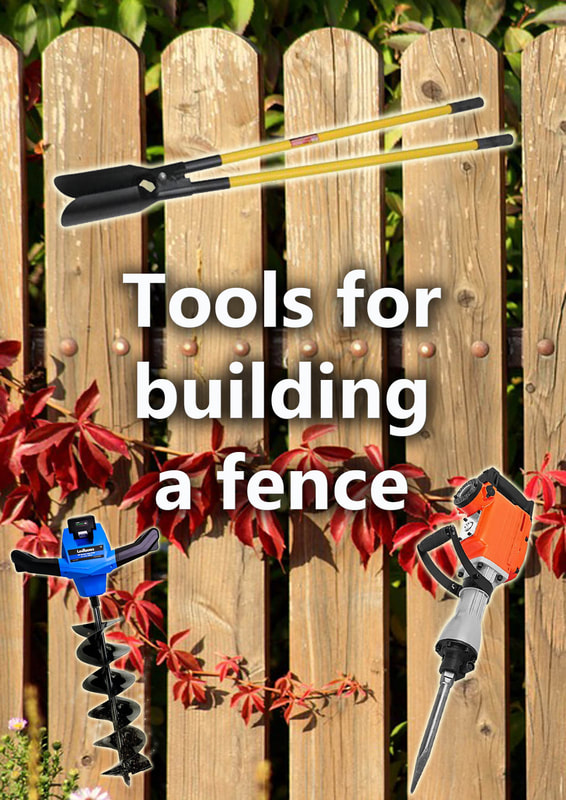
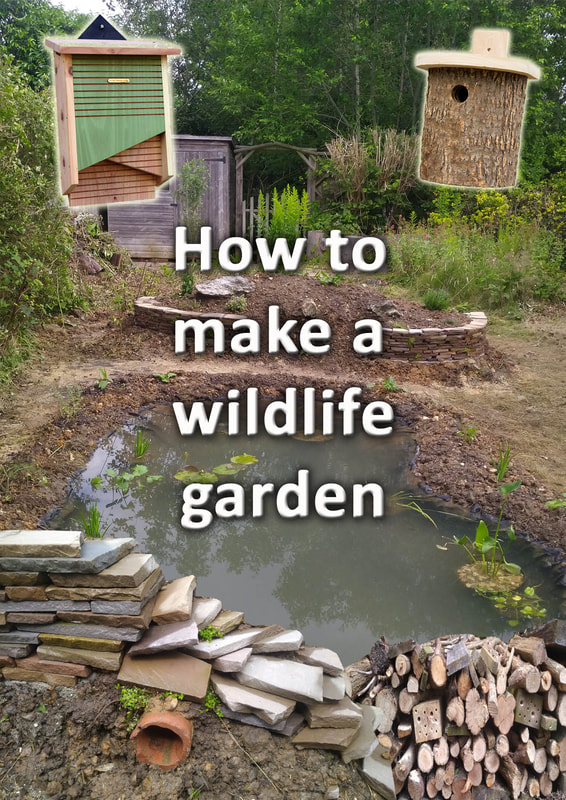

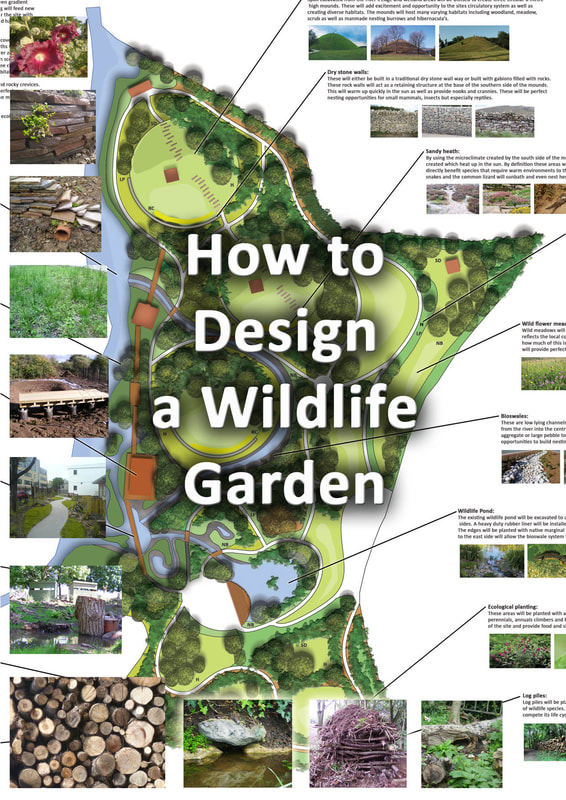

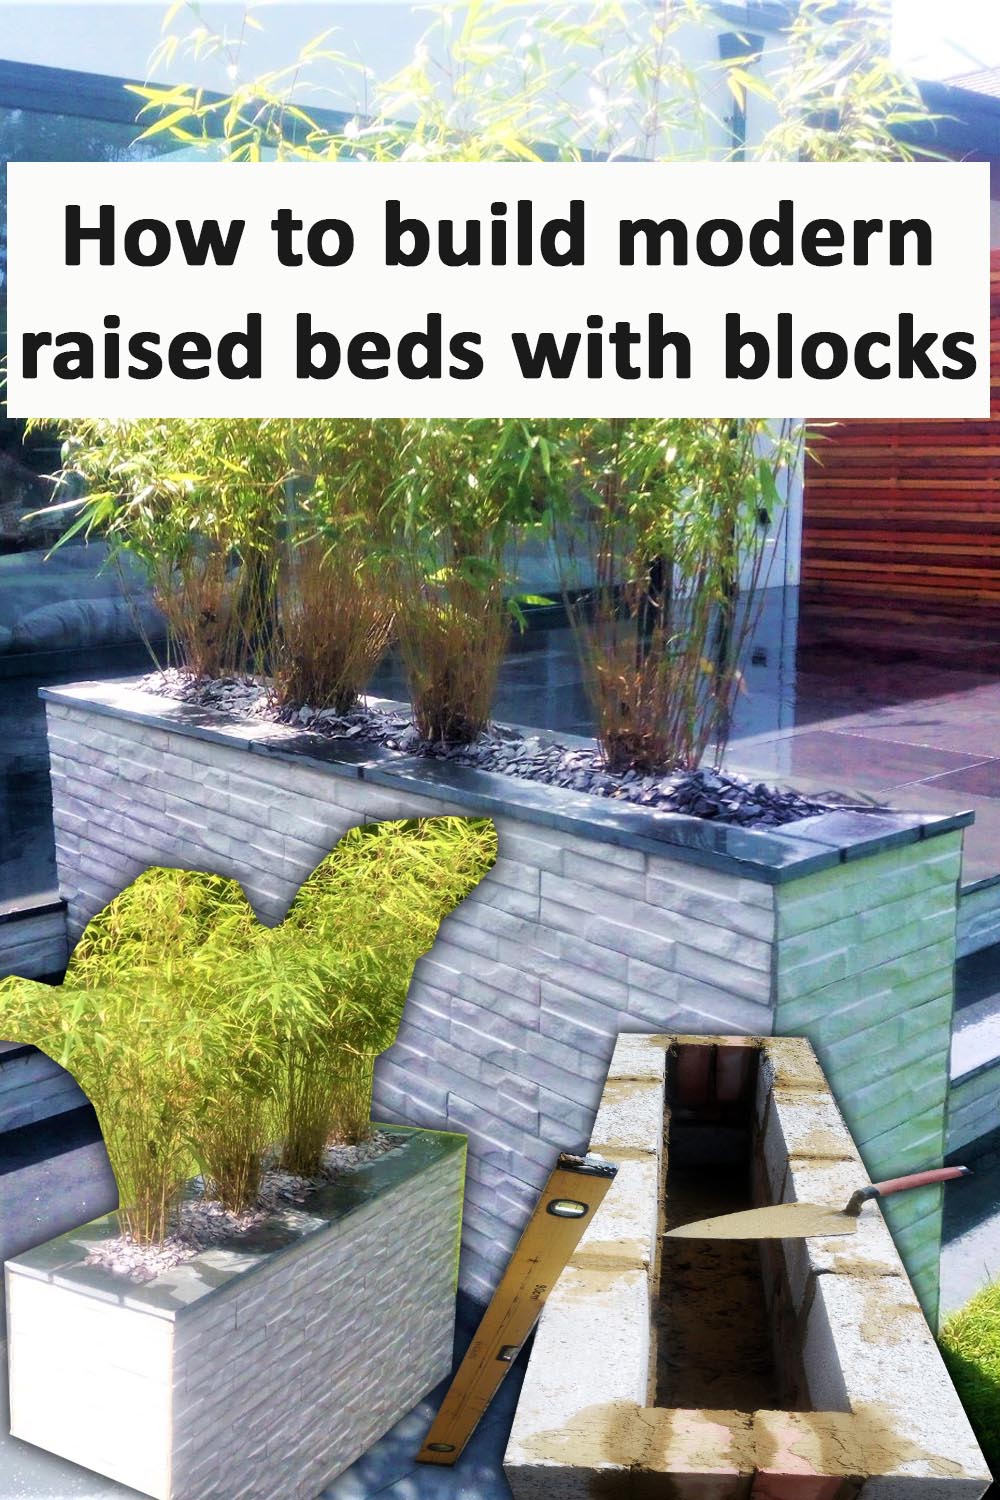
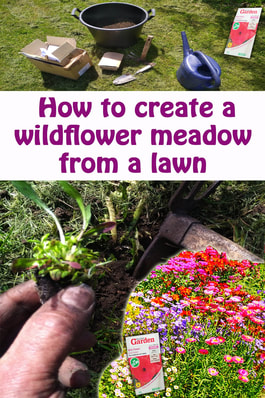
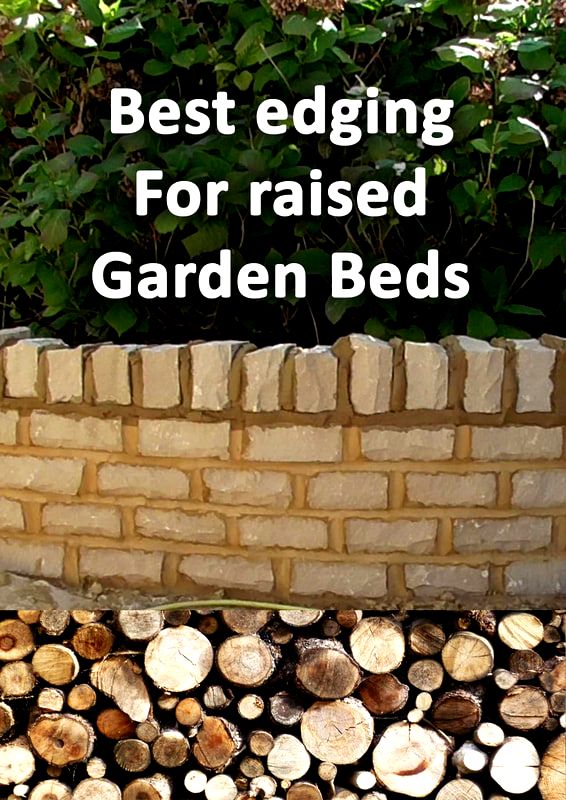

Landscaping services across Buckinghamshire, Amersham, Aylesbury & High Wycombe
Hyde Heath, Amersham, Buckinghamshire
|
|