This article contains affiliate links
Grass is one of the most common garden surfaces for good reason. Grass lawns are lush and multifunctional hosting a wide range of activities outdoor activities.
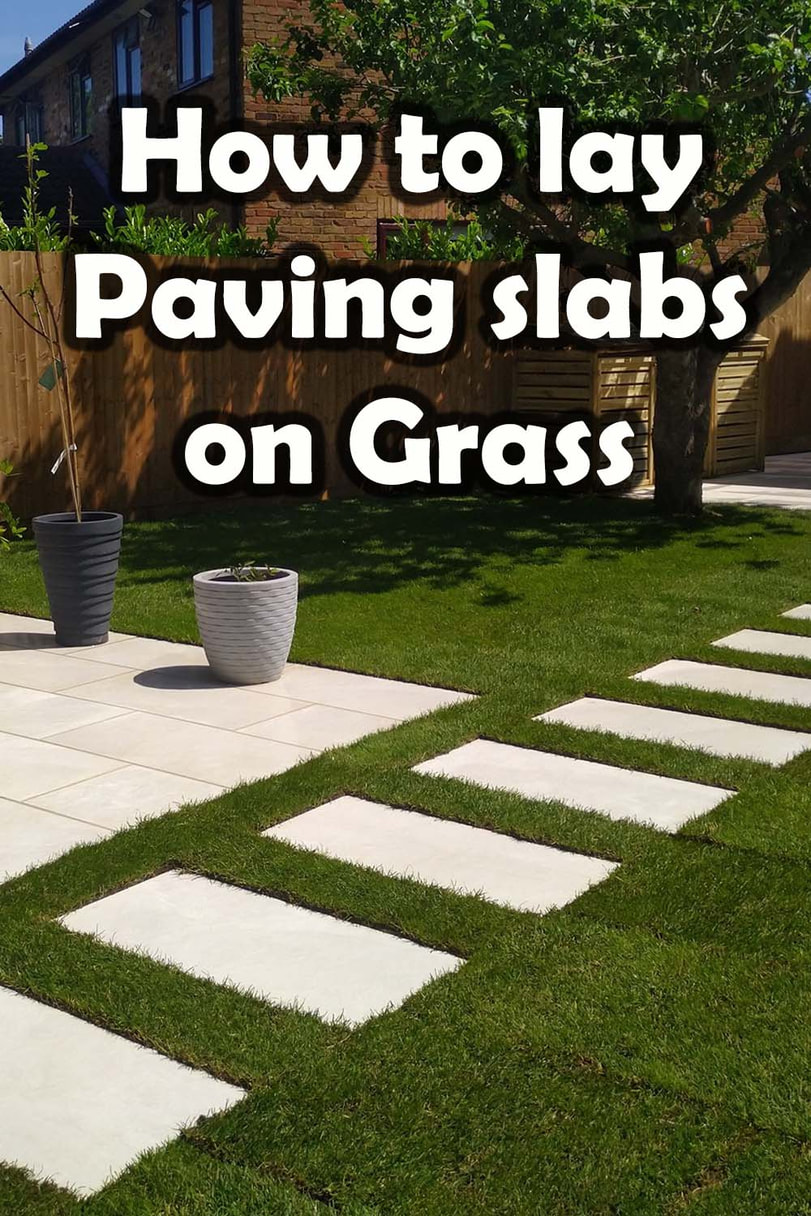
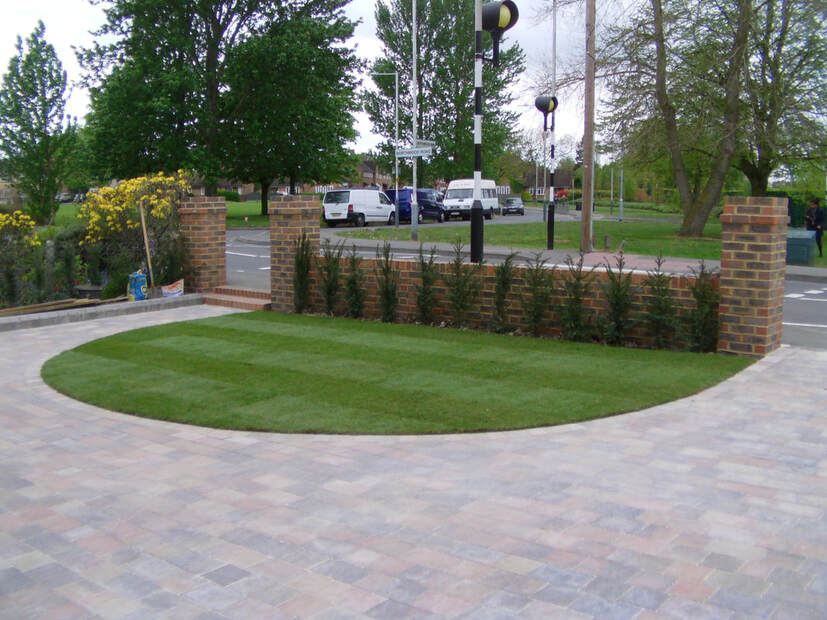
However, there are also some serious disadvantages to lawns especially during wet weather. Therefore it is often sought to lay paving slabs onto grass. Replacing lawn with paving can provide a more maintenance free and practical outdoor surface. In this article I will explain how to replace grass with paving slabs correctly. I will include some considerations of replacing grass with paving such as installing correct drainage, sub-base and jointing. Can you lay paving slabs straight on grass?
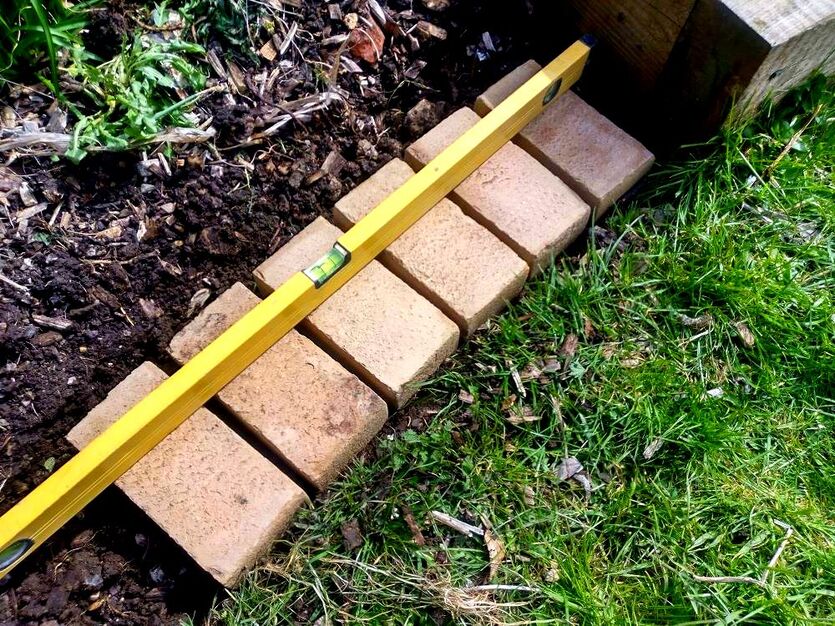
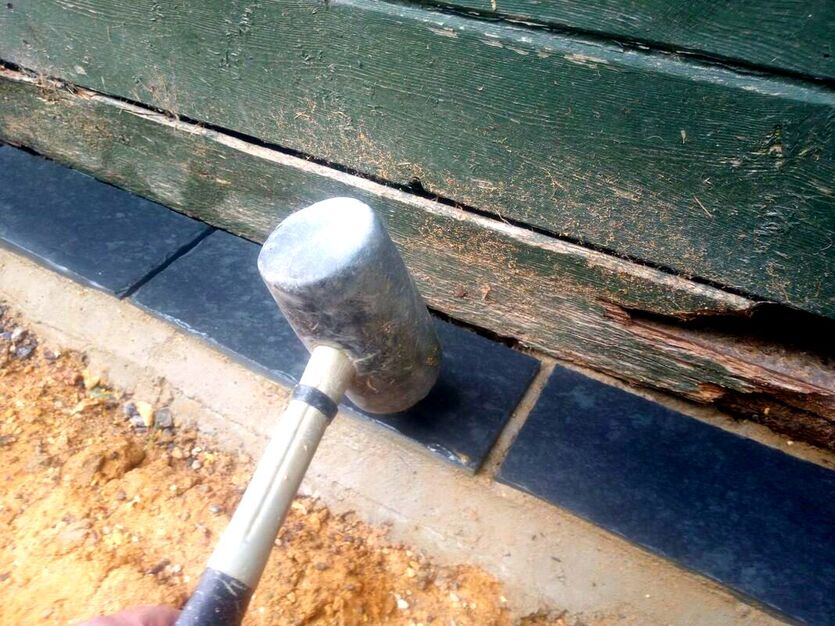
It is never advised to lay paving slabs straight onto grass for a few reasons I will discuss this below. Firstly it is very rare lawns are flat enough to lay slabs consistently level. Furthermore, seasonal variations in ground moisture can lead to paving shifting and moving. In order to lay paving slabs on grass you will need to remove the soft topsoil and install a robust sub-base. You will then need to lay your paving on a 30-40mm layer of cement based mortar to stick them into position. Perhaps the only acceptable scenario where you would put paving slabs directly onto grass is stepping stones. 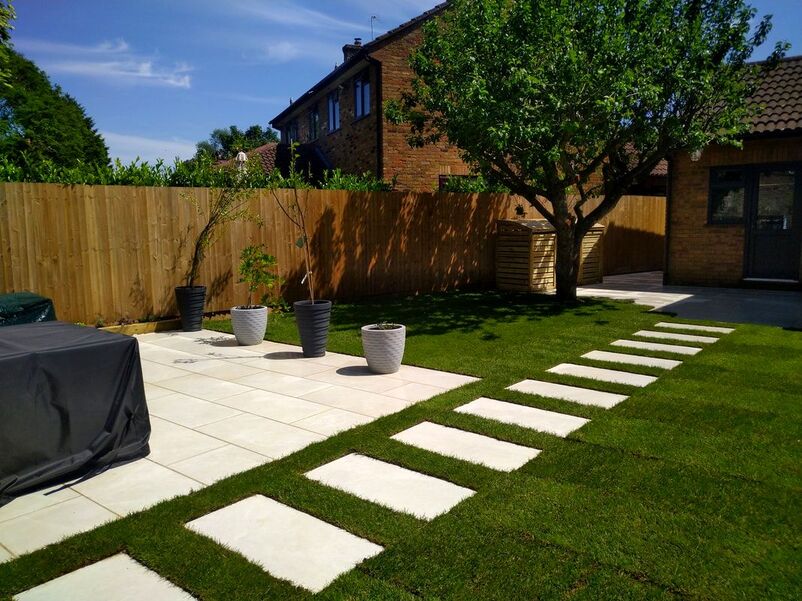
At the very least it is best to base these upon a level bed of compacted sharp sand.
However, if you laid multiple slabs together this way as a patio they would move and displace too much! Any jointing or pointing material would deteriorate between the gaps and weeds would become established. Eventually your paving slabs would sink and become overgrown with a layer of weeds and grass. Planning your paving
If you are planning to replace a grass lawn with paving it is important to plan correctly. Do you want the whole area to be paving? What shape patio do you want? What is your budget? Planning your project correctly will enable you to get a good idea of what it will involve and cost. It is more efficient to get your project right first time with no cutting corners. Below I will break down and explain the considerations and stages of replacing grass with paving slabs. Implement a drainage strategy
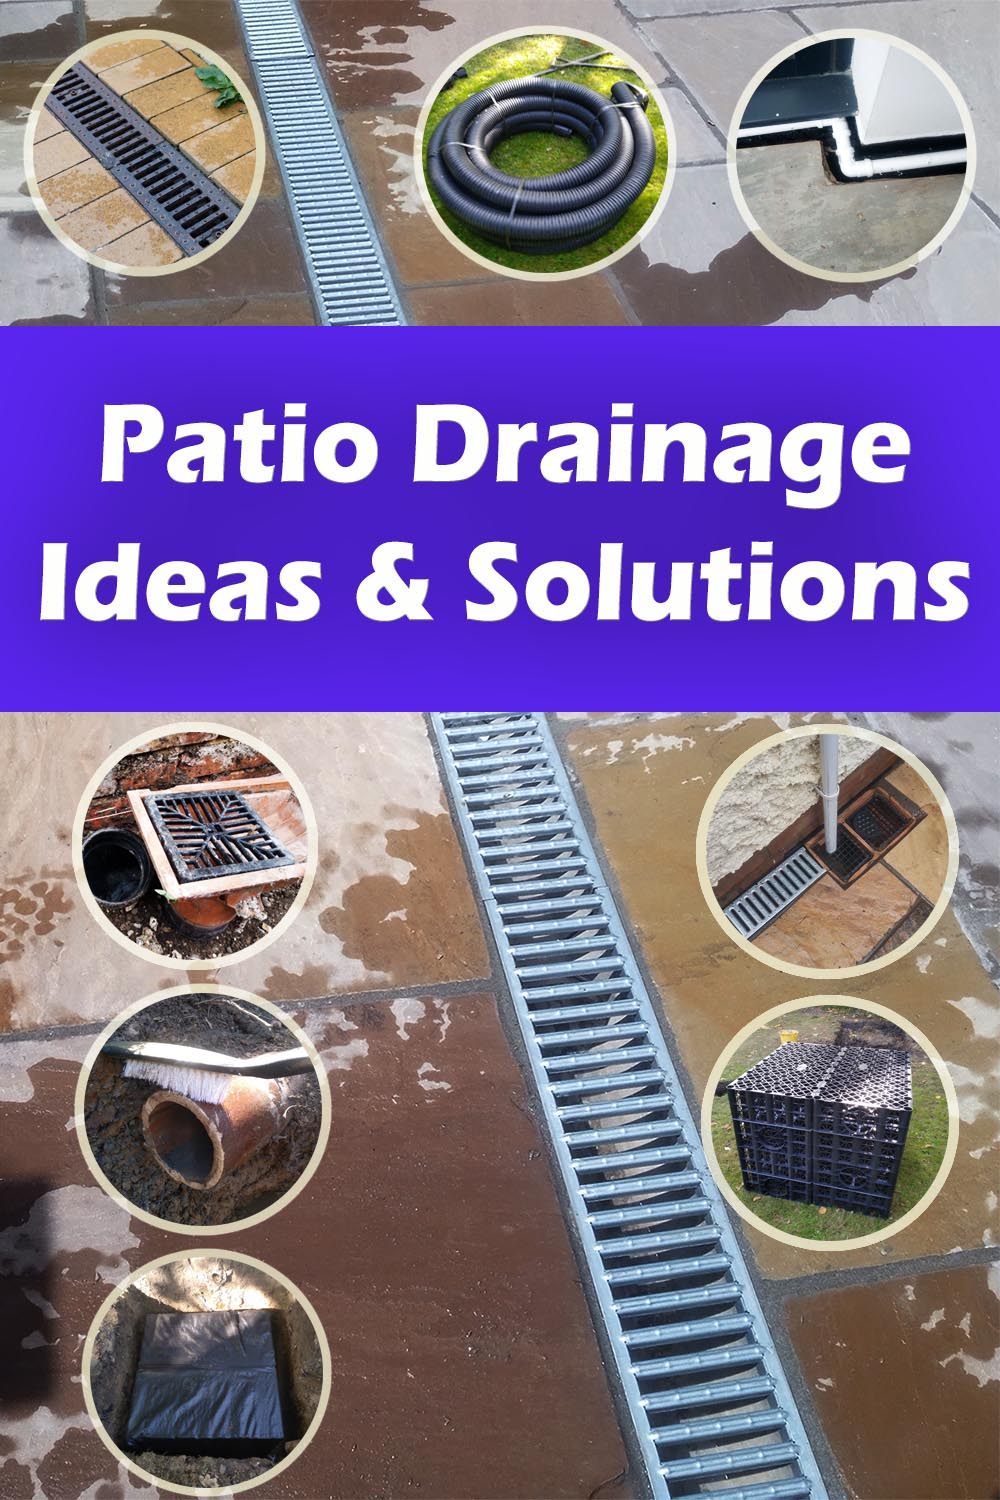
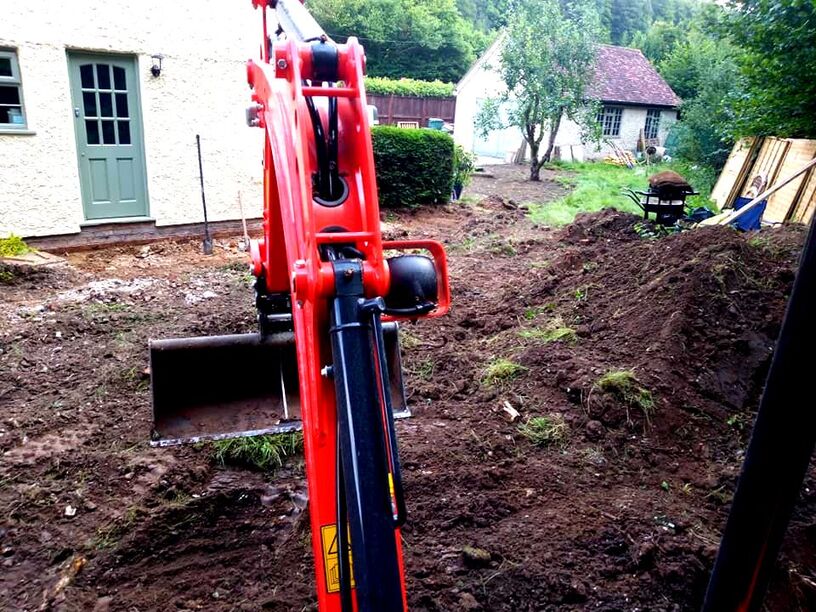
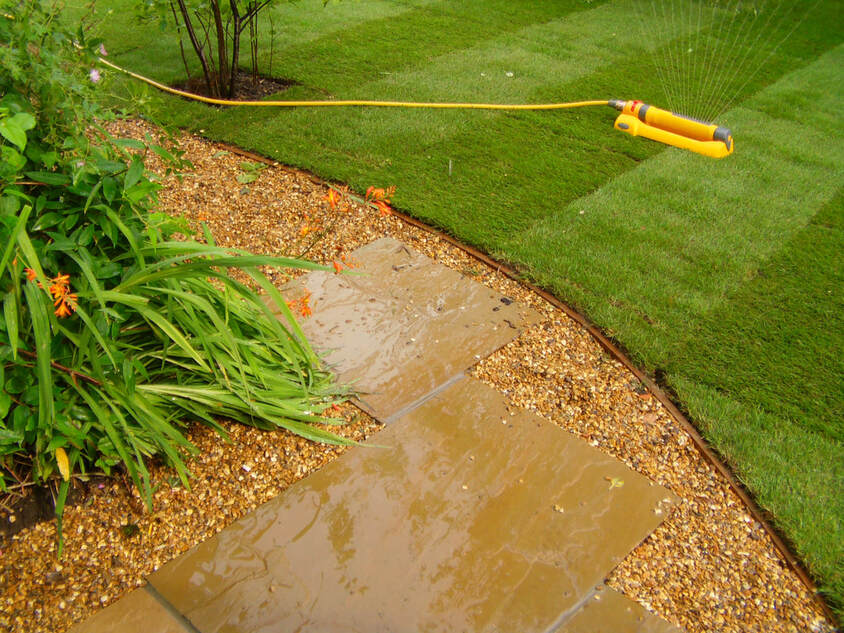
Drainage is a very important consideration when replacing grass with paving slabs. As grass grows upon natural topsoil it naturally absorbs rainwater like a big sponge. However, when you replace grass with paving the water has fewer places to permeate to. This can lead to flash flooding and boggy gardens. If you are installing a paved surface where it was once grass you need to implement a drainage strategy. 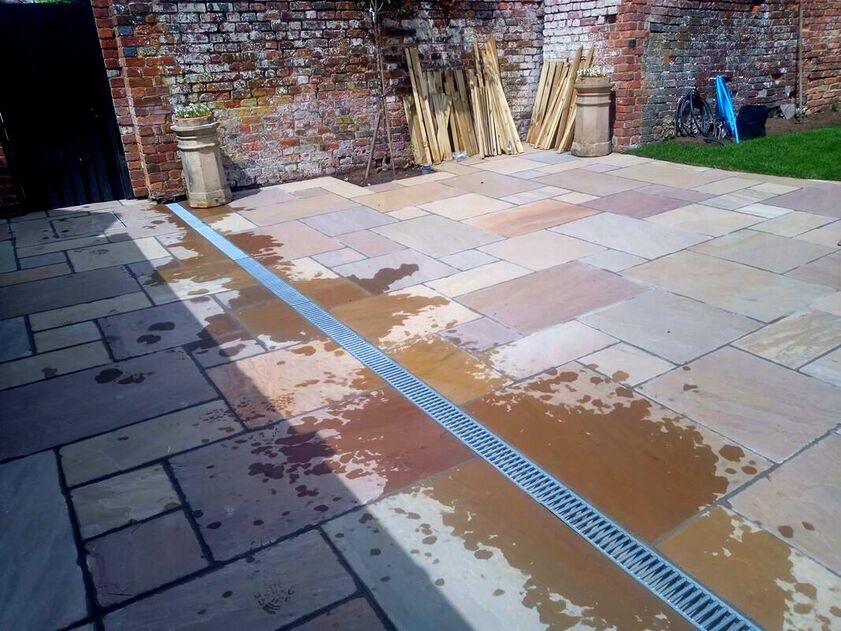
This could involve gently sloping the paving to a channel drain or a large flower bed. The most typical patio drainage systems are plumbed into a soak-away system.
For more information about implementingpatio drainage visit our article on the subject here. Excavation
One of the most common pitfalls of replacing grass with paving is not removing the soft topsoil. This top layer of soil is full of organic matter or ‘humus’ which can move and displace when wet. If this soil is not removed before the paving is laid the surface will shift and crack. Consequently all areas of grass should be excavated to a minimum depth of 150mm. The soil should then be removed leaving no loose particles in the base. You will then need to spread a compactable sub-base to the area. 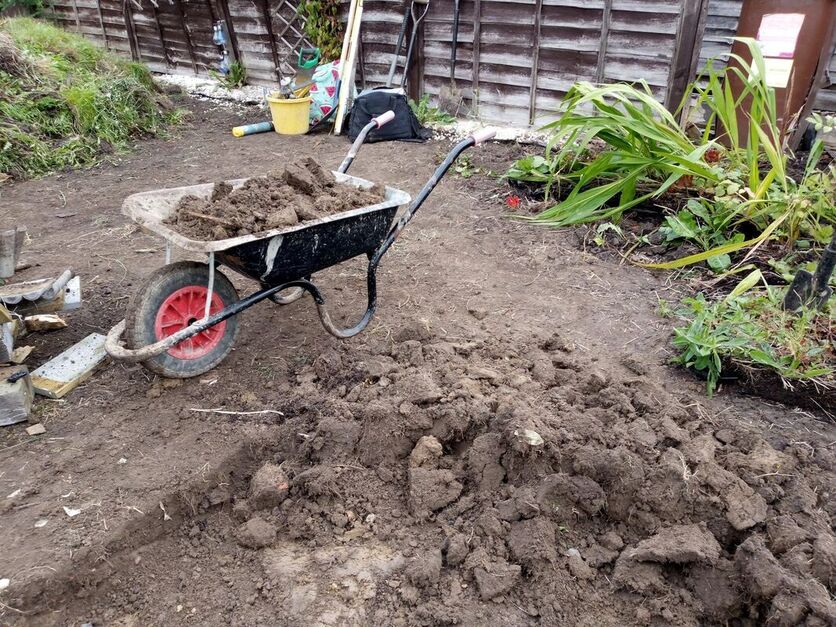
Laying your sub-base
A paving sub-base is typically a compactable aggregate such as Mot type 1 or crushed concrete. This is spread to a depth of around 100mm or 150mm for vehicular traffic and compacted. This sub-base will then allow you a strong and stable base to lay your paving slabs. 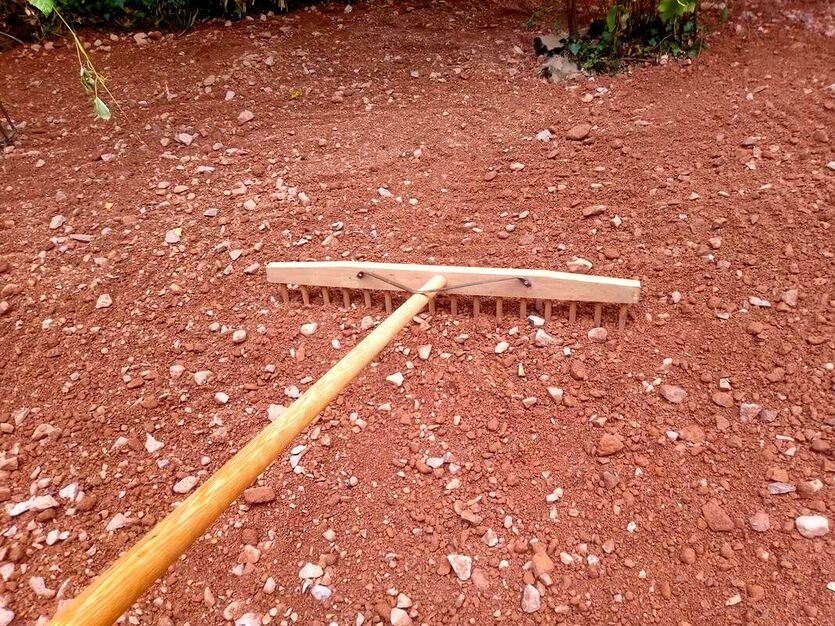
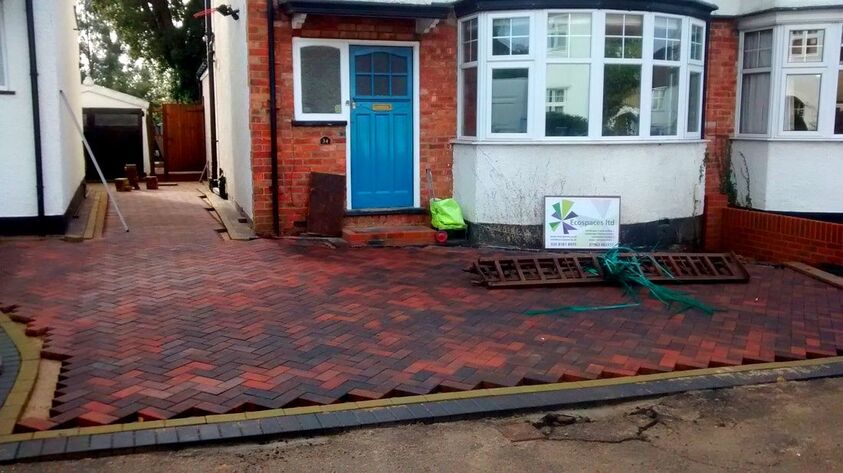
Laying your paving
Once you have laid and compacted your sub-base you are ready to lay your paving. You will need to mix a 1:4 sharp sand to cement mortar mix using a cement mixer. Add plasticiser and water until your mix reaches the consistency of bricklayer’s mortar. Bed down your paving slabs onto the mix so there are no voids under the paving. You want your paving to be as flush and level as possible. Use a long spirit level to level your paving as your work. 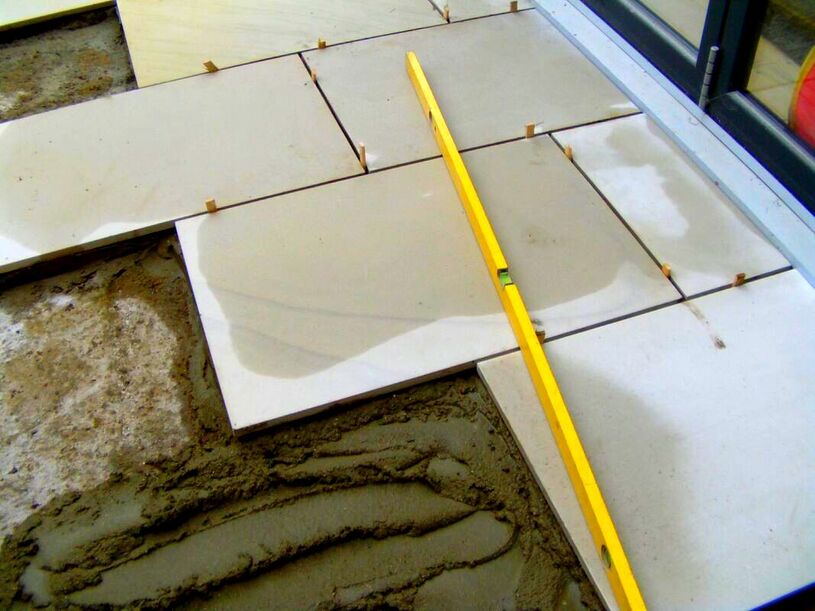
Jointing your paving
When you’re paving is set after 24 hours you can joint the gaps in between the pavers. This is best done using a 1:3 plastering sand and cement mortar mix. For our full guide on how to grout paving slabs visit our article here. 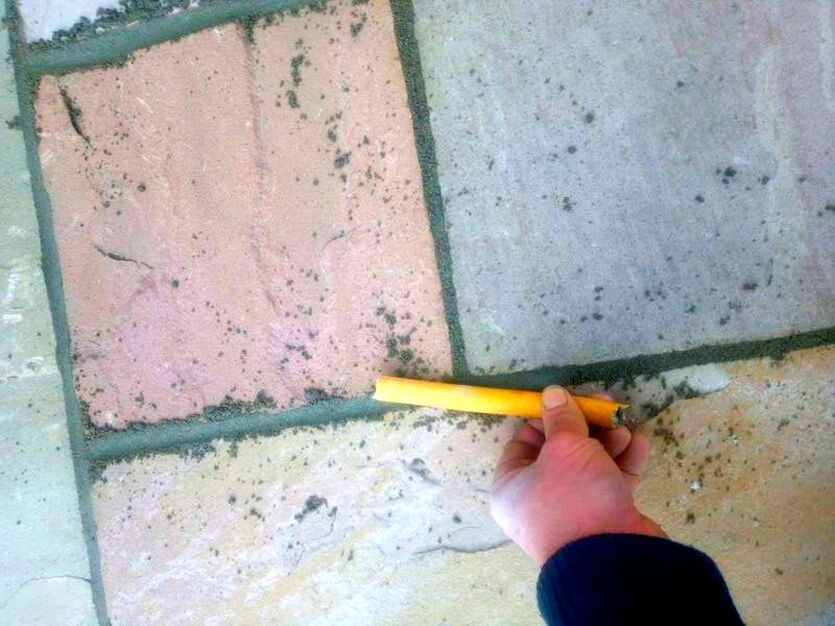
FAQ'SHow do you build a cheap patio on grass?
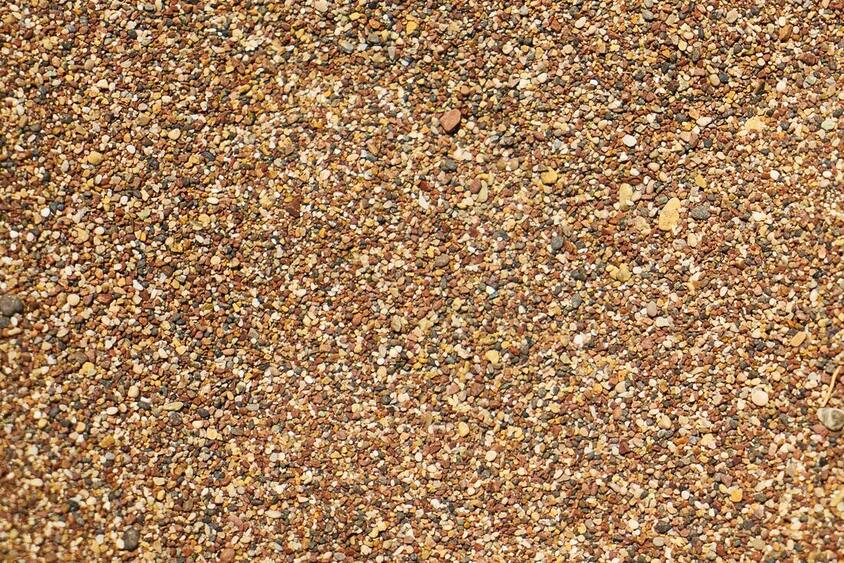
Probably the cheapest way to build a seating area on grass would be using gravel. Gravel is generally cheaper than paving slabs and faster to lay. However, just because you are using gravel it doesn’t mean you should not add a sub-base. You should still remove the topsoil and spread a minimum sub-base of 60mm. Alternatively you can use cheaper paving slabs. However, it is never advised to lay less base to save money, this normally results in spending more in the long run. Can you lay pavers without a base?
If you lay pavers without a base they will move and shift over time. Tables and chairs will not sit firmly upon the surface and will rock. Eventually soil will rise up in between the gaps leading to weed establishment. The result will be a messy surface with loose pavers which is not suited for purpose.
Thank you for reading our article on how to lay paving slabs on grass. If you require garden patio or paving services do not hesitate to contact us. Based in Amersham, Buckinghamshire we provide a wide range of landscaping services I will link to other relevant articles below you may also find useful.
'As an Amazon Associate I earn from qualifying purchases'
0 Comments
This article contains affiliate links
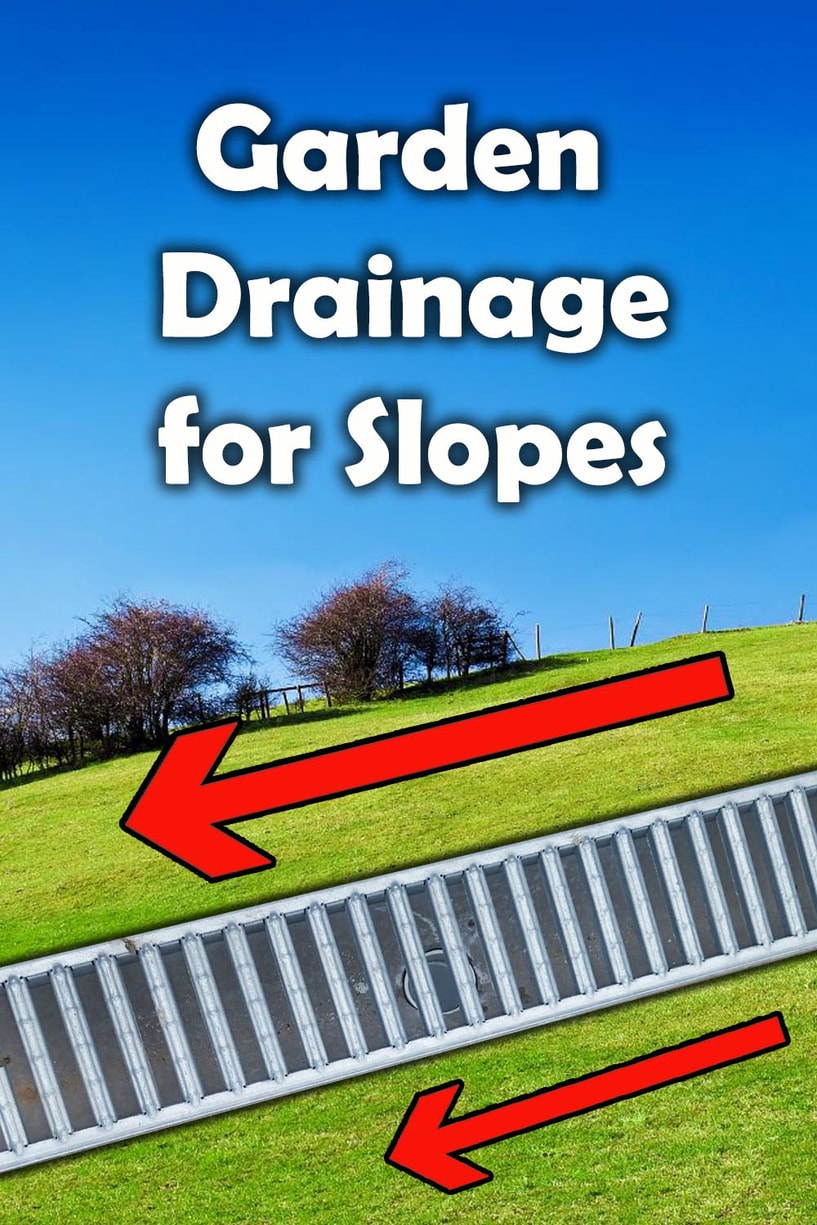
Sloping gardens are a very typical in hilly areas and regions of topographical undulation.
Although there are some advantages of having a sloping garden there are also many disadvantages. This can be particularly so when it comes to landscape drainage. Garden hydrology in hilly regions can be complex with slopes distorting both catchment and surface run-off acceleration. On slopes it is very typical for your gardens drainage to be affected by surrounding properties. The most problematic garden drainage on slopes is when water flows towards the home. In this article I will provide a summary of typical garden drainage problems on slopes and how they can be resolved. Why do you need to install drainage on slopes?Sloping ground can greatly accelerate the velocity of storm water runoff in times of heavy rain. This can lead to flooding events which in extreme cases can cause damage and financial loss. Land on a gradient is also much more susceptible to movement and subsidence. Seasonal moisture changes on such sites can help contribute to such movements. Consequently, providing adequate landscape drainage to sloping gardens is always advised. This is particularly the case on sites with extreme bogginess and moisture fluctuations throughout the year. 
How do you drain a sloping garden?
To drain a sloping garden effectively you will firstly need to diagnose the source of your particular issue. Most drainage problems on sloping sites are due to topographical funnel points. This is where surrounding landform channels and directs run-off into a specific area. These wet zones can become particularly boggy and saturated. 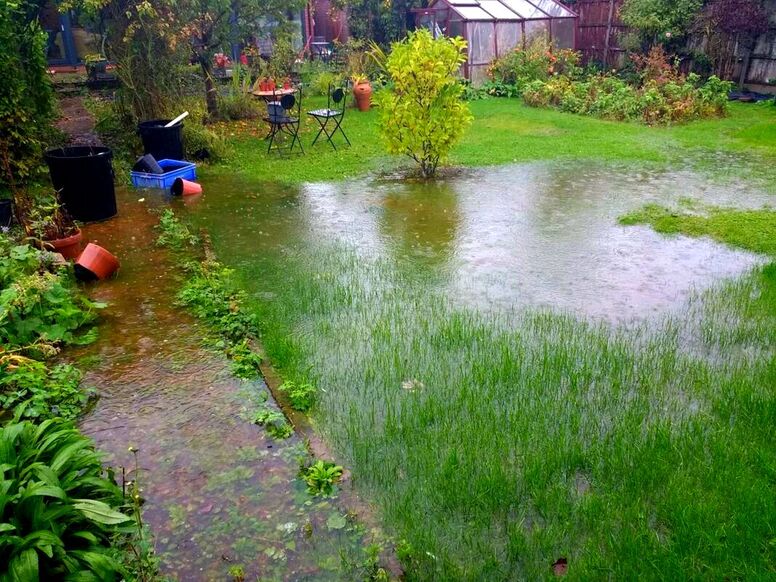
Landscape features such tree lines, boundary walls and buildings can also act as a barrier to water travelling downhill.
In such cases horizontal drainage channels must be installed to collect water and direct it away in an orderly fashion. These can include, French drains, channel drains, swales and other landscape drainage installations. I will describe these in more detail below: 6 Drainage installations for sloping gardens
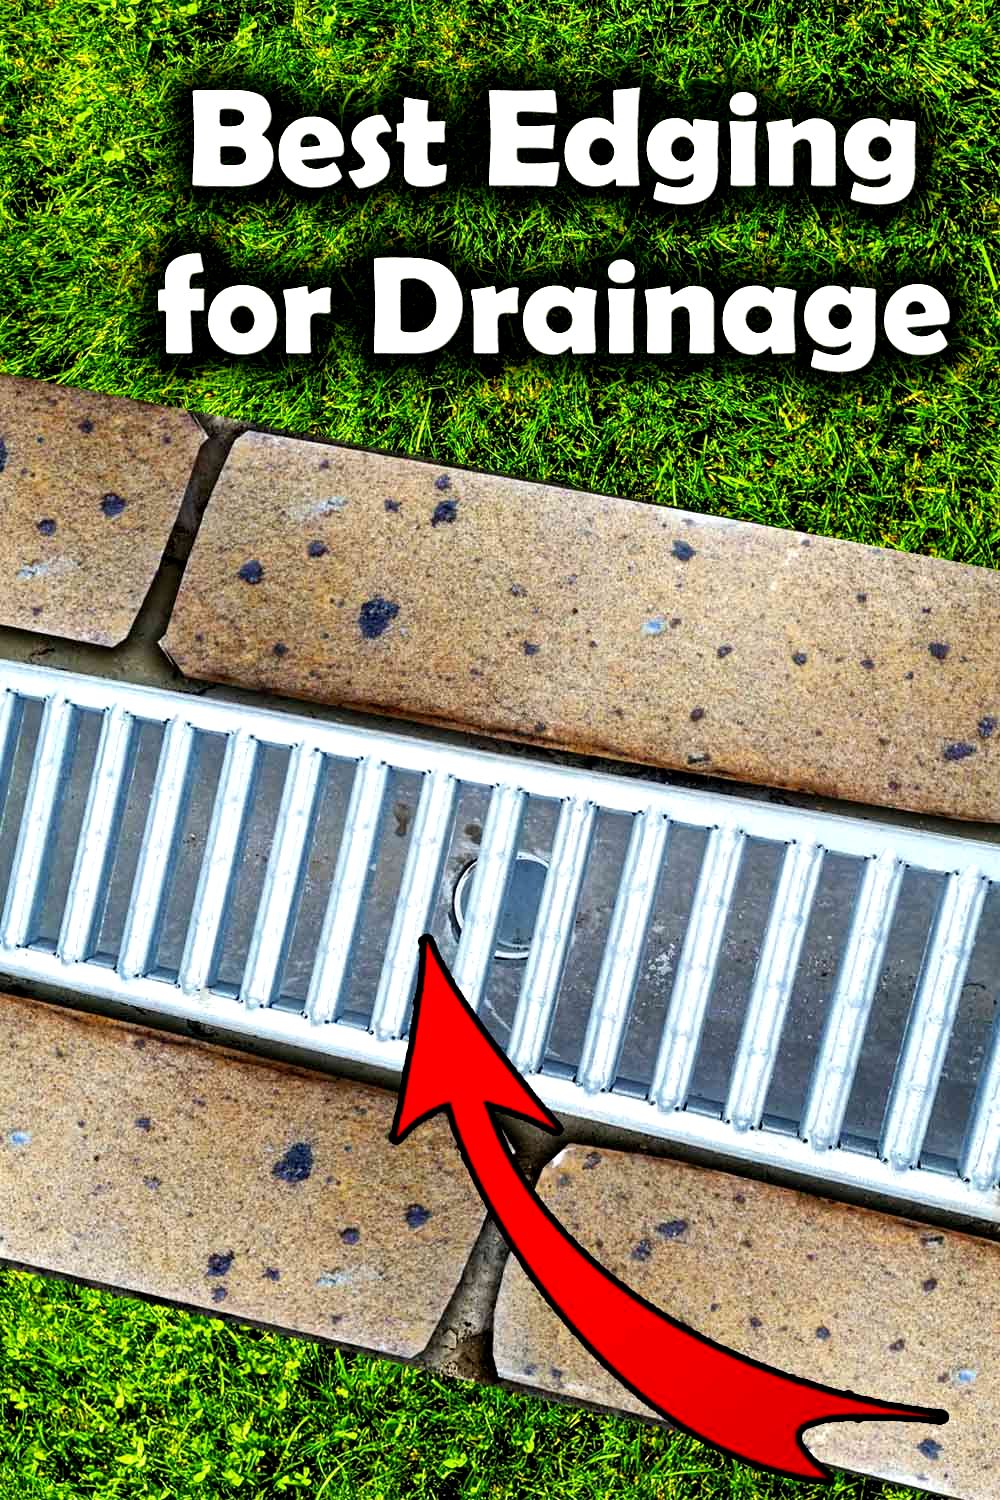
Channel drainsChannel drains are linear drainage channels which slot together to form a continuous surface collection drain. These channels are typically topped with a robust drainage grill which allows water into the drain. Channel drains are typically installed into paved surfaces where surface water can be captured. On sloping sites these drains can be installed along garden edging, retaining walls and patios. The water can then be piped downhill to a collection vessel or drainage network. 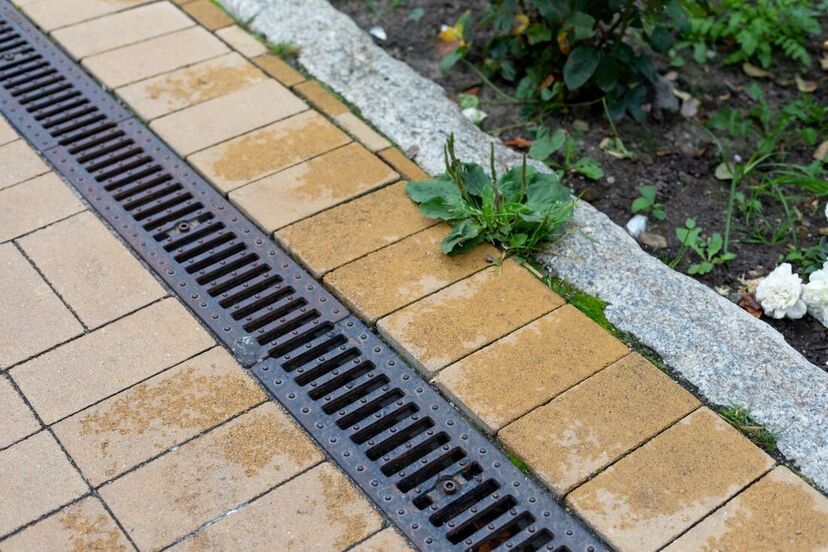
French drains
French drains are long trenches filled with free draining gravel encasing a perforated drainage pipe. These drainage channels can not only direct water flows but draw water from the surrounding ground. In sloping gardens French drains are laid along the width of a slope to collect all downward moving water. French drains are very effective at draining lawns and low lying boggy areas. These drainage channels can be plumbed into soak-aways. 
Garden levelling
One of the most effective ways to mitigate drainage problems on sloping sites is by levelling. Levelling upon slopes is almost always the most expensive option, especially where terracing is involved. However terracing a whole slope is not necessary to improve its drainage. Simply by flushing up the levels to the existing ground will make a significant improvement. Scraping off high areas into low areas can create a more consistent slope which allows water to escape evenly. 
Retaining walls
Retaining walls are almost always associated with raised beds, and terracing slopes. However retaining walls can also be utilised strategically for garden drainage on gradients. Walls can be positioned to make changes within the slopes gradient. Subsequent gradient manipulation can help funnel surface water where it is less likely to affect lawns and flower borders. Grated channel drains can also be installed to the top and base of retaining walls to capture storm water. 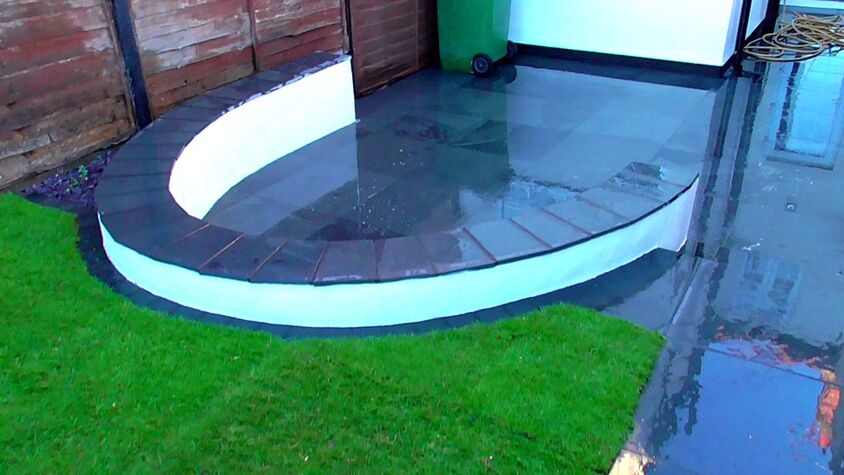
Mounds
Mounded soil can create linear bunds of ground which help to redirect surface water on slopes. Mounds can be particularly effective at steering water around a property or away from a specific area. These types of damming mounds are very effective combined with French drains. French drains can be installed along the line of the mound to collect excess surface water. The water can then be directed away or to a soak-away system. 
Moats & Swales
Moats and swales are shallow ditches and landscape depressions which collect water during heavy rain. Traditionally moats would be larger and hold standing water where swales would normally only fill during wet weather. Nonetheless moats and swales can be excavated along sloping ground to help channel and redirect water. Contouring such channels can help to reduce flash flooding and garden drainage problems on slopes. 
Thank you for reading our article on garden drainage for slopes. If you require garden drainage services do not hesitate to contact us.
Based in Amersham we cover Buckinghamshire and neighbouring counties. We have also just opened a new office in Norfolk. Below I will link to some of my other landscape drainage articles you may find useful.
'As an Amazon affiliate I earn from qualifying purchases'

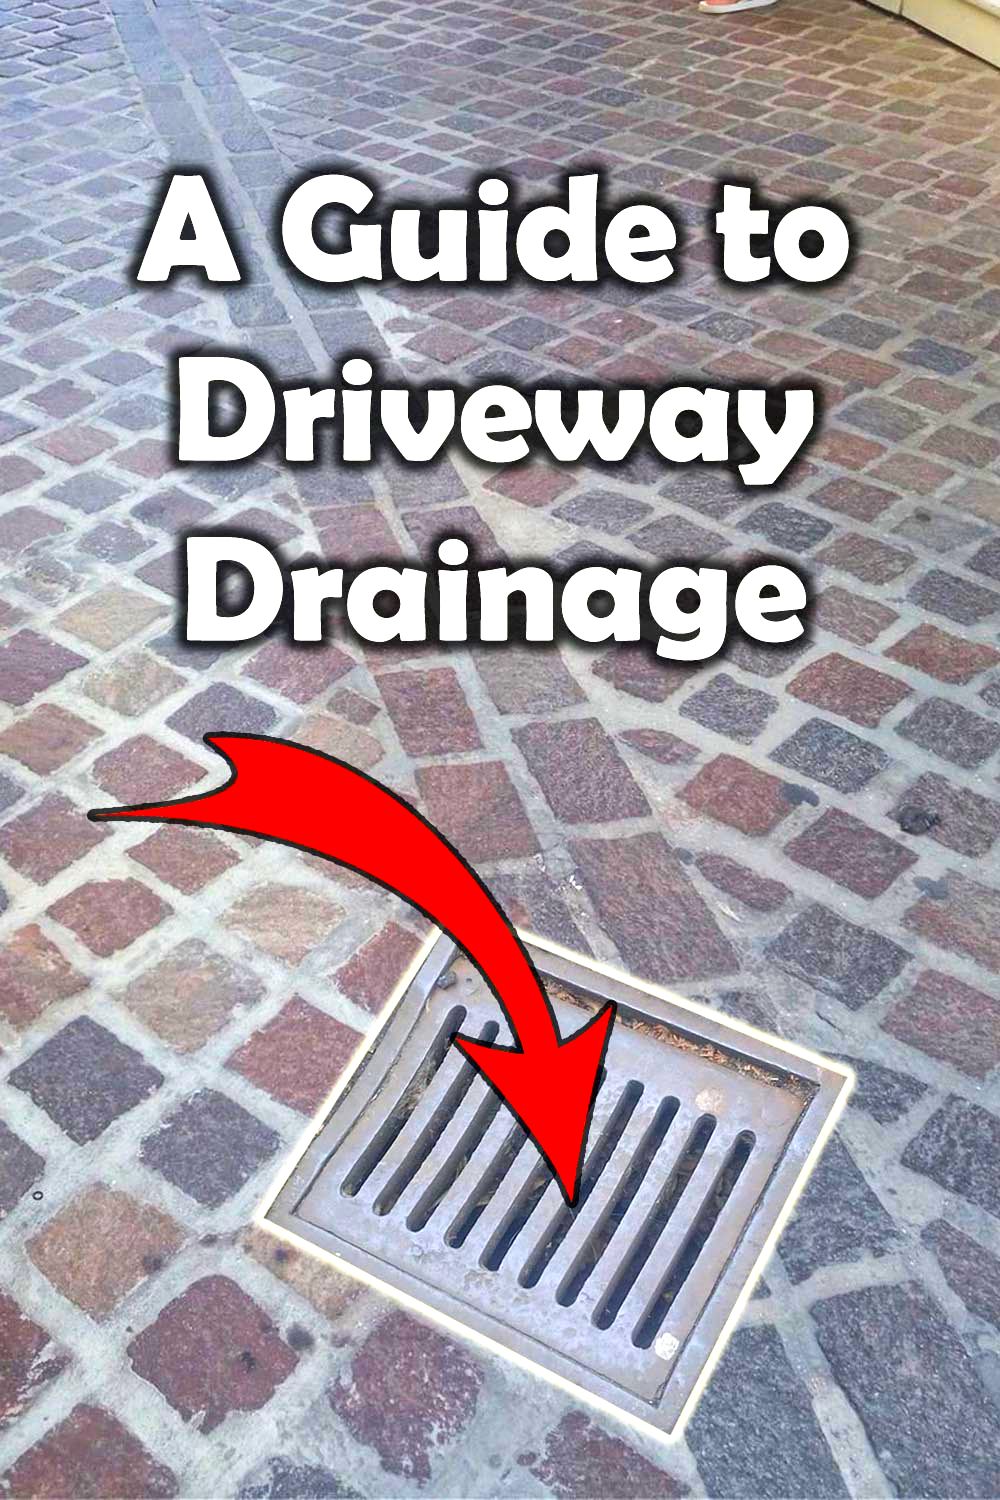
This article contains affiliate links
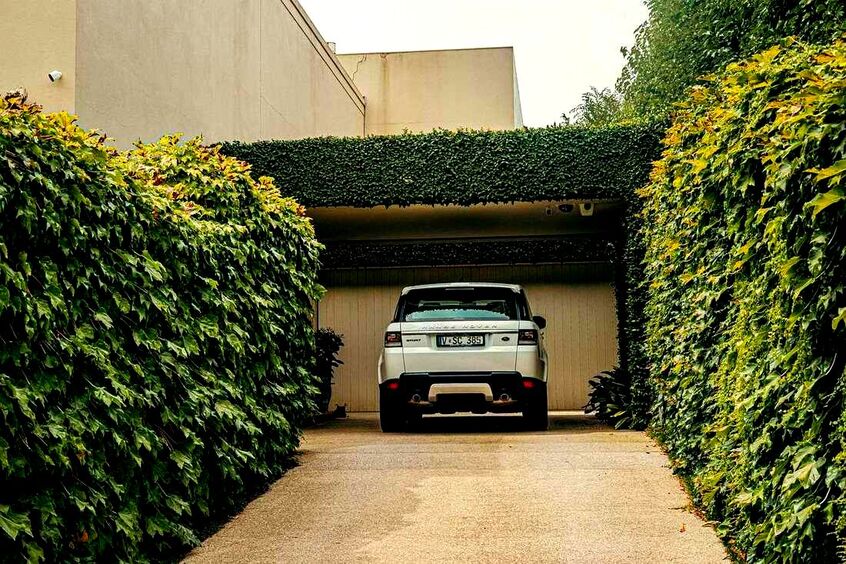
Driveways are one of the most convenient and practical surfaces around your home. They provide fast and safe access to your front door with a clean and level surface to load necessities.
Like all hard surfaces however, driveways can accelerate surface run off whilst contributing to flooding and pollution. Consequently, driveways should always have a suitable drainage strategy which mitigates the effects of water runoff. One of the most effective ways of doing this is by collecting water in drainage channels. Drainage channels for driveways come in a wide variety of different products and installations. In this article I will explain everything you need to know about drainage channels for driveways. I will summarise the various types as well answer some common questions regarding driveway drainage channel installation. Why have drainage channels for driveways?
Drainage channels collect vigorous flows of surface water in times of heavy rainfall. This is particularly important for properties where drives slope down towards the home. A well installed driveway drainage channel will collect excess water and direct it to a drainage feature. Driveway surface water drainage is particularly important as it contains toxic particles. 
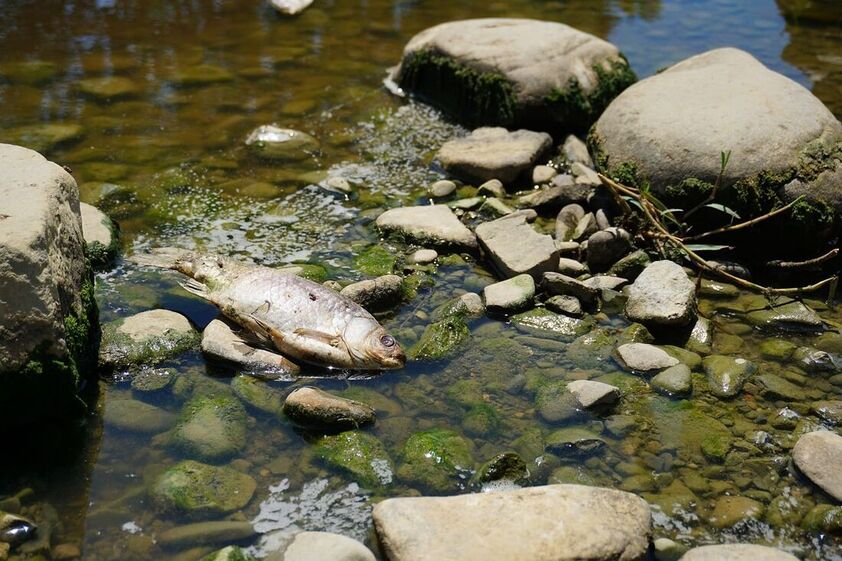
Tyre rubber, break pad dust, oil spills and metal particles all wash off our driveways and access roads.
If allowed to drain into drainage networks these lead to the toxification of natural watercourses and aquatic ecosystems. Such pollution can intern effect our drinking water, food sources and health. Therefore drainage channels play a critical role in collecting and draining driveway runoff away safely.
|


|
|

|
'As an Amazon Associate I earn from qualifying purchases'
This article contains affiliate links
When planning a new driveway it can be easy to get carried away with material, design and style choices. However one of the most important components of installing a new driveway is drainage.
Many do not realise the impact driveway drainage has upon the wider, natural environment. This is especially so when it comes it to surface run-off from driveways and other impermeable surfaces.
Getting your driveway drainage strategy wrong can lead to flash flooding, damp and costly alterations and repairs.
In this article, I break down and summarise all the elements of driveway drainage. I explain why driveway drainage is so important and how it should be implemented correctly.
Why is correct driveway drainage important?
Water run-off from driveways is some of the most polluted surface water produced by the urban environment.
Driveways accumulate a dirty combination of brake dust, heavy metals oil, grease and rubber particles. During times of heavy rain these toxic materials can be washed from driveways into the local drainage network.
These pollutants can then be washed into local watercourses and wetland habitats.
This can lead to the destruction of delicate ecosystems. Furthermore, continuous toxification of fresh water within the landscape is also detrimental to human health.
Consequently, installing an effective driveway drainage system is paramount. Not only is it important to collect surface water, it will have to be drained to an isolated drainage feature.
Consequently, installing an effective driveway drainage system is paramount. Not only is it important to collect surface water, it will have to be drained to an isolated drainage feature.
The environmental cost of incorrect driveway drainage
Pollutants
In recent times there has been a growing awareness of micro pollutants such as micro plastics and chemical spillage.
Our driveways and paved surfaces collect many chemical compounds as well as metal and plastic particles. If surface water is not collected in a managed way these can wash into rivers and streams.
These substances can kill animal life and pollute fresh water ecosystems. The ramifications of such for human health and longevity are not even yet fully understood.
Flash flooding
When driveway drainage is not installed excess storm water can overwhelm drainage networks. This can lead to flash flooding causing damage to homes and property.
Sewage overflow
During times of excessive rainfall drainage networks can overflow into sewage systems. This can lead to raw sewage spilling out into rivers and watercourses.
Not only can this cause a health risk it leads to high nutrient levels within water bodies. The result is excessive algae blooms, low oxygenation and habitat loss.
Ecosystem destruction
The combination of toxic chemicals, waste particles and nutrients washing into watercourses destroys wetland ecosystems.
These delicate food webs help to keep our natural environment balanced and healthy. If storm water from driveways is not mitigated on site it can lead to health consequences for local ecosystems and people.
Driveway drainage: Law & Legislation
Any new driveway with impermeable surfacing above 5 square metres will require planning permission.
Permission is unlikely to be granted without water being collected and reabsorbed by the ground within your property.
This can be achieved by installing a driveway drainage system plumbed into a soak-away or bio-swale.
Does my new driveway need drainage?
Any new driveway or hard surfacing installation will require sufficient run-off mitigation. This will ether include; permeable paving or the installation of a drainage collection system.
Does my existing driveway need drainage?
If your existing driveway runs surface water onto your street then there is existing precedent. Therefore it is unlikely you will ‘have’ to install driveway drainage to an old driveway.
However, rules from country to region do vary, so check with your local authority.
Ethically it would be best to install a drainage system to driveways where surface water runs onto the street.
How to install driveway drainage
There are two main ways of installing driveway drainage; permeable surfacing and impermeable surface water collection and storage. Below I will summarise both of these driveway drainage strategies.
Permeable Paving
Permeable paving is paving which allows water to pass through and be absorbed by the underlying ground. Permeable surfaces include gravel, resin bound aggregate, and gapped block systems. However none of these surfacing methods are permeable if their sub-base is also not permeable.
If you want to install a permeable surface you must also base it with a free draining aggregate such as MOT type 3. This sub-base material has very fine particles washed out, this means water can pass through.
It must be said however that in times of extreme rainfall many permeable surfaces can become overwhelmed. This can lead to some spill over into adjacent areas.
It must be said however that in times of extreme rainfall many permeable surfaces can become overwhelmed. This can lead to some spill over into adjacent areas.
Impermeable paving
Impermeable paving is hard surfacing which does not allow water pass through its surface. This type of paving constitutes the vast majority of driveway surfacing.
Impermeable paving includes block paving and other types of pre-cast blocks and natural stone. There are some claims that block paving is permeable but I disagree!
In any case such surface will produce run-off in times of heavy rainfall. Therefore, surface water must be collected and channelled into a drainage feature.
In most scenarios this feature will be a buried soak-away crate system.
Calculating storm water runoff volume
If you are installing driveway drainage for an impermeable surface you will need to channel water to a soak-away.
For most driveways a cubic metre soak-away has enough storage capacity to contain run-off during heavy rain. However for larger surfaces you may want to check if a cubic metre is adequate. You will need to times the surface area of your driveway by 30mm of rainfall (about the UK ‘average’ highest rainfall for a 24 hour period).
The calculation would be 30m x 0.030mm = 0.9 cubic metres
So for a 30 square metre driveway a cubic metre is more than adequate. It is important to remember the ground around the soak-away will instantly start to absorb water.
Even during times of extreme rainfall the water will fill a soak-away relatively slowly.
Collecting storm water from impermeable paving
Channel drains & Slot drains
By far the most effective way to collect surface water from a driveway is with channel drains. Channel drains are linear channels that are laid into a driveway or patios surface.
They often have metal or plastic grills which allow water to pass through and into the channel. The channels slot together to create continuous runs where water can be directed to drainage features.
Slot drains are essentially the same concept as channel drains without the grills. Instead slot drains have a raised slot providing a flush drainage outlet within the paved surface.

Ground pipes
Pvc plastic ground pipes are installed to pipe collected water from channel drains to drainage destinations.
Typically 30-50mm diameter pipes with elbow sleeves are connected to the base of the channels. Water can then be channelled underground to soak-aways or other locations.

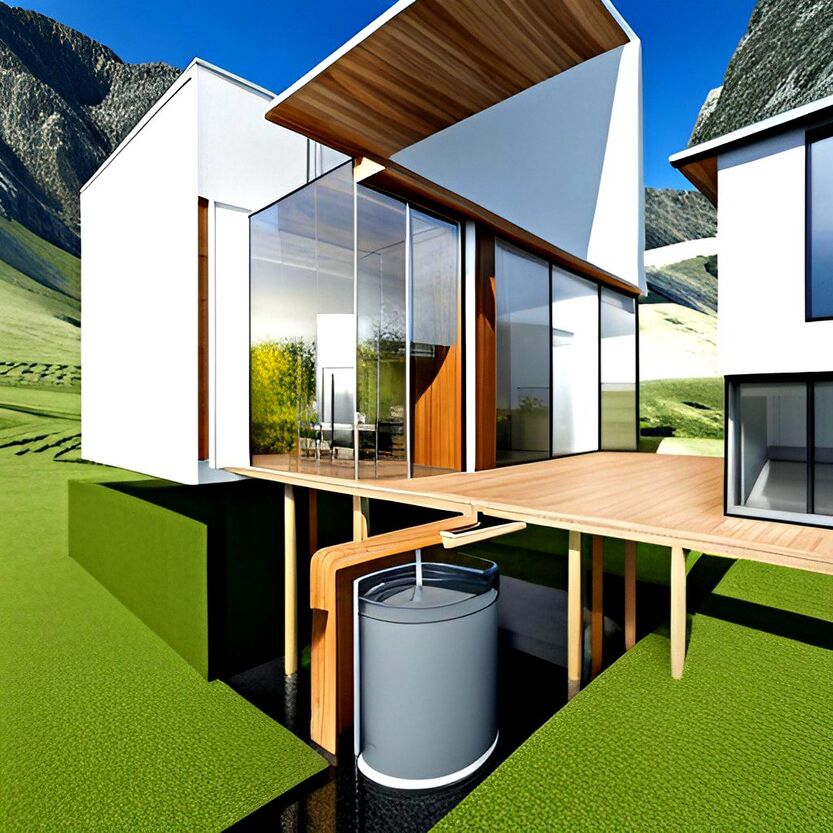
Soak away systems for driveways
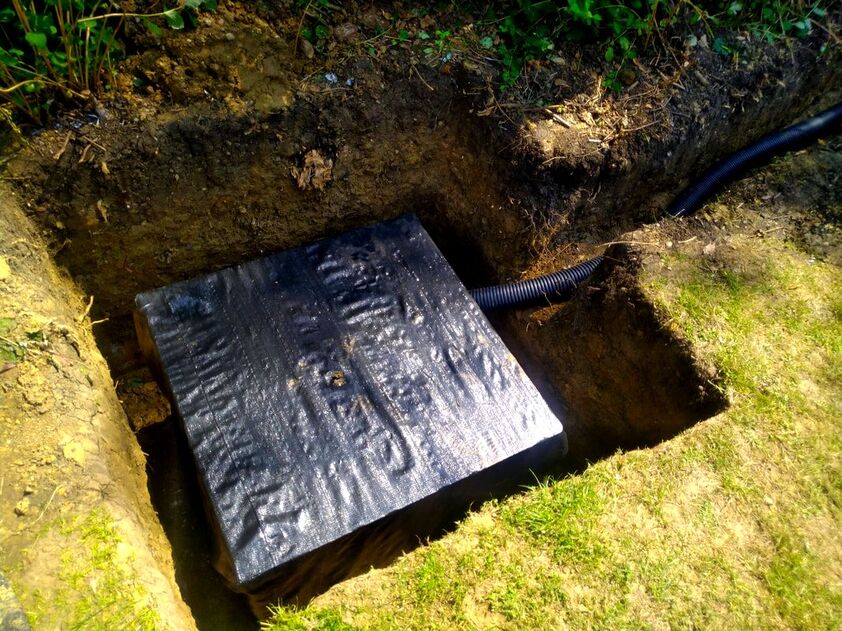
Soakaway systems today are commonly constructed from reinforced plastic soakaway crates.
These strong but lightweight crates slot together to create any sized soakaway you require. These are lowered into an excavation at with at least 100mm ground clearance either side.
The crates are then wrapped within a strong filtration membrane and backfilled with free draining 10mm pea gravel. Soakaways are the perfect system to channel away surface run-off from driveways.
Why not visit our full installation guide on how to install soak-away crates here.
Why not visit our full installation guide on how to install soak-away crates here.
Retention vessels
Retention vessels are large water storage units submerged underneath the ground. These are particularly useful for climates which suffer from summer droughts.
Instead of a soakaway which soaks water into the ground these retain it for later use. A submersible pump system can be activated in summer when water can be utilised for irrigation.
The installation of underground retention tanks can be costly but a fantastic way to utilise surface water sustainably.
Sustainable drainage for driveways
Seasonal flooding wetlands
Seasonal flooding wetlands are naturalistic, low lying, habitats which flood during winter and times of heavy rain.
In essence these are really natural soak-ways which can also create habitat for wildlife. These boggy looking depressions can be landscaped to become attractive features with rocks, pebbles and flowering plants.
In essence these are really natural soak-ways which can also create habitat for wildlife. These boggy looking depressions can be landscaped to become attractive features with rocks, pebbles and flowering plants.
Seasonal flooding wetlands are actually a nationally recognised endangered habitat. Seasonally flooded habitats provide nesting and feeding opportunities to rare and specialised species.
Consequently you can provide sustainable drainage for your driveway whilst also providing essential habitat for plants and animals.
Consequently you can provide sustainable drainage for your driveway whilst also providing essential habitat for plants and animals.
Bioswales
Bioswales are linear depressions in the ground that absorb surface runoff slowly and naturally. Very much like seasonal flooding wetlands these swales are planted with wetland plants.
This creates great habitat for wildlife whilst also acting as a functional drainage solution for driveways. As storm water passes through the roots of wetland plants the water is oxygenated and cleaned.
This makes bioswales one of the most ecological solutions for driveway drainage projects.
Retention ponds
Retention ponds are effectively large wildlife ponds with extra capacity to accept surface run-off from hard surfaces.
Typically ponds are created with pond liners but with sloping sides that reach up higher than the liner level. This creates a controlled flood zone which can fill during times of heavy rain.
Surface water from driveways and other hard surfaces can be collected and piped into the ponds flood basin. The storm water is then retained and allowed to slowly be reabsorbed by the landscape.
Conclusion
Implementing a satisfactory driveway drainage system is not only crucial for functionality but also for minimising negative impacts on the environment.
Incorrect driveway drainage can mean falling short of legal requirements and risking the threat of costly alterations and repairs. However by learning about the impact of urban runoff you can start to think about your driveway within its wider context.
This will lead to better planning and inspiration when it comes to implementing a driveway drainage strategy. Perhaps you want to integrate seasonal flooding wetlands to your front yard to attract wildlife?
Or perhaps install a drainage tank which can now be used for summer irrigation. Installing an effective driveway drainage system will not only save you hassle it will also provide you peace of mind.
Who knows it may even make your front garden landscaping more interesting!
FAQS
What is the best drainage for a driveway?
The best drainage for driveways is collection chambers such as a channel drains plumbed into a water storage vessel, soak-away or seasonally flooded wetland habitat.
This allows you to collect all surface water and not contribute to flash flooding and environmental degradation. The second best drainage solution for driveway drainage is permeable surfacing with a permeable sub-base.
What drainage do I need for a driveway?
Fundamentally you need to keep surface water away from the walls of your home and prevent it flowing onto the street. The best way to achieve this is by installing channel drains and directing surface water to a soak-away,
Thank you for visiting our ultimate guide to driveway drainage! If you require driveway drainage, patio drainage or garden drainage services do not hesitate to contact us.
Based in Amersham, Buckinghamshire we undertake a range of landscaping services including land drainage and paving. We also now have a Norfolk office.
Based in Amersham, Buckinghamshire we undertake a range of landscaping services including land drainage and paving. We also now have a Norfolk office.
|
|
|
|
'As an Amazon Associate I earn from qualifying purchases'
This article contains affiliate links
If your garden has drainage problems it can dramatically reduce the usability of your outdoor space. Boggy lawns are particularly troublesome and can take some work to put right.
Seasonally sodden flower borders can also lead to the death of plants, shrubs and even trees. When encountering garden drainage problems it is tempting to reach out to a qualified professional.
However, such problems are not out of reach for most DIY enthusiasts to solve. In this article I will list and summarise 11 DIY garden drainage solutions you can implement yourself.
1. Garden re-levelling
Very often, garden surface levels are the main contributor to standing water and drainage problems.
Water naturally runs to low spots within the landscape, during heavy rain these areas can become particularly saturated. Analyse your gardens levels using a string line, long spirit level or laser level.
You will normally find water simply has nowhere to escape to! By re-levelling your garden you can raise low spots and grade your surfaces to a new flush level.
You want to achieve a very gentle gradient running towards your lowest boundary. This is also a good opportunity to ameliorate your soil so it is free draining.

2. Free draining soil amelioration
A very typical scenario is a gardens soil will become compacted over time. This can lead to poor water penetration and general drainage problems.
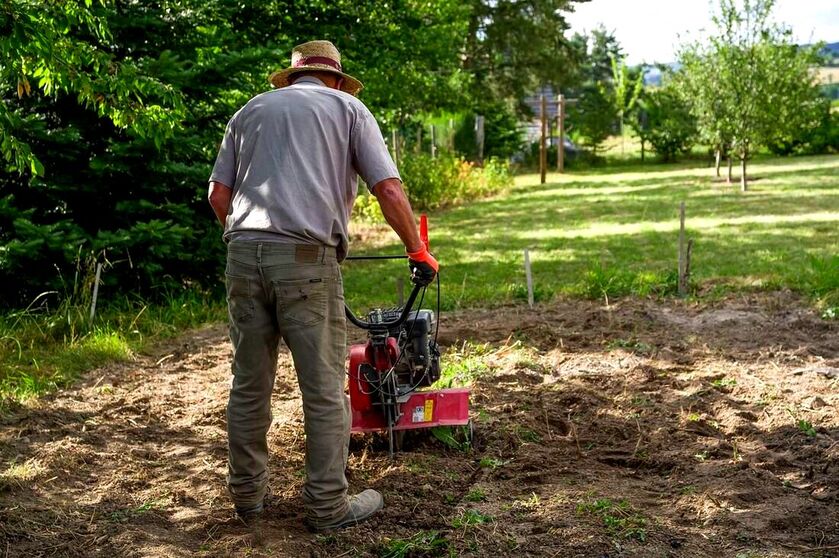
The wetter the ground becomes the more it compacts under foot, this is particularly so with clay soil. This negative cycle needs to stop in order for the problem to be solved. The best way to do this is by ameliorating the soil.
This involves digging over the soil deeply and mixing in plenty of organic matter and coarse sand. These materials help to break apart the soil particles promoting better drainage.
The ground can then be worked to a fine texture using a tiller machine. This work is best undertaking during early summer when the ground has the ability to dry out.
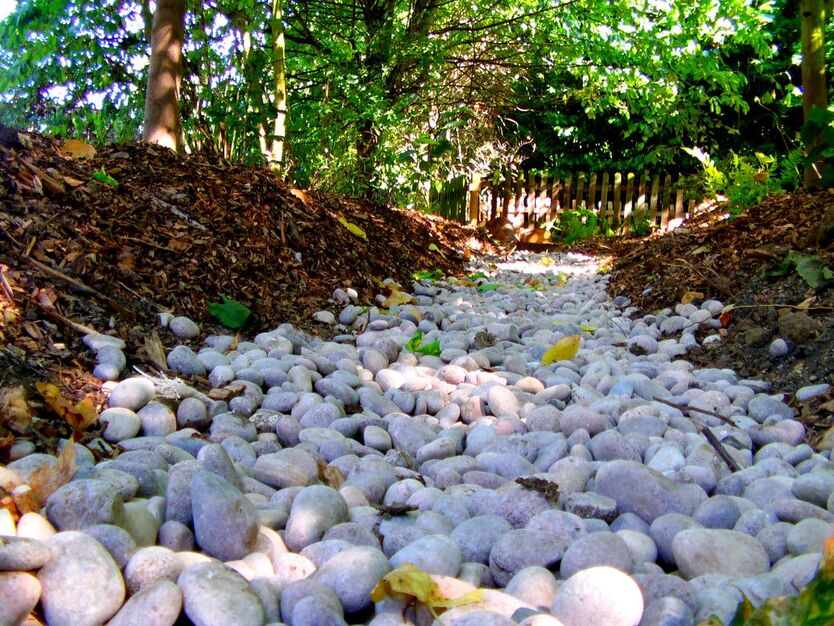
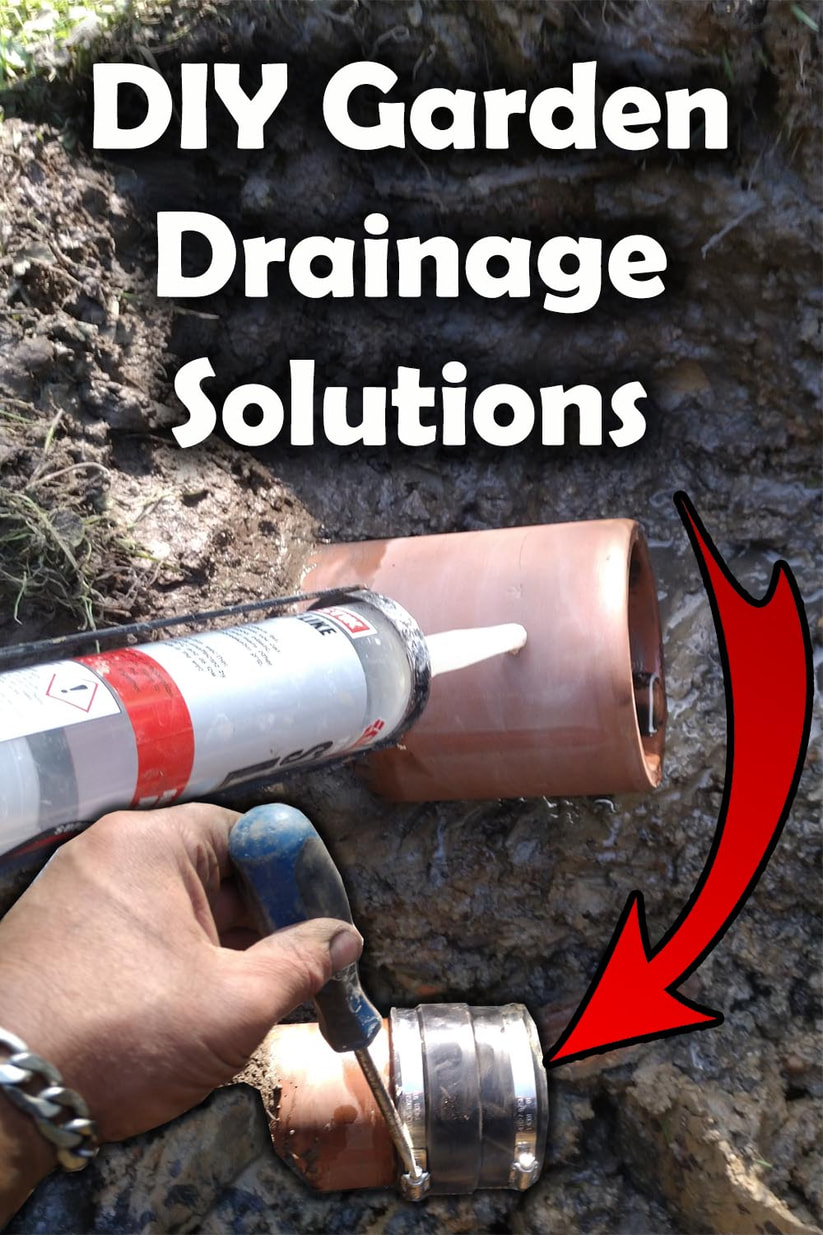
3. French drains
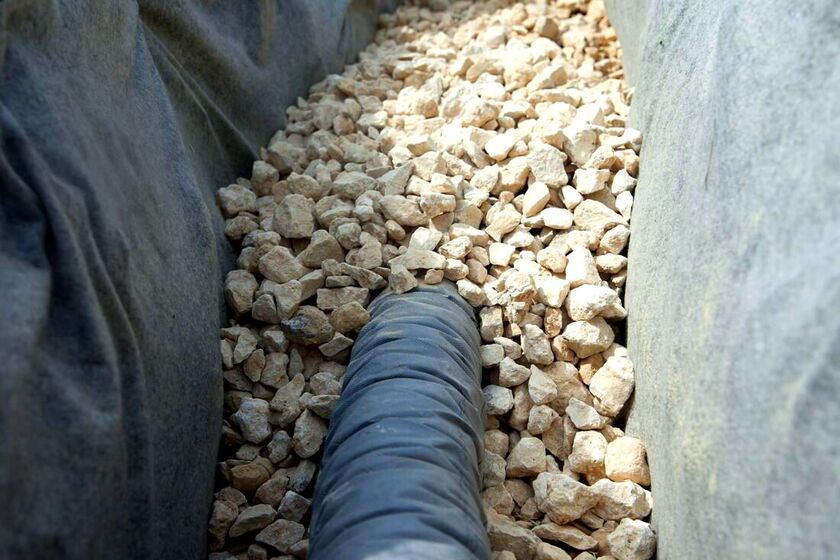
French drains are linear trenches filled with free draining gravels which drain water away from a particular area. They are most commonly installed with a100mm perforated pipe laid within the centre of the gravel.
This enables water to percolate into the French drain quickly draining the surrounding ground. These drains are particularly effective for draining ground water away from boggy lawns.
They are even more effective when combined with garden drainage soakaways for seriously flooded gardens. French drains typically consist of a trench 700mm deep by 300mm wide by the desired route.
A filtration membrane is laid to the channel and a 150mm layer of 10mm free draining gravel. The perforated pipe is then laid to the channel and buried with a further 350mm of gravel.
The perforated pipe can then be either plumbed into a drainage feature or capped.
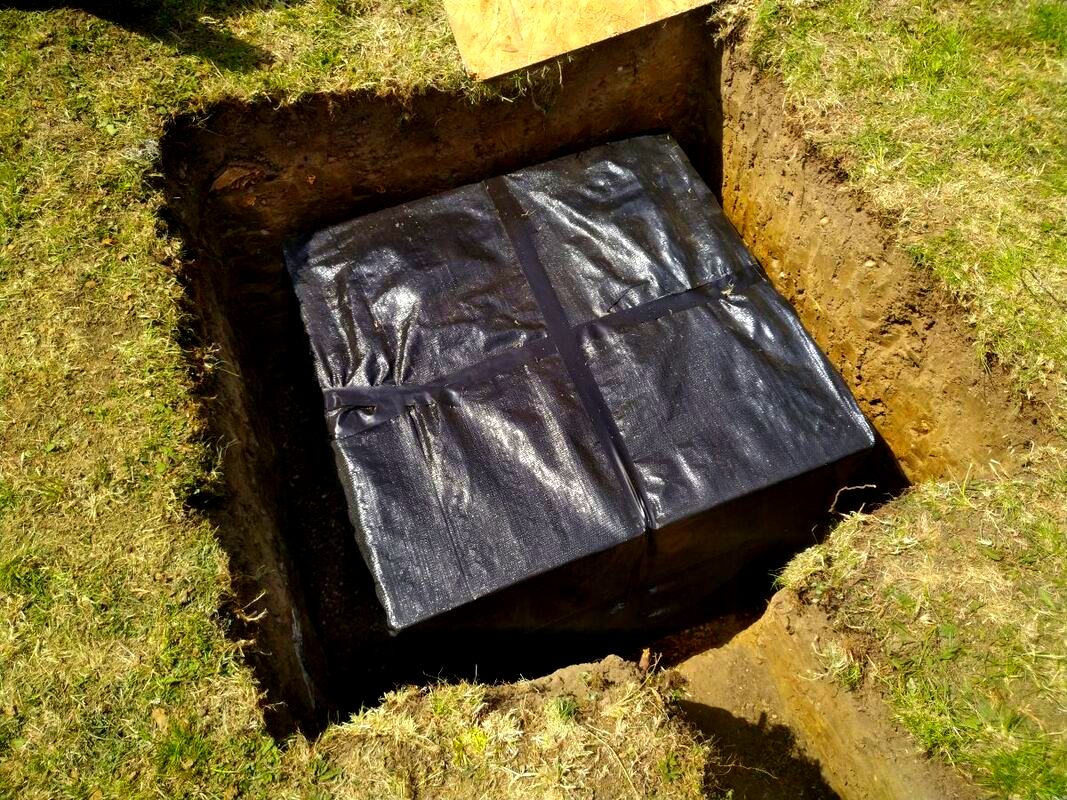
4. Soakaways
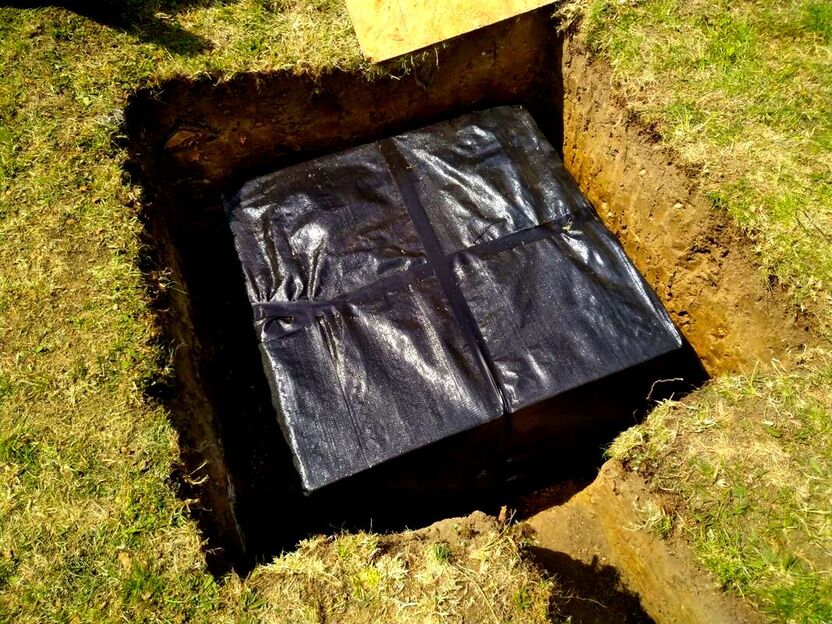
Soakaways are large drainage facilities under the ground which provide a void for water to drain to.
Very often soak-aways are installed where garden drainage water has nowhere to escape to. Modern soak-aways are installed using reinforced plastic crate systems which clip together.
Typically a large cube of around 1.3 cubic metres is excavated into the ground. The drainage crates are then lowered in and wrapped in filtration fabric. Drainage pipes and French drains can then be plumbed into the soak-away crates.
The whole soak-away is then backfilled with free draining gravel. The top is capped with more filtration membrane and 300mm of topsoil laid on top.
For a step by step resource on how to install your own soak-away visit our article here.
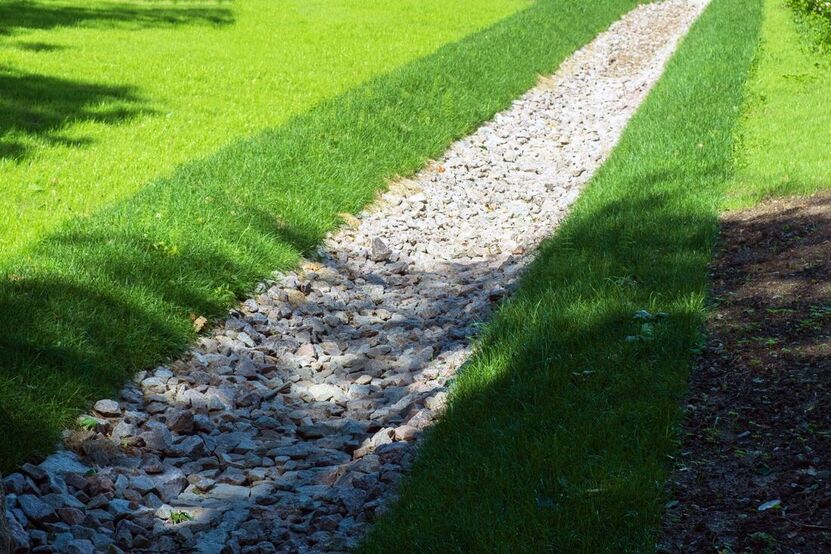
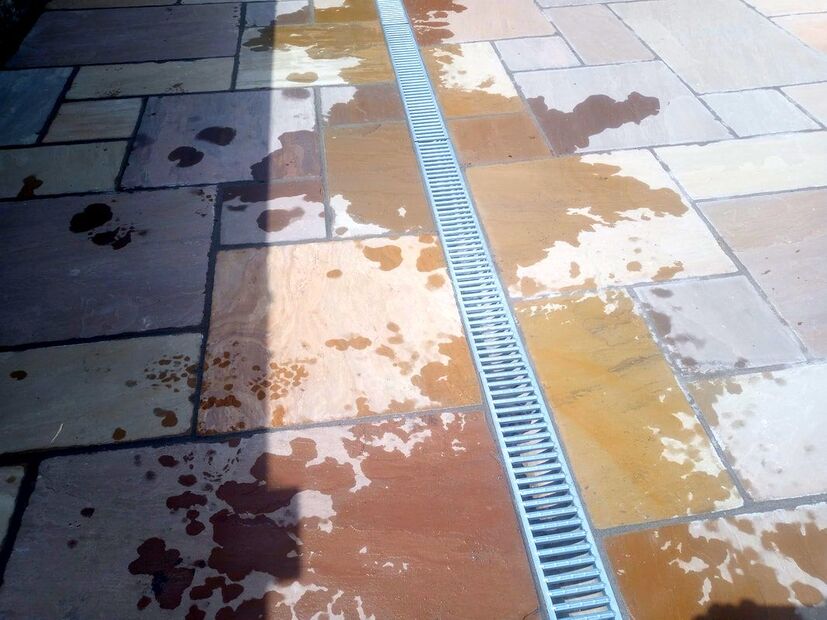
5. Channel drains
Channel drains are linear channels which connect together to create long collection drains.
These typically come with metal or plastic grills which are laid flush with paved surfaces. Paved surfaces are normally laid with a slight fall towards the drains for easily collection.
Surface water can then be channelled and plumbed into other drainage features such as soak-aways. Why not visit our article with pictures on how to install a channel drain here.
6. Rain water harvesting
Rain water harvesting is not always thought of as a drainage strategy but can make a difference. This is especially so if you harvest large volumes of water in underground storage vessels.
Such harvesting can be especially useful in regions that have wet winters but hot summers. In such cases underground storage tanks can be tapped into for garden irrigation during summer.
Rain water harvesting can also be achieved in large retention ponds with built in extra capacity. Household water butts very rarely make a huge impact to garden drainage but will make a positive contribution.

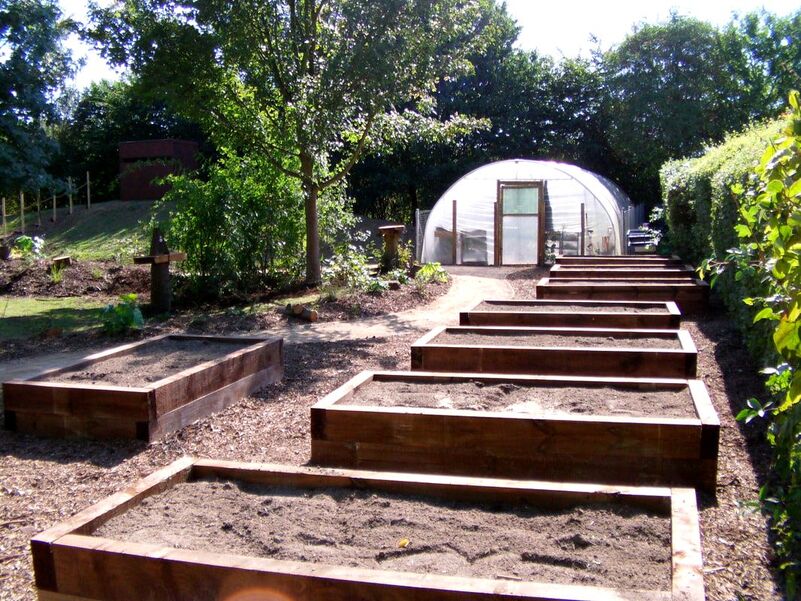
7. Raised beds
If you have a high water table or particularly bad garden drainage, raised beds can greatly improve soil drainage.
By building raised planters you will ensure that your plants have deep and well drained soil. Raised beds also provide the opportunity to greatly improve the quality and fertility of your growing beds. Raised beds can also help to drain soil within the rest of your garden.
By providing a greater volume of soil, moisture will be soaked up more easily like a sponge. This is especially so it you fill your beds with soil containing lots of organic matter like compost.
8. Planting
Plants which can tolerate boggy conditions can also contribute to draining your garden. The more plants you have growing the more transpiration your site will experience.
Transpiration is where plants draw up moisture from their roots and release it into the air via their leaves. Collectively from many plants and trees high levels of transpiration can dramatically reduce soil moisture.
This is especially so during the warmer, summer, months. Furthermore, well cultivated beds have less chance of becoming boggy than lawns. This is because worked soil with organic matter mixed in drains much better than soil that doesn’t.
Consequently adding more planted borders within your garden will help to reduce boggy soil conditions.
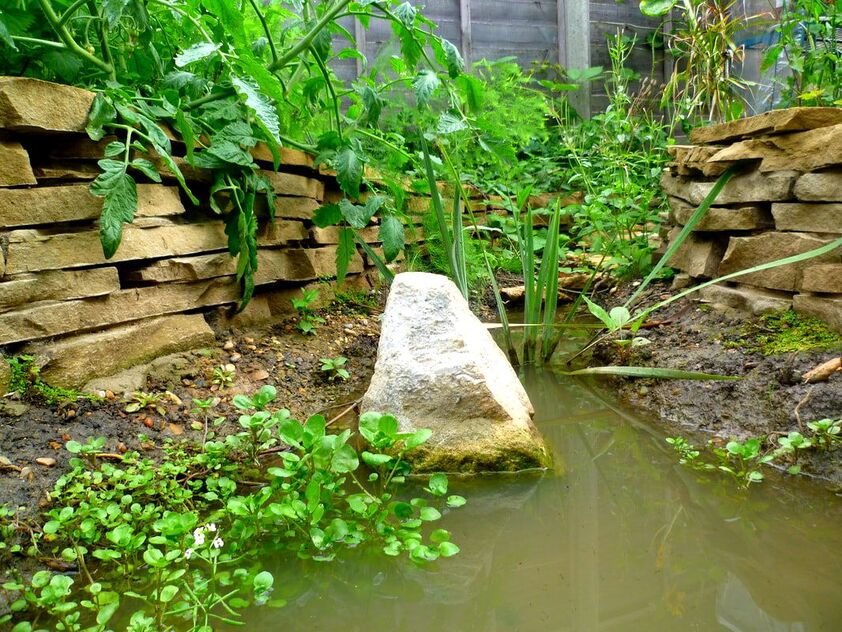
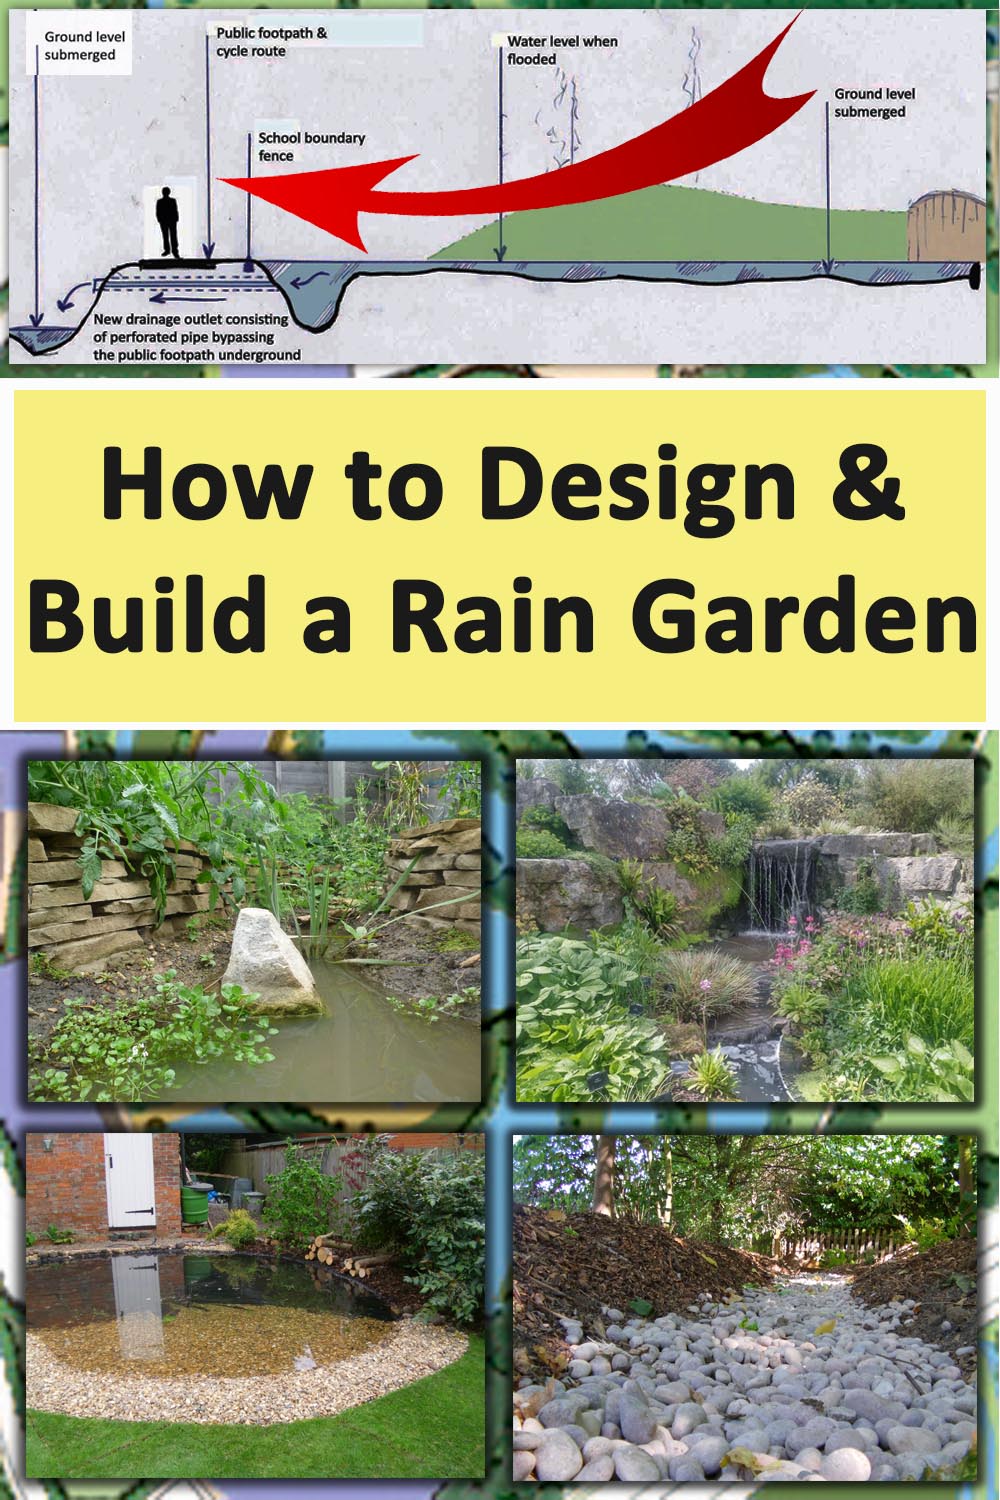
9. Rain gardens
Rain gardens are gardens which channel storm water from buildings and hard surfaces to create water features. These can be as simple as dry river beds which fill up in times of heavy rain.
These can also be designed to become quite elaborate and decorative landscape features. If you are interested in creating a rain garden why not read our article on rain gardens here.
10. Bioswales
Bioswales are naturalistic depressions landscaped into the ground to collect and absorb surface water runoff.
Bioswales are typically planted with wetland plants which help to oxygenate and clean the water naturally. These swales are typically landscaped to create attractive garden features which also provide habitats for wildlife.

11. Retention ponds
Retention ponds are ponds specifically designed to retain water within the landscape. This retention can be for a number of reasons including storage for summer irrigation.
However, when it comes to draining gardens, retention ponds can be installed as natural soak-aways. They can provide a facility for drained water to be channelled towards and also provide wildlife habitat.
Retention ponds can double up as wildlife or fish ponds with extra capacity for irrigation in summer.

Thank you for reading our article on 11 DIY garden drainage solutions. If you require garden drainage solutions or services at your property do not hesitate to contact us.
Based in Amersham we cover Buckinghamshire and surrounding counties. We have now also opened a new office in Norfolk, why not contact us here.
Based in Amersham we cover Buckinghamshire and surrounding counties. We have now also opened a new office in Norfolk, why not contact us here.
|
|
|
'As an Amazon associate I earn from qualifying purchases'
This article contains affiliate links
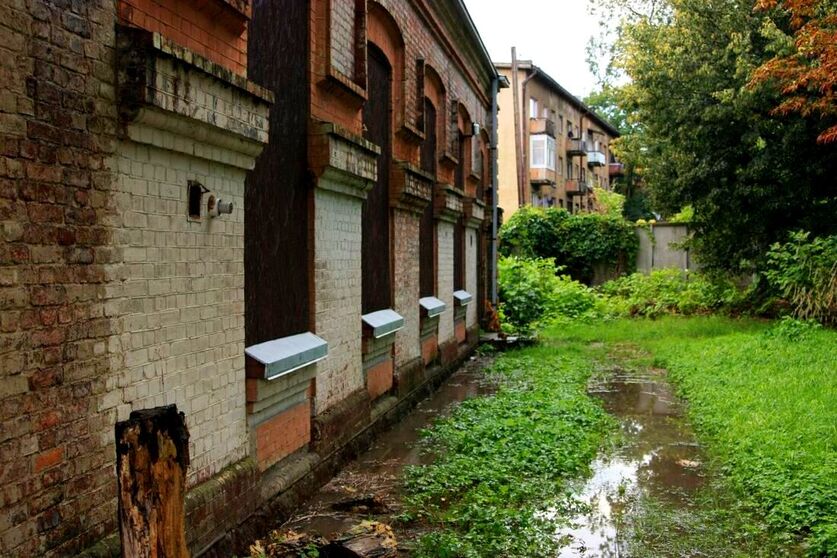
Those who have encountered garden drainage problems know just how frustrating they can be.
Not only can poor drainage kill plants it can render a large part of your property completely unusable. One of the worst parts about poor garden drainage is it is not always easy to diagnose.
Very often poor drainage can be a combination of contributing factors which may not be obvious. Even very simple changes within your local vicinity can result in new drainage problems where there were none previously.
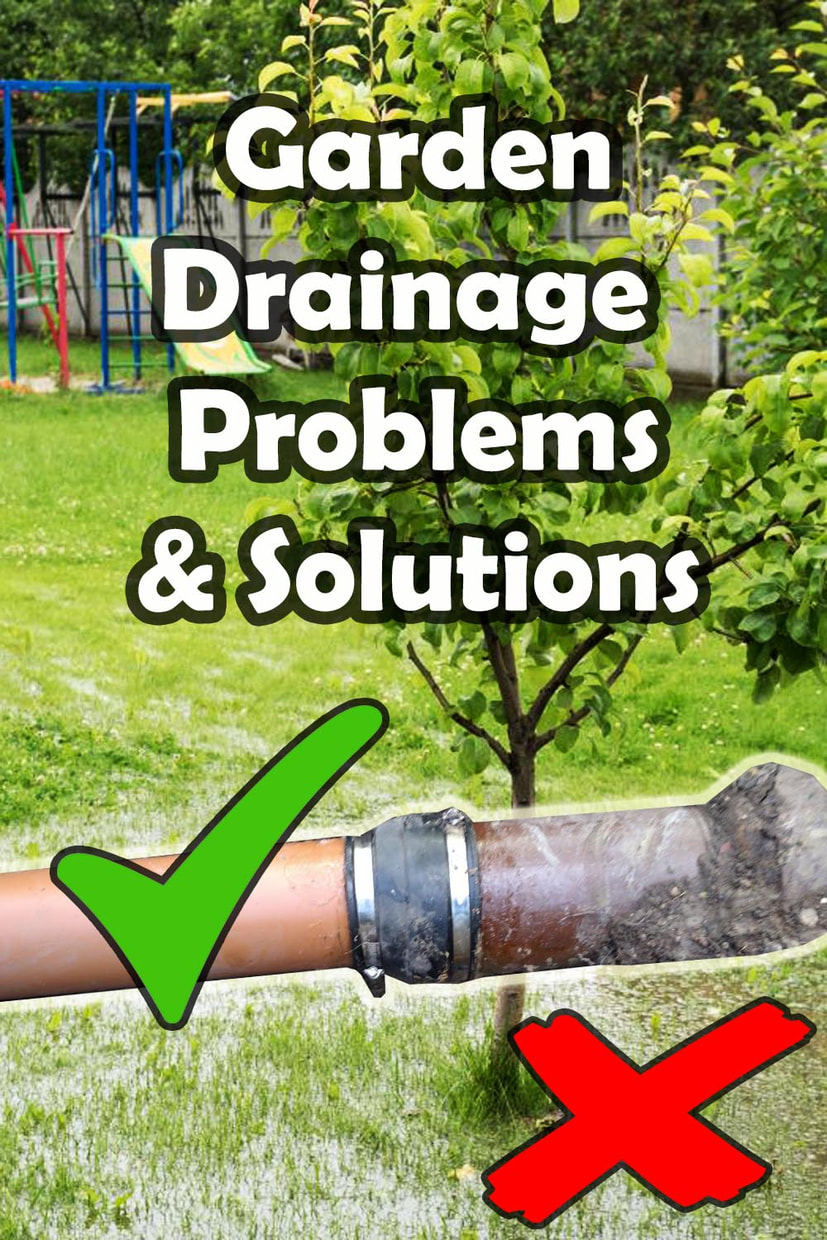
Consequently, in this article, I am going to list 10 common garden drainage problems and their solutions.
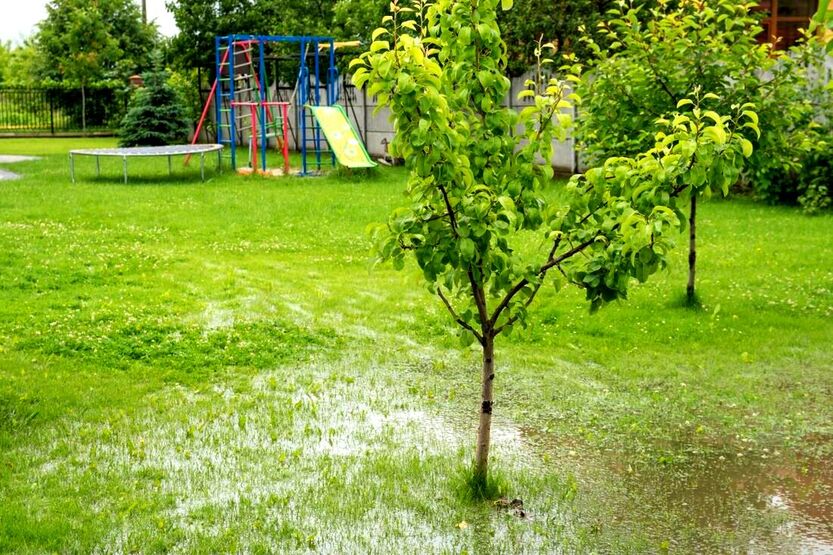
1. Boggy lawns
Boggy lawns are one of the most frustrating and common drainage problems for gardens. The issue can result in a muddy lawn and unusable surface for outdoor activities.
Solution
A typical problem with lawns is over time they become compacted. This can make it difficult for water to percolate and drain away.
Most boggy lawns have low areas where water naturally flows too. This can lead to standing water and bogginess. The two most common solutions for boggy lawns are re-levelling and drainage channels.
Drainage channels can be excavated into the lawn and perforated pipes installed. These channels can then be filled with free draining gravels. A new lawn should then be laid upon well ameliorated topsoil.
This will be consolidated and levelled so there are no low spots that collect water.
2. Poor soil drainage
Poor soil drainage is an ever increasing problem particularly in sub-urban developments. This is due to an ever increasing amount of hard surfacing. Patios and driveways can lead to less soil abortion and saturated flower borders. This can lead to roots rotting and plants dying.
Solution
Poor soil drainage is often a case of ground water having nowhere to go. This leads to saturated topsoil which is difficult to work and cultivate. The most common solution for this is installing a drainage feature.
This typically involves installing a soak-away fed by free draining gravel channels from your planting beds. Why not visit our article on how to install soak-always and drainage channels here.
3. Standing water
There are a few reasons why you may have standing water in your garden. The most common are low spots and compaction. It could also be a broken underground drainage pipe although this is much less common.

Solution
If the standing water is only in one area excavate the ground carefully to discover any broken pipes. If all the moisture is near the surface it is probably not a pipe.
If you do find a broken pipe it will need to be uncovered and repaired. Most of the time however standing water will be due to low spots.
The best solution for this will be levelling the ground to a more consistent gradient. You may also want to consider slightly raising your gardens level.
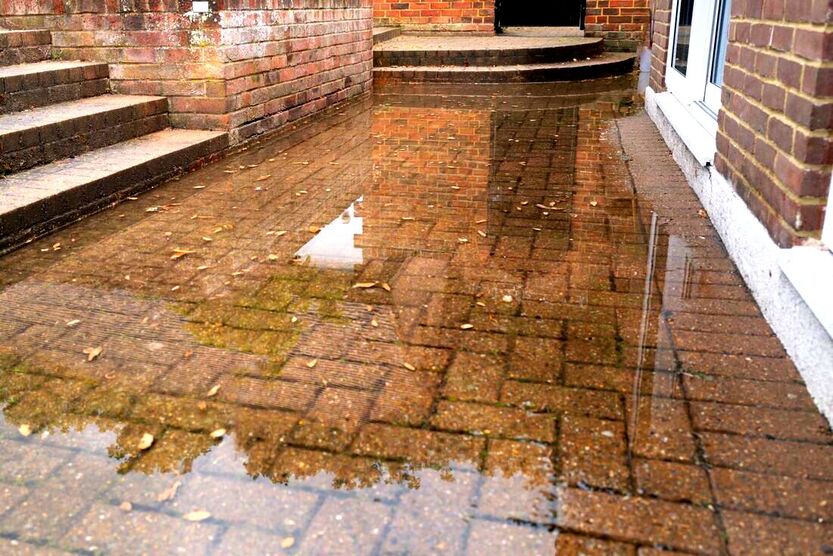
4. Water sitting on patios
Water sitting on a patios surface has two possible causes, incorrect levels or a clogged up drainage system. Sitting water on a patio cannot just render the space unusable it can also encourage algae. This can lead to discolouration and hazardous slips.

Solution
Clear out any gutters or drainage channels and make sure they are not blocked. If your paving and garden are both flooding you have a greater garden drainage problem.
This will need to be assessed by a garden drainage professional. Most of the time however standing water on patios is because the pavers have not been laid correctly.
You may need to relay the paving so there are no low spots.

5. Garden offices
There has been an explosion in garden offices over the past few years. Although particularly advantageous over the pandemic most of these installations do not mitigate surface run-off.
I have been called to dozens of gardens which have become flooded after garden office installation.
Most of these installations have made no provision for excess surface run off whatsoever. The result is an accelerated level of surface run off and an increased chance of garden flooding.
Solution
Installing a garden soak-away system plumbed into the roof gutters of the office. The minimum size should really be a cubic metre. For more information on garden drainage soak away installation visit my article here.
6. Neighbours landscaping
It is actually very common for a neighbours landscaping project to cause drainage issues for your garden. Most of the time, this is completely unintentional and not deliberate. Landscaping projects such as artificial turf, new patios, removing trees and re-levelling can all affect your gardens drainage.
Solution
Very often such circumstances are a matter of finding somewhere for excess water to go. Typically the best option here is to install a soak away system so the water has somewhere to drain to. You may also find and levelling your garden at a slightly higher level may also help.

7. Slumping levels
One of the commonest causes of garden drainage problems is low spots and slumping levels. Surface water naturally runs to the lowest point and collects in these low spots. In some cases the whole garden may sit within a natural low spot.
Solution
Survey your gardens levels using a tight string line and a long spirit level. One of the best devices for this is a laser level and tripod. Try to work out where the low spots are so you can raise these to a more flush level.
Work out if surrounding properties are naturally higher or lower than you. Ask yourself, before these homes where built where did surface water run to?
You will then need to re-level your garden so there is no slumping or low spots. If all your neighbours are higher than you, you will also need to raise your gardens soil level.
8. Compaction
Over the years through general usage, ground within gardens slowly becomes ever more compacted. This is particularly the case with lawns and gardens with little planted vegetation.
As the ground compacts water finds it difficult to percolate though the surface. Eventually the ground becomes so compacted rainwater simply pools upon the surface.
Solution
The best way to relive ground compaction is by ripping. This involves ripping through the ground with a long hook like attachment.
These attachments are traditionally fixed to excavator machines and tractors. However if you do not have access or the budget you can turn the soil by hand.
You can then use a tiller machine to break up the soil clods. Excavating and installing free draining gravel channels can also help water to drain easily.

9. Blocked drains and pipes
It is very common for existing landscape drainage systems to become silted and blocked over time. This can be due to leaf fall, accumulative silting and tree roots.
Solution
Clear out any moss, leaves and debris from any channel drains or drainage pipes. Flush all drainage systems with hot water to make sure they are clear.
10. Tree roots
It is sometimes the case that large tree roots establish around hidden land drains. This can lead to the pipes becoming broken and silted especially when made of clay.
If you suspect a failed land drain you may require a drainage survey to send a camera up the pipes. If you have located drainage pipes which don’t drain check their depth and direction. If they are shallow and run under large trees it is very likely they have collapsed.
Newly establishing trees have also been observed damming water inside gardens. This happens when trees or large hedges are planted along a low lying boundary. As the roots establish they fill and compact the soil causing it to become raised.
This acts as an impenetrable barrier to water where it used to percolate freely. The result is a damming effect where water becomes trapped inside the garden.
Solution
If tree roots have damaged a drainage pipe it will have to be excavated and replaced. If roots are causing damming you may need to excavate a drainage channel through the root mass.
Alternatively you can install a drainage soak-away to provide somewhere for trapped water to drain to. Another option is to excavate a seasonally flooding pond or bioswale to help absorb the water naturally.

Thank you for reading my article on 10 common garden drainage problems and their solutions.
If you are currently having garden drainage problems feel free to email me pictures and questions regarding your issue. I will do my best to give you as much free advice as I can!
Below I will link to some of my other garden drainage articles you may find useful.
If you are currently having garden drainage problems feel free to email me pictures and questions regarding your issue. I will do my best to give you as much free advice as I can!
Below I will link to some of my other garden drainage articles you may find useful.
|
|
|
|
'As an Amazon associate I earn from qualifying purchases'
This article contains affiliate links
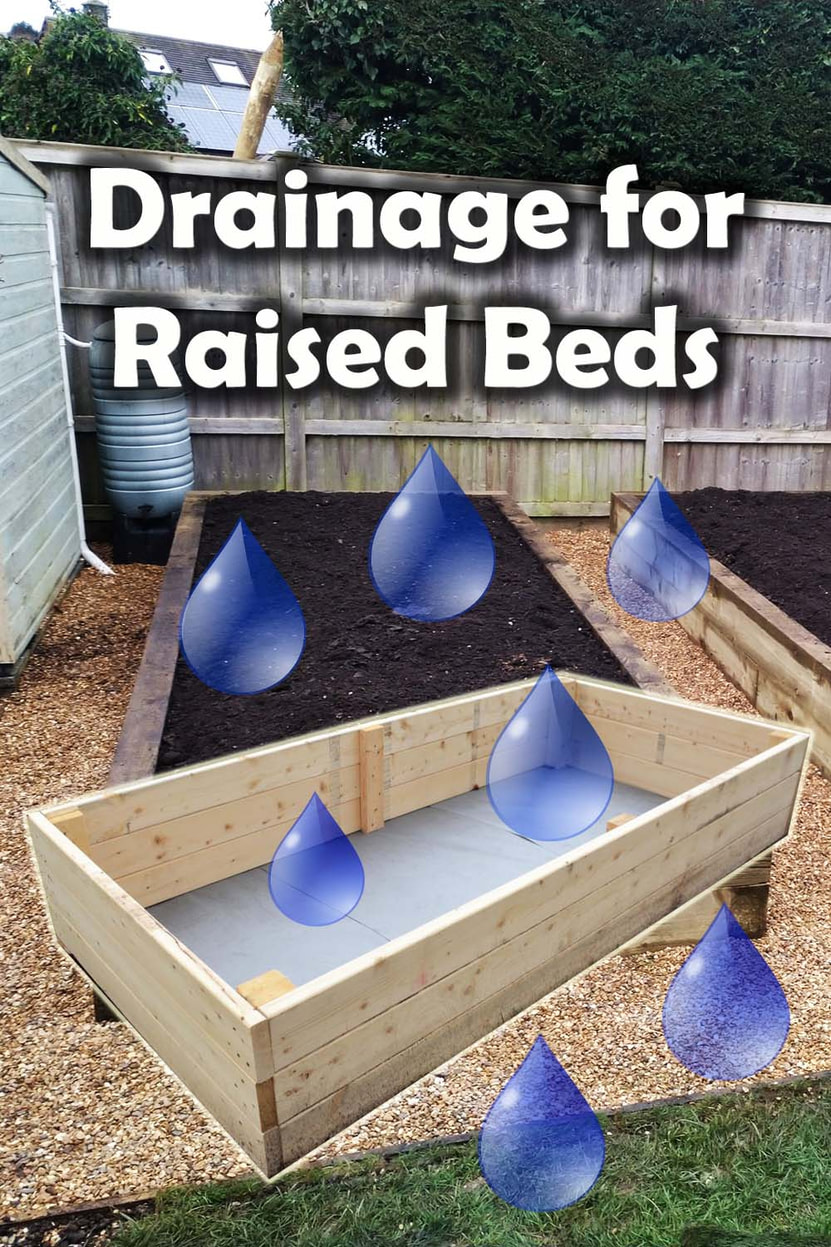
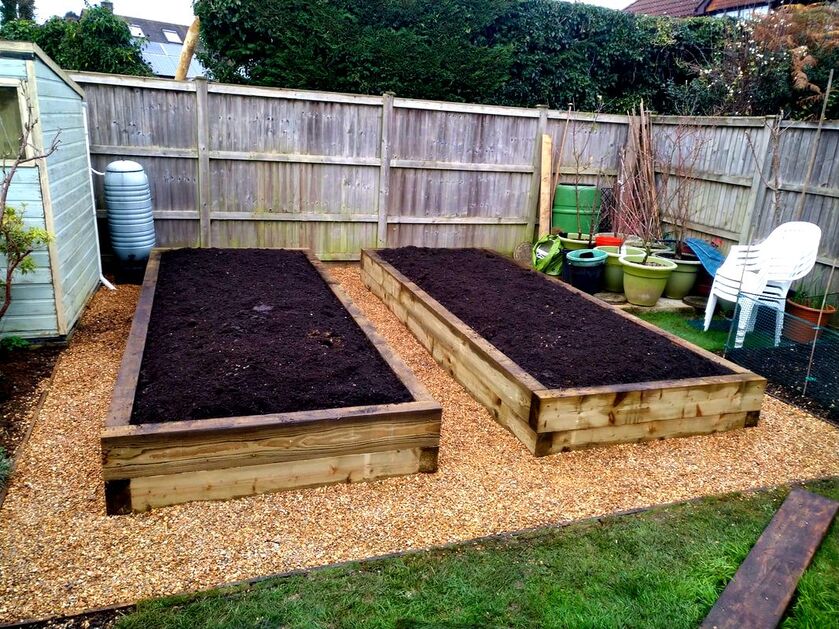
Raised beds are an excellent way to grow plants in a deep and fertile soil.
Growing in raised planters provides you more control over a number of different factors. One of these is drainage, raised beds by their very nature isolate a particular volume of soil.
Like pots, this can lead to greater volatility in seasonal ground moisture. Consequently raised bed drainage is a topic which deserves some attention for successful growing. In this article I will highlight some important factors to consider about the drainage of raised beds.
I will also summarise some common raised bed drainage problems and solutions.
Do raised beds need drainage?
All mediums intended for growing plants require a good level of drainage including raised beds. However, the level of drainage will depend upon your soil type, bed height, volume and position.
All raised beds will require drainage holes to allow excess rainfall to drain away. The size and spacing of these should reflect the size and volume of your raised bed. For large beds a 40mm diameter hole should be placed about every metre along the base.
If your raised bed is not in contact with underlying soil you will require extra drainage holes along the bottom. It is also vital that these drainage holes do not become silted and blocked.
To avoid this you will need to back the holes with wire mesh and filtration membrane.
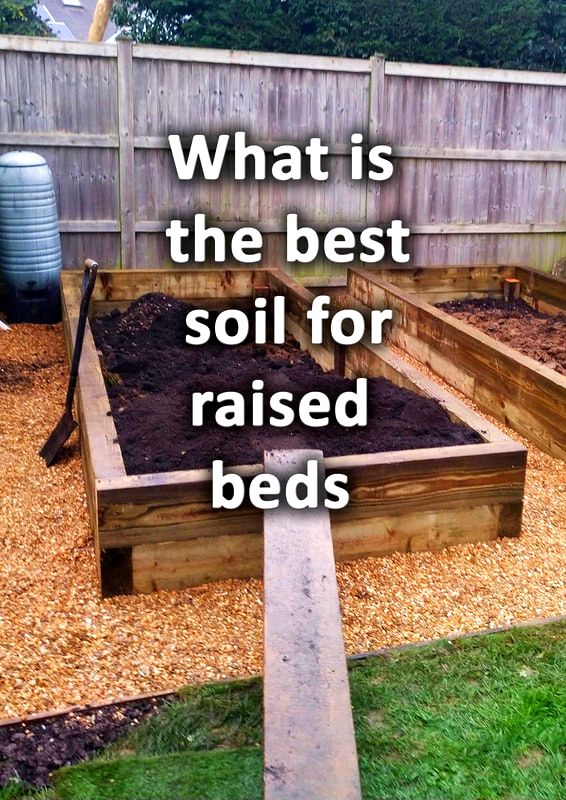
Well drained soil for raised beds
If you want good drainage inside your raised beds then you will need to focus on your soil. The best soil for raised beds is generally a clay based loam.
Such a loam consists of a combination of clays, fine sands and silts. The clays help to retain moisture and nutrients while the sands and silts increase drainage. However, how much drainage your raised beds need will depend upon your specific situation.
For example, if your beds soil meets the underlying ground it will require less drainage. Some raised beds are installed with solid bases which can lead to water logging. In such cases drainage holes or ‘weep holes’ should be added to your raised bed.
How much drainage you include within your raised bed will also depend upon your existing soil. You may already have very well drained soil that dries out in summer.
If so, your raised beds will require less drainage, if you have boggy soil you will need more drainage.
How much drainage you include within your raised bed will also depend upon your existing soil. You may already have very well drained soil that dries out in summer.
If so, your raised beds will require less drainage, if you have boggy soil you will need more drainage.
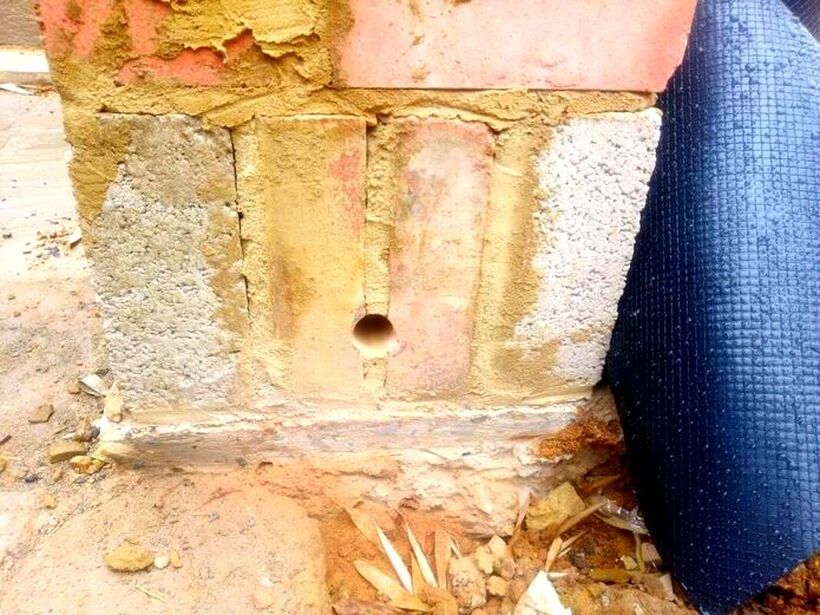
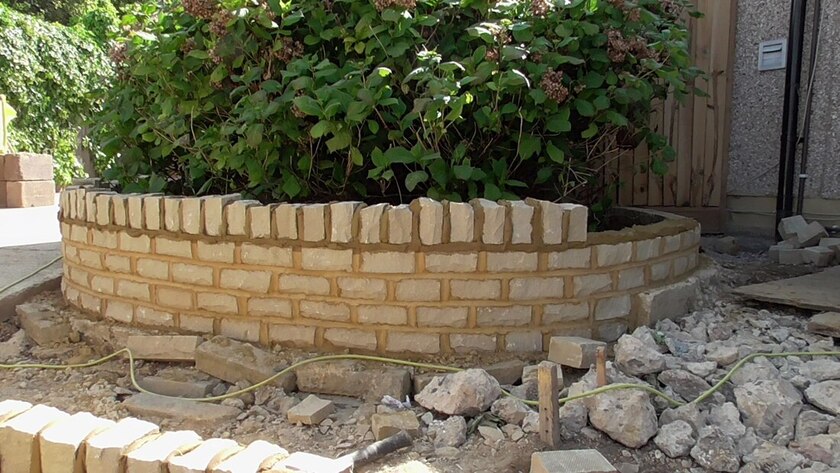
Drainage for brick and concrete raised beds
Brick and concrete raised beds are extremely popular as they are robust and durable. These raised beds are easy to waterproof and style with a broad variety of finishes.
The great advantage of building raised beds with masonry is it doesn’t degrade like timber raised beds. However brick and concrete raised beds can be more difficult to drain especially if they are waterproofed.
In such cases you should install weep holes into the lower sections of the bed. These can be added as you build the beds by laying around sections of 50mm plastic pipe.
Alternatively circular holes can be drilled out by using a circular diamond coring bit. Each hole should include a filtration net to prevent it from becoming blocked. This normally includes some wire mesh and a layer of filtration fabric.
Alternatively circular holes can be drilled out by using a circular diamond coring bit. Each hole should include a filtration net to prevent it from becoming blocked. This normally includes some wire mesh and a layer of filtration fabric.
Drainage for wooden raised beds
Good drainage for wooden raised beds is somewhat more important due to their construction.
Firstly, even pressure treated timber will eventually decompose leading to failure. Even very well waterproofed timber beds with plastic and bitumen can succumb to water damage.
Normally dampness around screw fixings leads to corrosion and eventually failure. On the plus side timber will shrink and expand depending upon its internal moisture content.
This can create thin crevices and drainage gaps within the bed to improve drainage. Such shrinkage and expansion can easily be seen within the joins of timber sleeper raised beds.
As timber beds will naturally create drainage gaps there is less need for substantial weep holes. However the more plastic and paint waterproofing you apply inside the bed the more drainage you should add.
All raised beds should have at least some drainage holes for excess water to escape.
As timber beds will naturally create drainage gaps there is less need for substantial weep holes. However the more plastic and paint waterproofing you apply inside the bed the more drainage you should add.
All raised beds should have at least some drainage holes for excess water to escape.
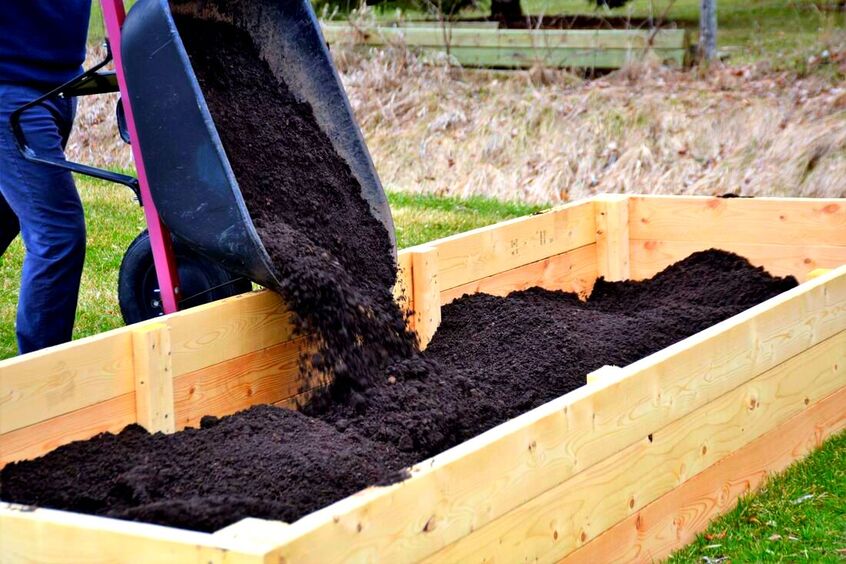
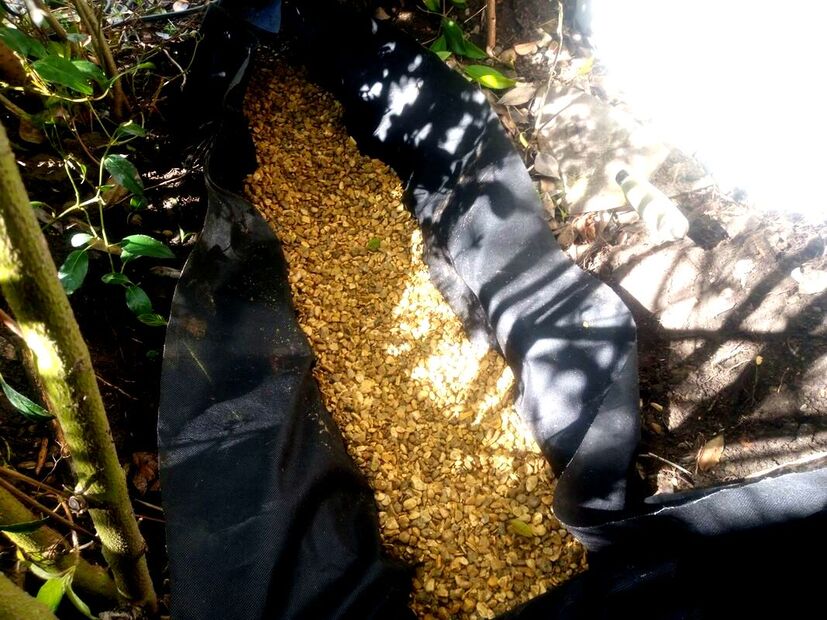
Gravel bases for raised beds
If you have particular concerns about water logging inside a raised bed you can add a gravel base. This involves spreading a 100mm layer of free draining gravel to the base of the bed.
The gravel layer should then be capped completely with a layer of landscape filtration fabric. This will help prevent the gravel from silting over time.
The gravels will help to draw out excess water from saturated soil in times of heavy rain.
Thank you for reading our article about raised bed drainage. If you require raised bed services including concrete or sleeper raised bed construction and drainage do not hesitate to contact us.
Based in Amersham we undertake a broad range of landscaping services throughout Buckinghamshire.
Based in Amersham we undertake a broad range of landscaping services throughout Buckinghamshire.
|
|
|
'As an Amazon associate I earn from qualifying purchases'
This article contains affiliate links
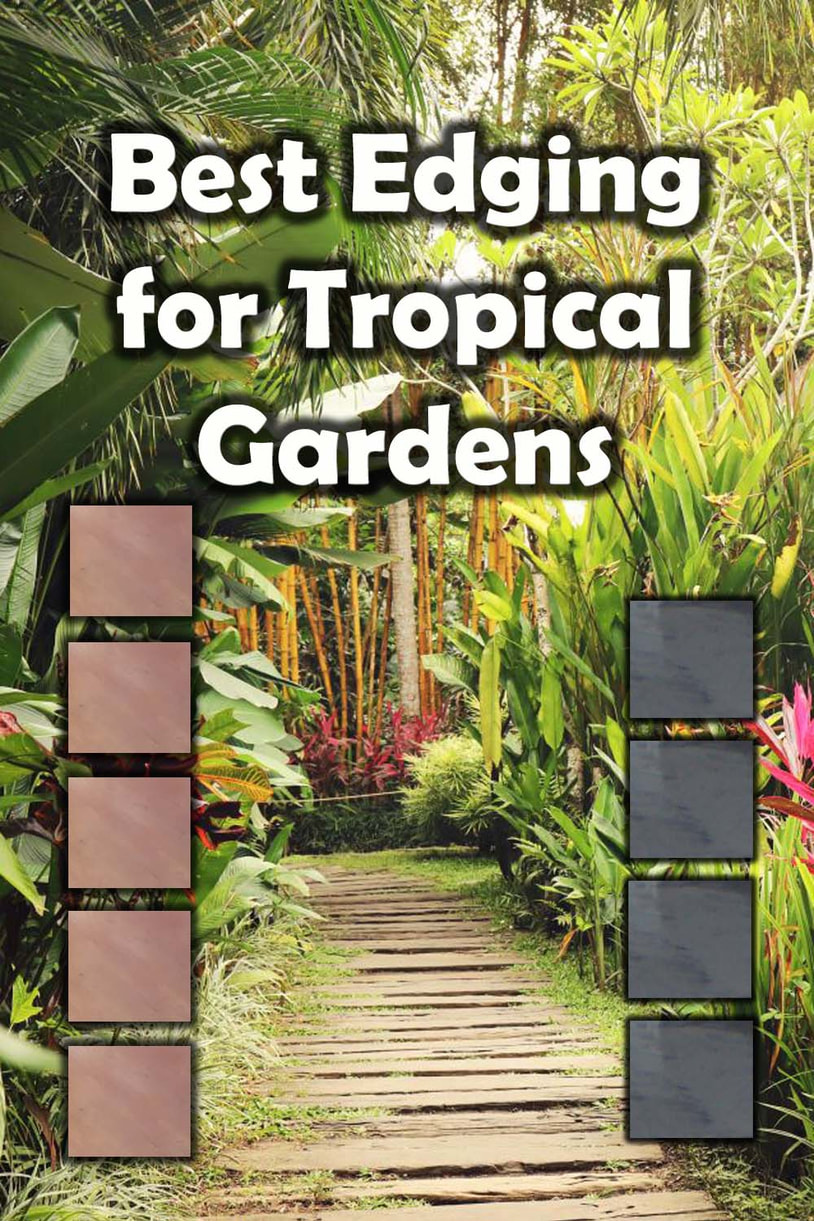
Tropical gardens have always been admired for their lush foliage, radiant blooms and the taste of the exotic.
However, when it comes to tropical garden design there is much more to consider than simply plant selection. The most successful tropical gardens do not just replicate a jungle environment!
Successful tropical gardens can also build suspense, create journeys and provide tranquil resting places. This can be achieved with good design, a defined structure and the correct landscape elements.
One crucial element is tropical garden edging! Edgings within tropical gardens can retain surfaces, form transitions and create contrasting borders. In this article I identify 8 edging materials and products which are perfectly suited to tropical garden designs.
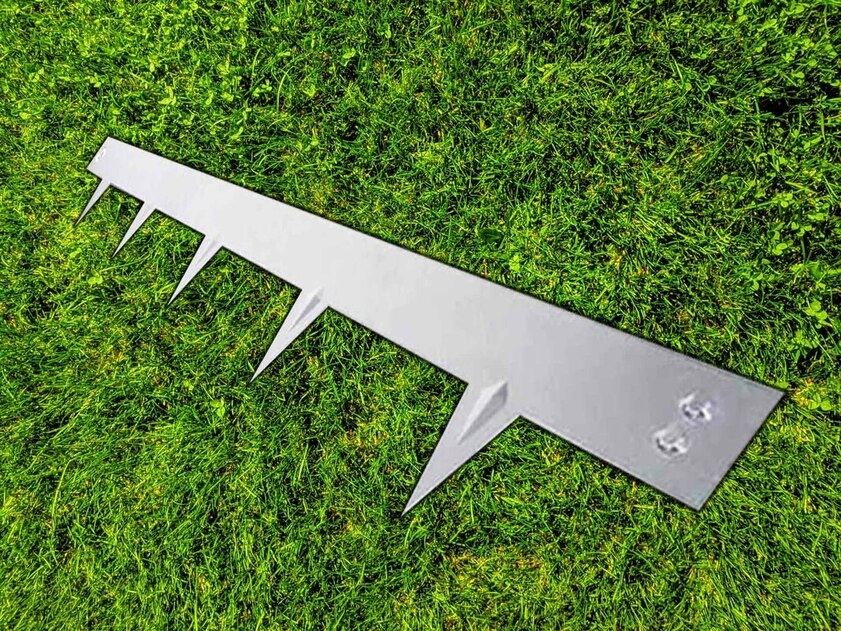
1. Flexible metal edging
Tropical gardens allow us the opportunity to become transported to a far away land! Creating your own jungle can be the perfect way to nature bathe surrounded by greenery.
In such circumstances you may wish to keep man made installations as secretive as possible. This makes flexible metal edging the perfect edging material for such tranquil spaces. Its thin profile and high tensile strength means it can retain any surface while being almost invisible.
This metal edging is perfect for a contemporary feel and perfect for forming organic shapes and curves.
2. Bamboo garden edging
If there is one building material associated with a tropical environment it is bamboo. If you want to provide an authentic tropical feel to your landscaping bamboo offers a great solution.
This natural material is strong and flexible making it perfect for edging planting and pathways. This bamboo edging comes in long, flexible, rolls which can be fixed to accommodate any shape.
This edging can also be fixed to existing features and structures to present and softer, tropical, aesthetic.

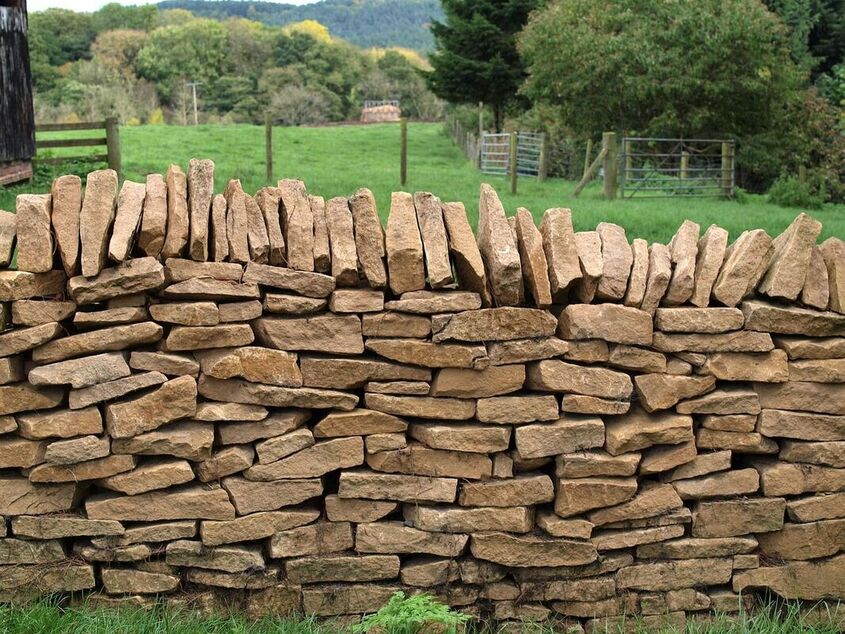
3. Dry stone walling
One common association with tropical regions and jungles is stone walls and ruins. Such ideas have become engrained within popular culture with films such as ‘The Jungle Book’.
However, most of these perceptions are indeed seated in truth. There are many examples of ancient jungle stone ruins across South America and Tropical Asia. Consequently dry stone walling makes a perfect edging and retaining low wall material for tropical gardens.
These can be obtained as natural stone packs, stone walling or dry stone cladding products.

4. Rendered block
One of the most striking aspects of tropical gardens is the vast array of bold lines and visual textures.
This is typically due to the varying types of dense vegetation and foliage jungle planting provides. These dynamic shapes and forms look their best when contrasted against smooth hardscaping materials.
This makes rendered block a very effective edging for tropical gardens. The smooth render provides the perfect backdrop for bold vegetation and vibrant flowers. This is particularly so if painted in light and neutral colours.
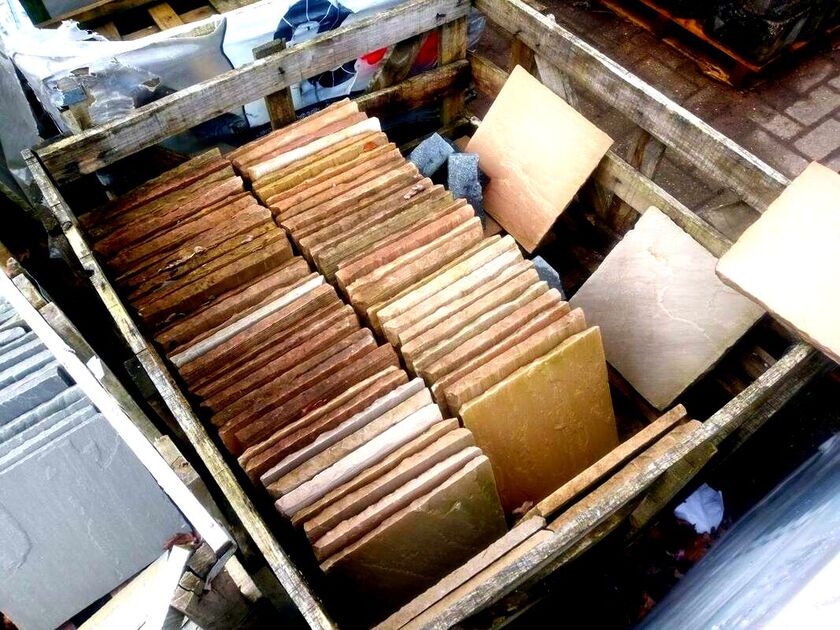
5. Natural stone blocks
Natural stone blocks come in a range of different sizes and natural materials. These stone blocks are typically sold as walling products to accompany a specific paving material.
This is demonstrated by the Indian sandstone blocks in our image below. These blocks greatly compliment tropical garden landscaping and make great edging.
These blocks can be used to edge pathways, borders and create retaining edgings to steps and low walls.

6. Rocks
Rocks and builders are a natural feature of many tropical environments and jungles. During the rainy season, large volumes of water cascades off mountains and into river basins.
These flash flooding events create huge gorges within the tropical landscape full of dislodged rocks and boulders. Consequently positioning rocks and boulders within your tropical garden is always really effective.
Rocks are also a great way to implement natural looking edgings into your design. These can be used to retain surfaces or form natural borders to planting and seating areas.
7. Black slate edging
Black slate provides an incredibly refined and attractive edging material for tropical gardens. Slate has a smooth and dark surface which forms a dramatic contrast against tropical foliage.
Its dark tones are a perfect match for shady jungle floors and humus rich mulches. Black slate paving can be cut into edging strips or blocks and make very effective edgings within tropical gardens.
These edgings are great for retaining bark chipping beds and adding borders to lawns and gravels.

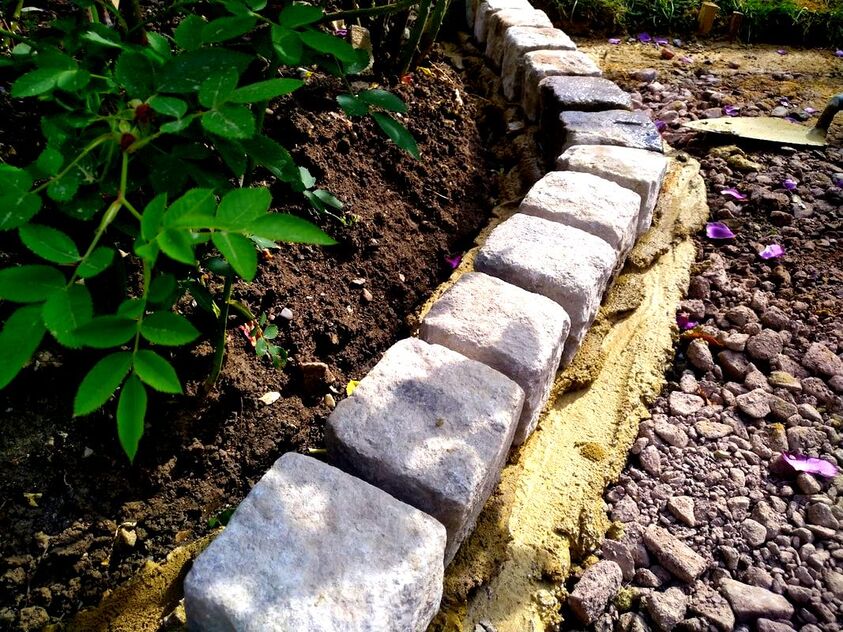
8. Kerb edgings
Kerb edgings are pre-cast concrete kerb stones which are utilised as retaining edgings and edging kerbs.
These kerbs are designed to be implemented into driveway, patios and other hard landscaping projects. Coming in a range of different sizes and shapes these kerbs are robust and bulky.
This makes them perfect for creating retaining edges to steps, pathways and planting borders. Kerb edgings come in both rustic and modern styles all of which work well within tropical gardens.

Thank you for reading our article on tropical garden edgings. If you require tropical garden landscaping or edging installation services contact us here.
Based in Amersham we serve Buckinghamshire, neighbouring counties and now also have a Norfolk office.
Below I will link to some other articles you may also find relevant to tropical gardens.
Based in Amersham we serve Buckinghamshire, neighbouring counties and now also have a Norfolk office.
Below I will link to some other articles you may also find relevant to tropical gardens.
|
|
|
'As an Amazon associate I earn from qualifying purchases'
English gardens are loved for their simplistic elegance and celebration of both formal and informal landscaping.
With multiple influences throughout the ages, English gardens are a combination of delicacies and skilled craftsmanship. With centuries of gardening tradition English gardens celebrate traditional horticulture and landscaping mastery.
One of the most important elements of English garden landscaping is edging borders. These provide clarity, definition and structure to a gardens design creating a visual consistency.
In this article I list and describe 8 edgings perfect for traditional English gardens.
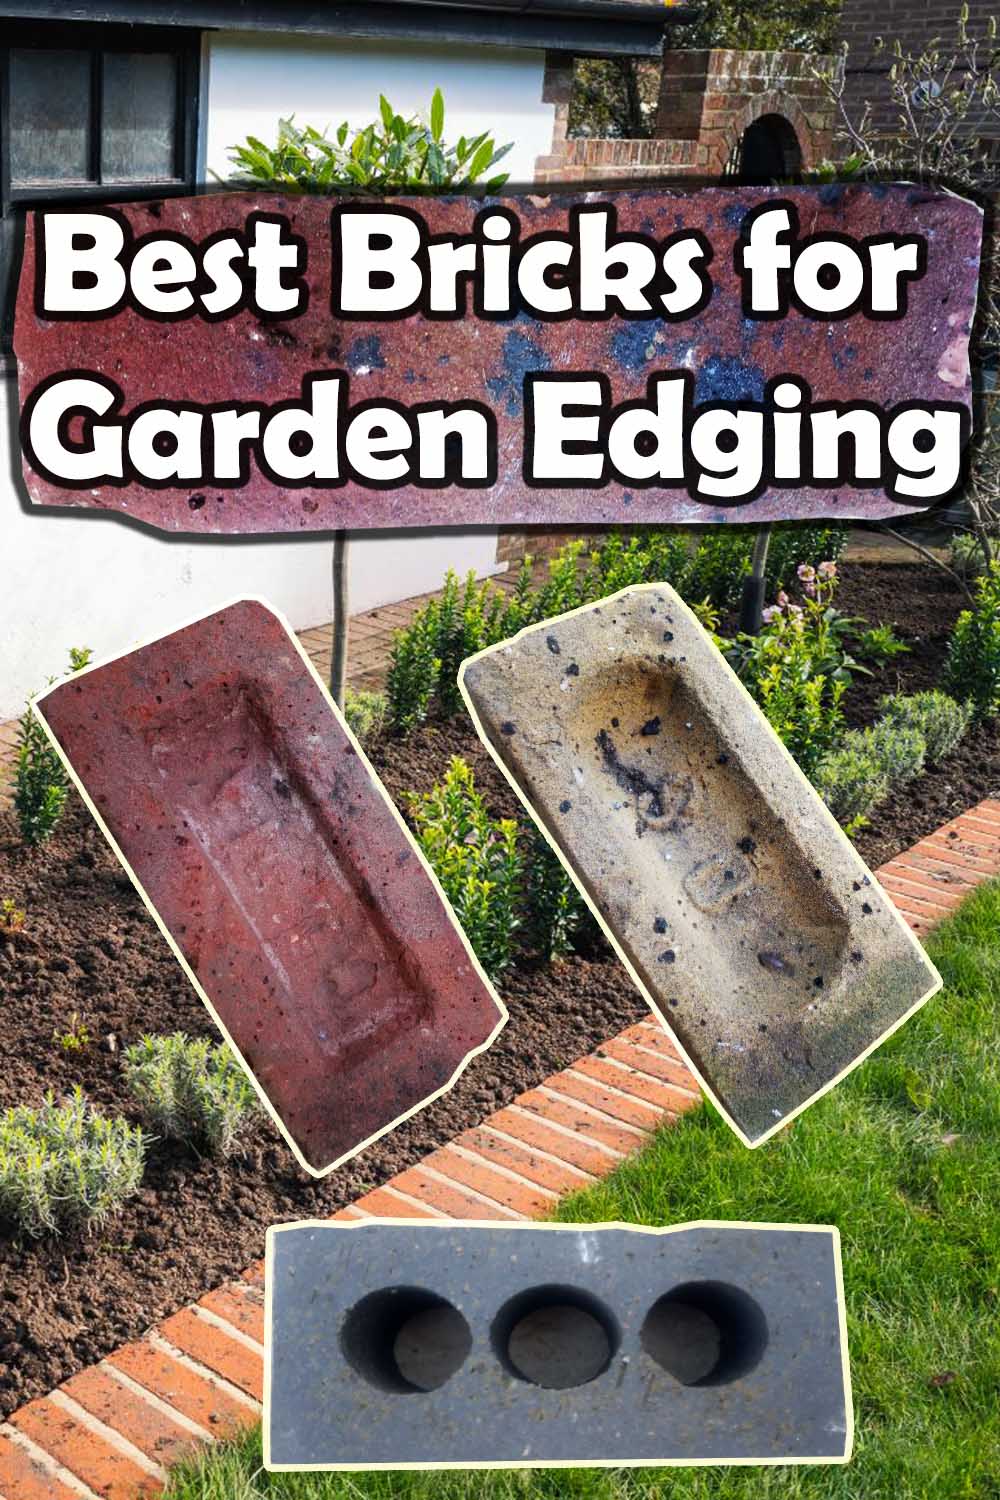
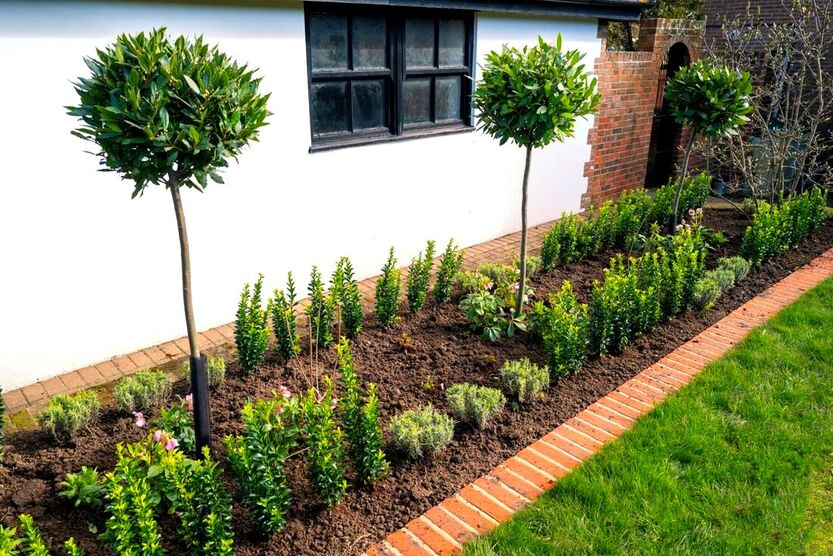
Bricks
In England bricks have been a common and versatile building material for hundreds of years.
Fired from the natural clay soils of the country's geology, bricks come in a range of attractive colours and styles. Bricks provide the opportunity for retaining walls and raised features to seamlessly match garden landscaping.
Laid on edge, bricks can create beautiful edging to lawns, pathways and flower borders.
Terracotta tiles
Terracotta has long been associated with the gardens of southern Europe and the Med. However these tiles are also commonly found within English courtyards and cottage gardens.
Their warm colours and elegant style make them a great contender for garden edging.Tiles can be used to clad concrete edgings or laid flush with lawns, pathways and beds.
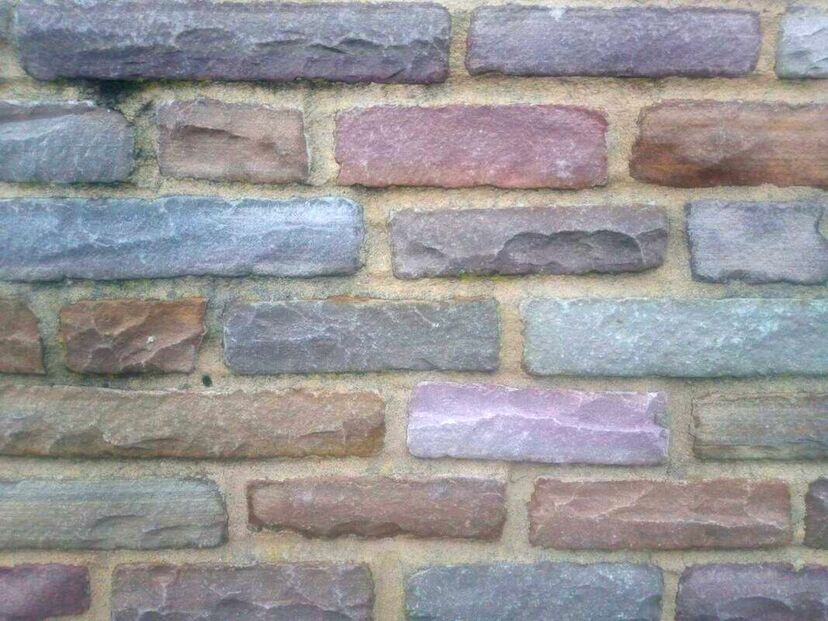
Sandstone paving
Sandstone has always been a traditional paving stone laid within English estates and country homes.
This was due to the popularity of a type of sandstone quarried within the north of England, ‘York stone’. Today cheaper sandstones imported from Asia have led to less use of traditional York stone.
However sandstone has still kept its popularity with sandstones making exceptionally good edgings for English gardens.
Path edging kerbs
Path edging kerbs are linear, pre-cast concrete edgings designed to retain pathway gravels and paving. Generally measuring a metre long by 150mm wide these kerbs now come in a wide range of products.
Some of these include standard PC edgings as well as terracotta and ‘rope top’ path edgings. Such edgings work extremely well along English garden paths and flower beds.
Dry stone walling
Dry stone walling is a traditional building technique commonly used in the west and north of England. These regions have a naturally rocky geology with plenty of accessibility to local fragmented rocks and stones.
Consequently many skilled masons utilised these rocks for rural building construction. Therefore dry stone walling can be both an effective and traditional way to install edgings to English gardens.
Natural stone paving
Over the years English gardens have been exposed to many different influences. From the Norman invasions to the explorations of empire, English gardens exhibit a multitude of different plants and materials.
This means there is actually much choice when deciding what materials to use for English gardens. A great way to create edging for such gardens is by using natural stone.
From slates and sandstones to granites and limestone, natural paving is excellent for cutting down and laying garden edging.
Rendered block
The English garden style has always celebrated the traditional but also the modern. Very often English gardens combine such design styles giving testament to their adaptability.
It is very common for English gardens to juxtapose traditional dry stone walls with more modern rendered walls. These exciting contrasts and contradictions can also be intricate into edgings.
Rendered concrete block is an excellent way to form low wall and raised border edging within English gardens.

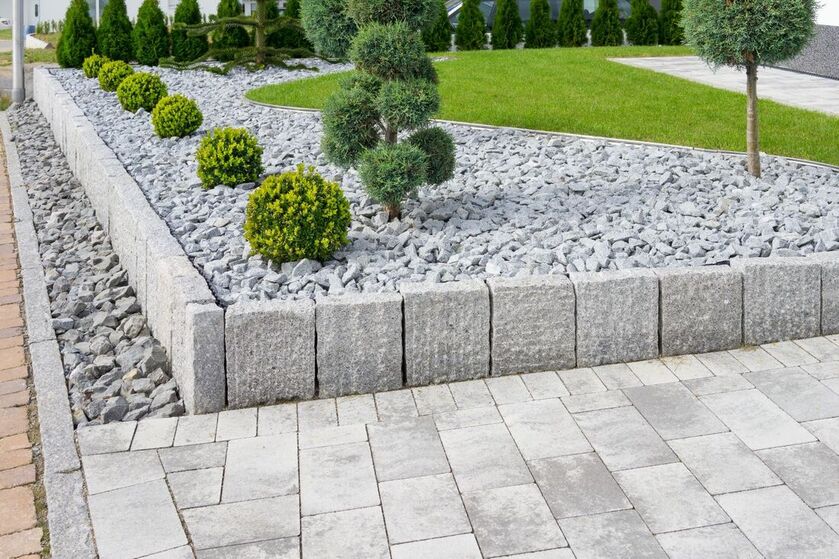
Granite setts
Granite setts have long been used within old, rural, towns of England and within the centre of large cities.
London itself was originally paved with this attractive but extremely durable paving material. Consequently granite setts have also appeared within the landscaping of public parks and country estates.
This makes them very suitable to be laid as garden edging within English gardens. Granite setts make excellent retaining edgings to gravel surfaces, lawns and flower borders.
Thank you for reading our article on the best edgings for traditional English gardens. Below I will link to some other articles you may find relevant.
|
|
|
|
'As an Amazon associate I earn from qualifying purchases'
This article contains affiliate links
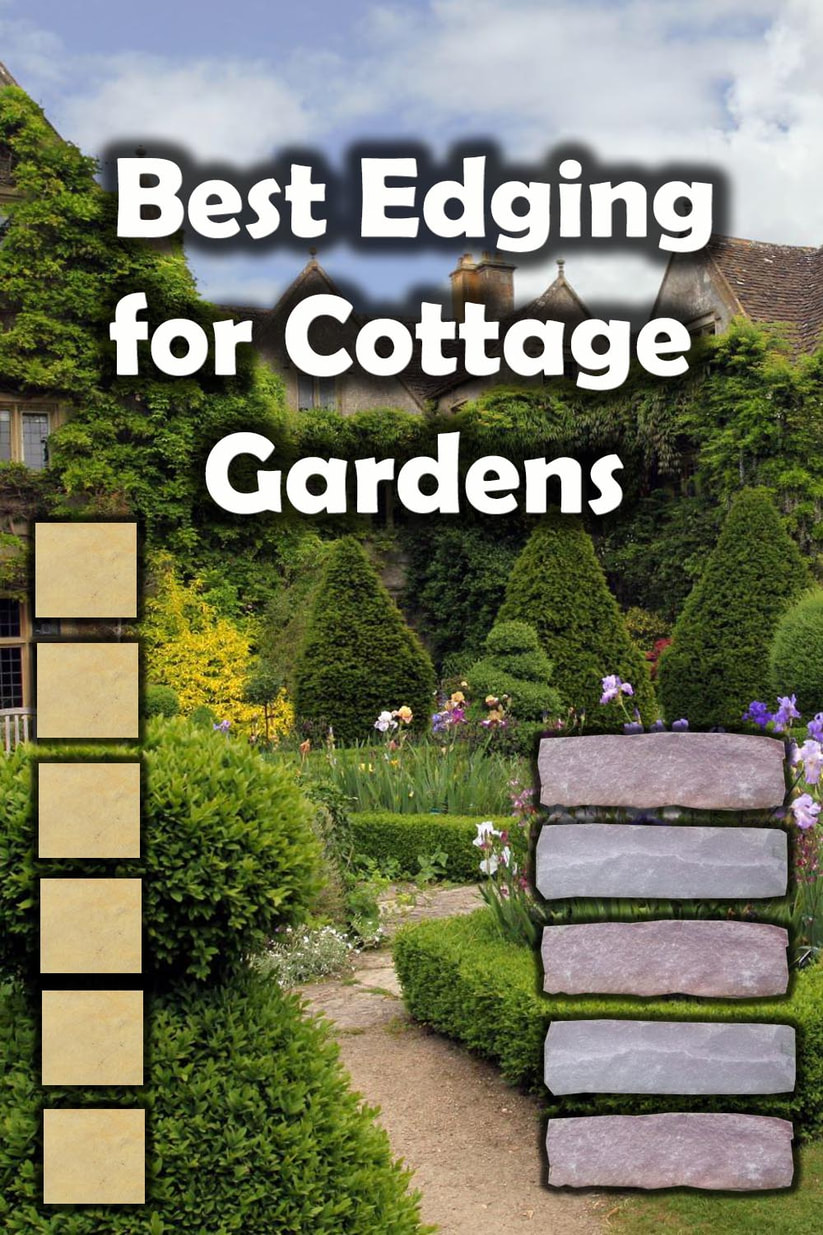
Cottage gardens are famous for their timeless and charming appeal associated with the iconic English countryside.
Traditional cottage living was the cultural hub of rural English life for centuries. Cottage gardens reflected the resourceful nature of the communities which worked within them.
These gardens were a place to enjoy nature, grow colourful flowers and produce food. The cottage garden style is just as popular today as it ever was all over the globe. Many elements are well known to many such as perennial borders, meadows and herb gardens.
However garden edgings that are suited to cottage gardens are often less well known. Conseqently in this article I will list and summarise 8 edgings perfect for cottage gardens.
Red bricks
Red bricks have long been associated with the buildings and countryside of England.
These fired clay bricks display colour tones that work well with the dramatic colours of the cottage border. The cottage garden style is known for its implementation of traditional materials and general resourcefulness.
Red bricks are typically used to lay pathways and as rustic edgings to flower borders. Some of the best rustic bricks for cottage garden edging include; old stocks, Thames yellows and Ashdowns.
Path edging kerbs
Path edging kerbs have long been utilised to form linear, retaining edgings to paths and borders. Coming in a variety of products and styles these edgings generally measure; 150mm x 50mm x 1 metre.
This makes them perfect for long, continuous edgings to paths and flower beds. The rope top patterned path edging kerbs are particularly suited to the cottage garden style.
Natural stone blocks
Traditionally cottage dwellers were poor rural workers who were limited to what local materials they had to hand.
This is why most cottages are built and landscaped with contextual materials. For example cottages in North Wales are built and landscaped with local Welsh slate. Consequently natural stone walling blocks make very effective cottage garden edging.
Sandstone walling blocks look very similar to the traditional Cotswold and York stone of the English countryside.
Cut paving edging
If you have a cottage garden it does not mean you have to be restrictive in your material choices.
There are plenty of good examples where more modern interpretations have been created of the cottage style. This can open up the opportunity to broaden your choice when it comes to edging materials.
In fact, any paving material can be cut into flush edging blocks and incorporated into your design.
Woven hazel edging
Woven hazel edging is very suitable for cottage gardens for a number of reasons. Not only does this boundary edging look amazing it has a visual charm in keeping with the cottage style.
Made from a historical weaving technique and local material it is perfect for traditional landscaping. Woven hazel is a sustainable and regenerative material in keeping with a rural cottage theme.
Timber edging
Timber edging has always been an affordable and effective way to create garden edging. Historically in rural cottage communities timber was a readily available building material.
Consequently it was numerous for garden installations including edging. Gravel boards are perfect for edging curvy lawns and gravel paths. Treated 6x2 on the other hand is best for straight and ridged edging.
Dry stone walling
Dry stone walls have long been associated with the rural landscapes of the British countryside.
These agricultural walls are characteristic of both the western and northern parts of Britain. As a local and contextual building material many cottages were built using rocks.
This makes dry stone rocks and walling perfect for creating authentic edging borders with cottage gardens. These rocks can also be arranged to form retaining edging and decorative borders.

Granite setts
Granites setts are characteristic of old cobble roads and historical streetscapes. However granite setts have also been laid in and around the grounds of old cottages.
This makes them a great candidate for installing edging borders around your cottage garden. Their historical reference combined with a clean look and extreme durability makes them an excellent choice.
Granite setts are particularly effective at creating cottage garden edging to paths and gravel surfaces.

Thank you for reading our article the best landscape edging for cottage gardens.
If your require cottage garden landscaping or garden edging installation services do not hesitate to contact us.
Based in Amersham we serve Buckinghamshire, Oxfordshire, and Hertfordshire. We now also have a Norfolk office!
Below I will link to some other cottage garden articles you may find useful.
|
|
|
|
'As an Amazon associate I earn from qualifying purchases'

|
The Author
Paul Nicolaides
BA (Hons) Dip
Paul Nicolaides has over 30 years of recreational gardening and 20 years of professional landscaping experience. He has worked for landscape contractors including design and build practices across London and the South East. In 2006 he qualified with a BA Hons degree and post graduate diploma in Landscape Architecture. In 2009 he founded Ecospaces an ecological landscaping practice which aims to improve social cohesion and reduce climate change through landscaping. In 2016 he founded Buckinghamshire Landscape Gardeners which designs and builds gardens across Buckinghamshire and the South East. This blog aims to provide easy problem solving information to its audience and encourage others to take up the joy of landscaping and gardening.